Important: Image Analytics Package / Image Deduplication: This functionality has been deprecated and is no longer supported and/or available for new installations. This documentation is retained as a reference only for customers already using the functionality and for whom it remains available in the current state. The functionality will be removed in the future so customers using this should make plans to transition away from their implementation of it.
When the Auto-Handling Threshold parameter in the image deduplication configuration is set to 'Yes,' images that cannot be handled by auto-handling are sent to clerical review to be addressed manually. When the Auto-Handling Threshold parameter in the image deduplication configuration is set to 'No,' all images evaluated are sent to clerical review to be addressed manually.
Managing clerical review tasks in the workflow includes identifying duplicate images and then confirming or overriding the selected master image.
Prerequisites
Before you can use the clerical review workflow, you must:
- Set up the Web UI for managing images sent to the clerical review workflow, as defined in the Configuring Web UI for the Image Deduplication Clerical Review Workflow topic.
- Perform the Image Deduplication process as defined in the Running the Image Deduplication Process topic.
- To understand what is presented for clerical review and how images are processed, refer to the Handling Duplicate Images topic.
Configuration
To ensure the best user experience in Web UI, the maximum number of images that can be included in a group for deduplication evaluation is limited to 250 by default. When the number of images exceeds the limit, a number of groups are created of approximately equal sizes. For example, with the default limit, if 500 images are being evaluated, two groups of 250 each are created, but with 251 images being evaluated, the two groups created will include 125 and 126 images.
The default can be changed via the sharedconfig.properties file on the STEP application server using the case-sensitive ImageDeduplication.ImageDeduplicationClericalReviewGroupMaxSize property up to a maximum size of 2,000. When this property is absent from the file, the default is used. Any number entered above 2,000 is ignored and the 2,000 max is used.
For example, you could use the following text to increase the limit to 300:
ImageDeduplication.ImageDeduplicationClericalReviewGroupMaxSize= 300
When a group of images is split due to the number of images being evaluated, an message is included in the execution report and in the logs beginning with the following text:
Group with master ID [Master ID] exceeds the group size specified in the ImageDeduplication.ImageDeduplicationClericalReviewGroupMaxSize property and has therefore been split into [Number of groups] groups. The IDs of the masters for the additional group(s) are: [Master ID], [Master ID]...
Identifying Duplicate Images
Use the following steps to address images that are sent to the image deduplication clerical review.
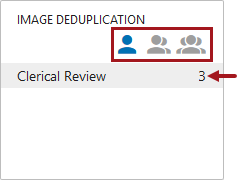
- In Web UI, on the Image Deduplication homepage widget:
- Select the appropriate user group to display duplicate sets in the clerical review workflow.
- Click the Clerical Review row of the widget to display the task list page.
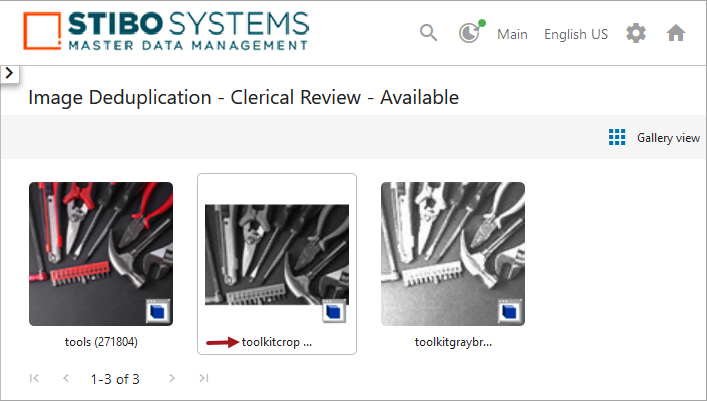
- On the task list page, click the name of the image to display the duplicate suggestions page.
Important: To open the duplicate suggestions page you must click on the name, not the image itself.
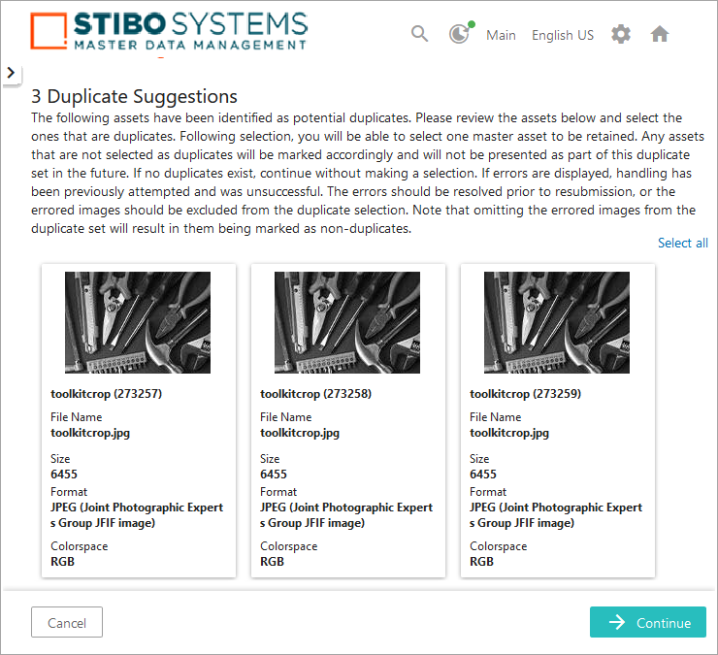
- On the Duplicate Suggestions page, an image card is displayed for each potential duplicate in the group.

- If an image you expected to be considered a duplicate is not displayed, modify the 'Clerical Review Threshold' parameter in the configuration and repeat the test. For more information, refer to the Creating an Image Deduplication Configuration topic.
- If the duplicate suggestions meet your expectations, proceed with the Managing Duplicates section.
Managing Duplicates
After performing the steps in the previous section Identifying Duplicate Images, use the following steps to complete the deduplication process.
- On the 'Duplicate Suggestions' page, images that do not meet the criteria for being auto-handled are displayed alphabetically by name.
Note: Text that exceeds the setting on the title and metadata attribute parameters is not displayed. To display more text, refer to the available 'Number of rows displayed' parameters in the Image Deduplication Clerical Review Screen topic of the Web User Interfaces documentation.
Perform one or more actions:
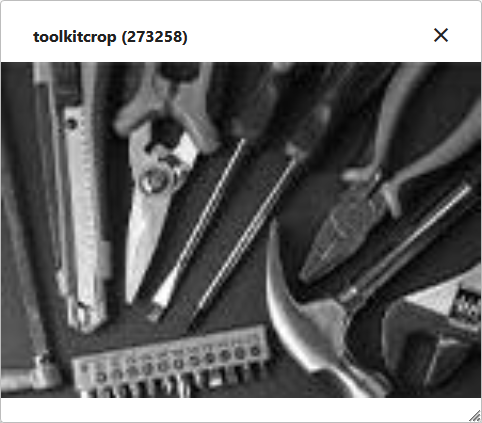
- Hover over an image to display a magnifying glass pointer (
 ). Click with this pointer to view the image in a separate dialog that can be resized or moved. Multiple images can be displayed in this way at the same time for better visual comparison. Click the X to close the zoomed image.
- Visually inspect and compare the metadata of the images to determine if one is more suited as the master. Hover over metadata attributes to display the full text hidden due to character length. The number of rows can be configured for each attribute displayed, as defined in the Image Deduplication Clerical Review Screen topic.
- As necessary, click on any metadata attribute to confirm that an image is a duplicate, display a white check mark on a blue background (
 ), and a blue border on the image card. Click an image card with a check mark to remove the check mark. The absence of a check mark indicates that the image is not a duplicate and will be marked as a 'confirmed non-duplicate' of the master.
Click the Select all or the Deselect all link to mark or remove the marks from all images displayed.

Note: It is expected that two or more images will be selected as duplicates, or none will be selected at all. Selecting only one results in only that image being available to select as the master in clerical review. Selecting no duplicates results in all being marked as non-duplicates of one another and removes them from future comparisons unless new assets are added that cause them to be reconsidered.
- Click the Cancel button to leave the duplicate suggestion page without making any changes. You must click Confirm to verify that you want to cancel, or click Cancel again to remain on the duplicate suggestions page.
- Click the Continue button to proceed to the master image selection page after all necessary duplicates are marked.
Note: If none of the images presented in the Duplicate Suggestions screen are duplicates, none will be selected. Clicking the Continue button and confirming that all images are non-duplicates skips the Select Master page and runs the image deduplication handler.
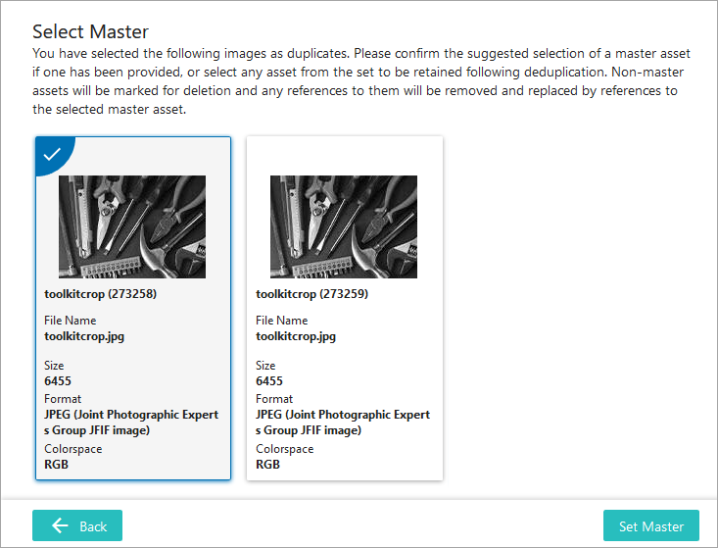
- When the Select Master page is displayed, all of the selected duplicate images are included.
Perform one or more actions:
- Hover over an image to display a magnifying glass pointer (). Click with this pointer to view the image in a separate dialog that can be resized or moved. Multiple images can be displayed in this way at the same time for better visual comparison. Click the X to close the dialog. (Example image shown in the previous step.)
- Visually inspect and compare the metadata of the images to determine if one is more suited as the master. Hover over metadata attributes to display the full text hidden due to character length. The number of rows can be configured for each attribute displayed, as defined in the Image Deduplication Clerical Review Screen topic.
- The system-selected master image is displayed with a white check mark on a blue background () and a blue border on the image card. As necessary, to override the selection, click on any metadata attribute for a different image card to select that image as the master. If the system-selected master image was not selected as a duplicate in the Duplicate Suggestions screen, no images are selected for the master.
One (and only one) image card must be set as master to complete the workflow task. The absence of a check mark indicates that the image is a duplicate and will be marked for deletion.
- Click the Back button to return to the duplicate suggestion page.
- Click the Set Master button to start the handler and complete the deduplication process. You must click Confirm to verify your selection, or click Cancel to remain on the select master page.
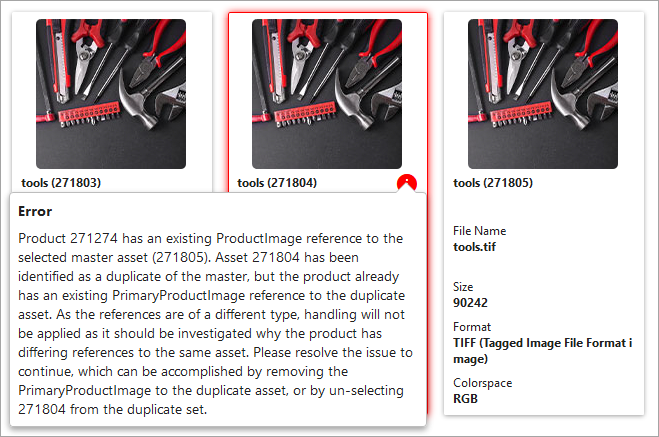
- After confirming the selected master, the image handling process is checked for errors, for example, with moving references from duplicates to the master. An informational message is displayed, and once closed, the first error is displayed with an error indicator (
 ) and a red border is added to on the image card.
Click the error indicator to display details for resolving the problem.
Once the 'Image Deduplication Run' handler finishes without error, the workflow task is submitted successfully, and the 'Deduplication completed successfully' message is displayed. This message indicates that the images in the group have been set as confirmed duplicates, confirmed non-duplicates, or the master. Additionally, references for confirmed duplicates have been moved to the master. For details, refer to the 'Updating Image Metadata' section of the Handling Duplicate Images topic.
A submitted workflow task is no longer displayed on the task list. Other groups found to be potential duplicate groups are displayed and can be evaluated by repeating the steps starting with step number 2 above.
- If you want to modify the configuration and evaluate the same images again, refer to the 'Clearing Image Deduplication Metadata Attribute Values' section in the Running the Image Deduplication Process topic.
Important: Once an image is marked as a duplicate (its 'Deduplication Delete Flag' metadata attribute is set to 'true') it is ignored by the deduplication functionality, and the final processing should be performed manually. That may include using a workflow to verify and then delete it from STEP, or move it to a hierarchy node outside of the one selected in the configuration, or searching to find all images marked for deletion and then deleting them from STEP as a group. The final processing should also include removing the IDs of the deleted images from the 'Confirmed Duplicates' metadata attribute.