The Mapper Configuration Setup Entity can be executed in the following ways:
- By Executing Through Mapper Action Button (this is the recommended method in the Web UI as it will be faster)
- By executing through Stacked Mapper Action button (this is being used when multiple Mapper Configuration Setup Entity has to be accessed standing on the object)
- By executing through the
Setup entity definitions can be exported as comments and submitted to an external source control system for comparison purposes. For details, refer to the Configuration Management documentation.
Prerequisites
It is assumed that the admin user has knowledge of STEP administrative functions and experience working in System Setup, including creating and editing business rules, workflows, and Web UIs. This section targets only the specific information needed for a knowledgeable STEP admin user to execute the Mapper Configuration in different possible ways. For more introductory material of these concepts, refer to the Business Rules, Workflows, and Web User Interfaces sections.
Before any Mapper Configuration is executed, the relationship must be established through references between the Source object to the Target object.
Before any Mapper Configuration is executed, it is necessary that the configuration aspects of the Data Onboarding solution in both the workbench and the Web UI are completed. For more information about creating and configuring the mapper configuration setup entity, refer to the Data Onboarding Solution Initial Setup and the Configuring Web UI for Data Onboarding Solution topics within this section.
Executing Through Mapper Action Button
This process involves defining an action button called Mapper Action to hold the Mapper Configuration setup entity, and configuring the action button in required screens. Clicking on the action button will initiate the Mapper Configuration setup entity on the selected node.
The Mapper Action button can be configured to be available within the Source object (or Target object) screen, or any other places that allows the action button to be executed (e.g., run as a bulk update on a Collection, or initiate the action button with a node selected in the Search by Card screen). For the ease of understanding, this document depicts an example of configuring the Mapper Action button in the Node Detail screen that is configured to view the Source object.
Note: If the Mapper Action button is to be configured in the Target object screen, then it is required that the user selects the Run From Target parameter as explained in this topic below.
Following are the steps to configure the Mapper Action button.
- In the Web UI designer, navigate to the screen that requires the Mapper Action button to be configured > Buttons > go to component > Button Properties.
- Click Add next to the Actions field that is available within the Buttons Properties to access the Add Component dialog.
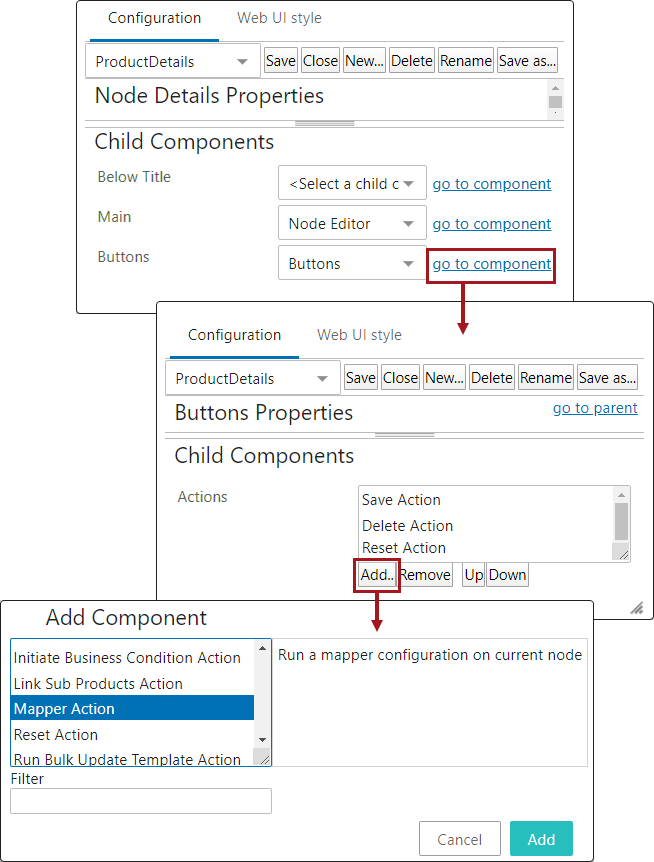
- Find Mapper Action and click Add, and the Mapper Action Properties dialog will be displayed.
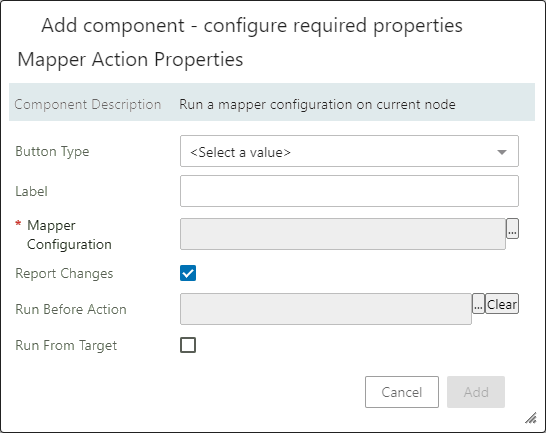
- Populate the parameters as detailed below:
- Button Type: Select from ICON_AND_TEXT, ICON, and TEXT using the Button Type dropdown. If the user choose to select TEXT or ICON_AND_TEXT and the Label parameter is empty, the default text 'Run Mapper' will display.
-
Label: This parameter defines the text that the user wants to appear in the button that is displayed on screen.
-
Mapper Configuration: Required parameter to specify the Mapper Configuration setup entity that needs to be executed. Click the ellipsis button (
 ) to find and select the Mapper Configuration setup entity that is available in the system.
|
Button Types |
Button Displayed As |
|---|---|
|
ICON |
|
|
TEXT |
|
|
ICON_AND_TEXT |
|

-
Report Changes: This parameter is checked by default. Having this parameter checked ensures that the changes effected by the execution of the associated Mapper Configuration setup entity is displayed in the message dialog (explained below) and also in the 'Recent warning notifications' panel, located in the upper right corner of Web UI.
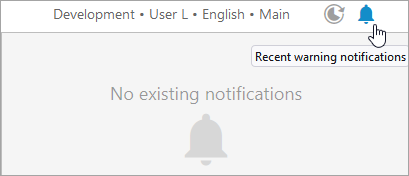
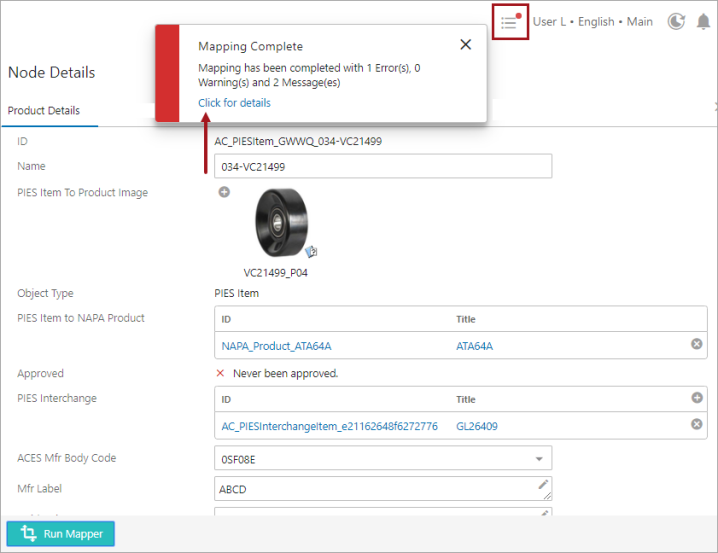
With the parameter checked, the ''Mapping Complete - Mapping has been completed with X Error(s), X Warning(s) and X Message(es)'' message with the 'Click for details' link will display in the message dialog (as shown below). If this parameter is left unchecked, any errors and warnings encountered in the execution of the Mapper Configuration setup entity will not be displayed, and the message dialog displays as 'Mapping Complete.'
-
Run Before Action: This parameter allows the user to configure a business action. The configured business action gets executed before the Mapper Configuration setup entity is executed.
-
Run From Target:This parameter allows the user to execute the Mapper Configuration from the target object. When the Run From Target parameter is selected, users can initiate the onboarding from the target object. The onboarding of the data will continue the same way as it was run from the source object. It is required that the selected target object has a valid source object.
- Click the Add button to close the Mapper Action Properties designer screen.
- Click the Save button in the designer and Close.
A status message dialog will be displayed when the user clicks on the action button that is configured in any screen. This dialog shows the execution status of the Mapper Configuration and configured business action execution in the top center of the screen. More details on the status of the execution can be found either by clicking the 'Click for details' link in the message dialog, or by accessing it through the 'Recent warning notifications' side panel located in the upper right corner of Web UI.
Executing Through Stacked Mapper Action Button
This process involves defining an action button called Stacked Mapper Action to hold multiple Mapper Configuration setup entities, and configuring the action button in required screens. Unlike the Mapper Action button described above, this action button provides an option to configure multiple Mapper Configuration setup entity, thereby allowing users to select a Mapper Configuration setup entity standing on the object.
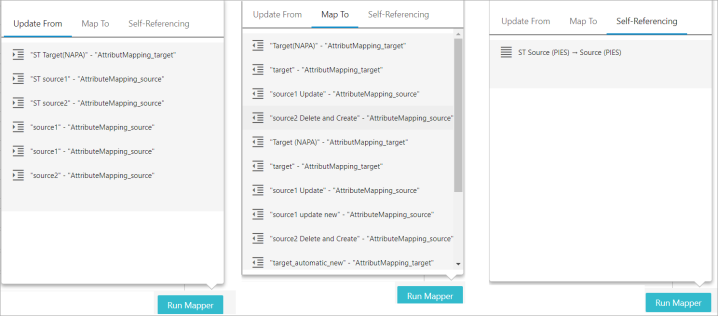
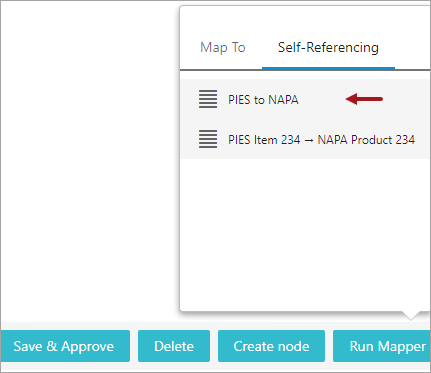
Clicking on the action button will display a dialog (with one or more tabs depending on the Mapper type configured) where users can select a Mapper Configuration setup entity and on the selected node. The Map To tab contains the Mapper Configuration setup entities that are to be run on the source object, the Update From tab contains the Mapper Configuration setup entities that are to be run from the target object, and the Self-Referencing tab contains the Mapper Configuration setup entities that are being self referenced.
The Stacked Mapper Action button can be configured to be available within the Source object (or Target object) screen, or any other places that allows the action button to be executed (e.g., run as a bulk update on a Collection, or initiate the action button with a node selected in the Search by Card screen). For the ease of understanding, this document depicts an example of configuring the Stacked Mapper Action button in the Node Detail screen that is configured to view the Source object.
Note: If the Mapper Action button is to be configured in the Target object screen, then it is required that the user selects the appropriate option in the Run On parameter as explained in this topic below.
Following are the steps to configure the Mapper Action button.
-
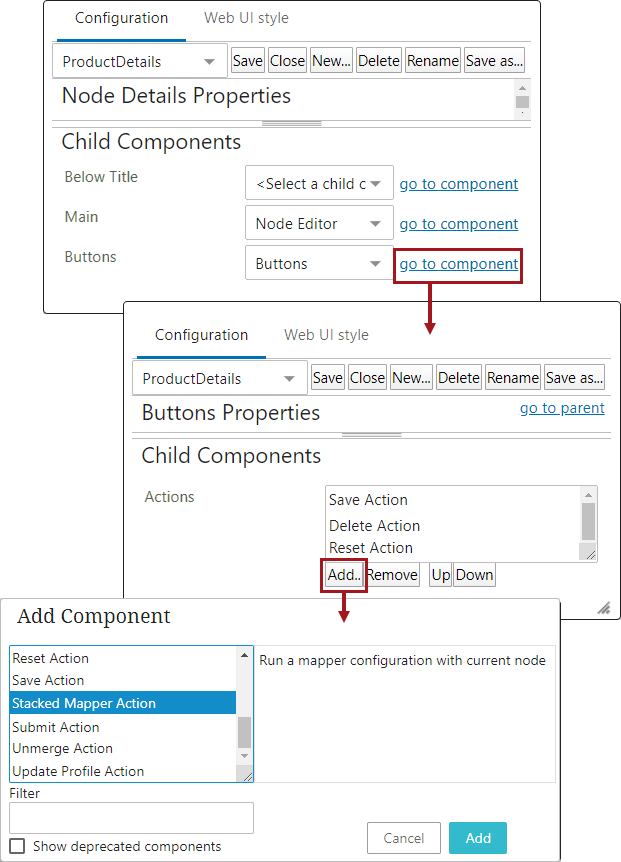
In the Web UI designer, navigate to the screen that requires the Mapper Action button to be configured > Buttons > go to component > Button Properties.
-
Click Add next to the Actions field that is available within the Buttons Properties to access the Add Component dialog.
-
Find Stacked Mapper Action and click Add, and the Stacked Mapper Action Properties dialog will be displayed.
- Populate the parameters as detailed below:
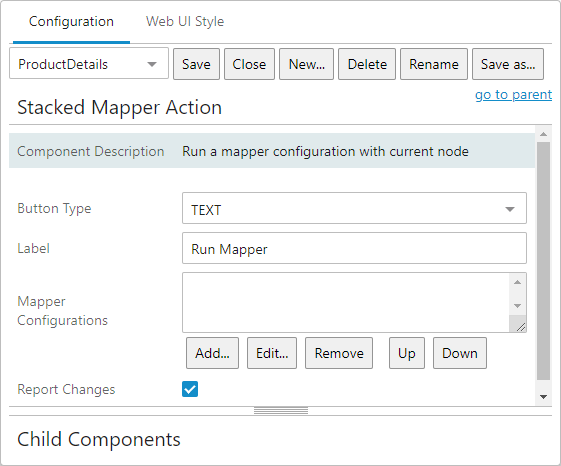
- Button Type: Select from ICON_AND_TEXT, ICON, and TEXT using the Button Type dropdown. If the user choose to select TEXT or ICON_AND_TEXT and the Label parameter is empty, the default text 'Run Mapper' will display.
-
Label: This parameter defines the text that the user wants to appear in the button that is displayed on screen.
-
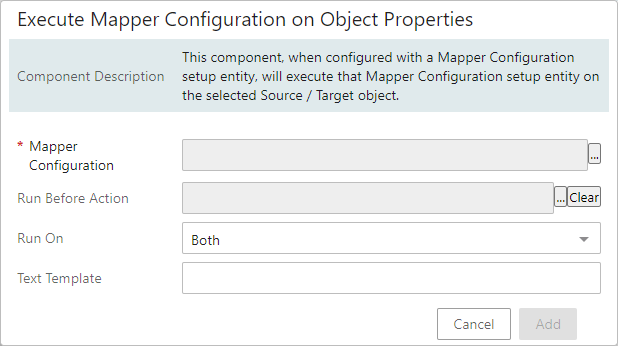
Mapper Configurations: Required parameter to specify the Mapper Configuration setup entity(ies) that needs to be executed. Click the Add button to display the 'Execute Mapper Configuration on Object Properties' dialog where users can find and select the Mapper Configuration setup entity. Further configuration is required within the 'Execute Mapper Configuration on Object Properties' dialog as explained in detail below:
-
Mapper Configuration: Required parameter to specify the Mapper Configuration setup entity that needs to be executed. Click the ellipsis button (
) to find and select the Mapper Configuration setup entity that is available in the system. -
Run Before Action: This parameter allows users to configure a business action. The configured business action gets executed before the Mapper Configuration setup entity is executed.
-
Run On: This parameter contains options that determine whether the Mapper Configuration setup entity is to be executed on the source object, target object, or both. The available options are Source, Target, and Both.
-
Text Template: This field allows users to determine how the Mapper Configuration setup entity has to be displayed in the dialog when the Stacked Mapper action button is clicked.
|
Button Types |
Button Displayed As |
|---|---|
|
ICON |
|
|
TEXT |
|
|
ICON_AND_TEXT |
|
-
Report Changes: This parameter is checked by default. Having this parameter checked ensures that the changes effected by the execution of the associated Mapper Configuration setup entity is displayed in the message dialog (explained below) and also in the 'Recent warning notifications' panel, located in the upper right corner of Web UI.
With the parameter checked, the ''Mapping Complete - Mapping has been completed with X Error(s), X Warning(s) and X Message(es)'' message with the 'Click for details' link will display in the message dialog (as shown below). If this parameter is left unchecked, any errors and warnings encountered in the execution of the Mapper Configuration setup entity will not be displayed, and the message dialog displays as 'Mapping Complete.'
-
Click the Add button to close the Mapper Action Properties designer screen.
-
Click the Save button in the designer and Close.
A status message dialog will be displayed when the user clicks on the action button that is configured in any screen. This dialog shows the execution status of the Mapper Configuration and configured business action execution in the top center of the screen. More details on the status of the execution can be found either by clicking the 'Click for details' link in the message dialog, or by accessing it through the 'Recent warning notifications' side panel located in the upper right corner of Web UI.
Executing by Onboarding Comparison Screen
This process involves configuring an Onboarding Comparison Screen to hold the Mapper Configuration and then access this screen for the Source object through multiple ways. This type of execution provides an option for the user to preview the changes affecting the Target object even before the data is onboarded. The Onboarding Comparison Screen allows users to assess each of the changes, and gives the user an option to accept or reject the changes that will affect the Target object. Additionally, this screen also provides users an option to exclude any Mapping plugin being executed for any required Source object on its subsequent import.
- Create and configure a Onboarding Comparison Screen. For the full set of instructions on configuring the Onboarding Comparison Screen, refer to the Configuring Onboarding Comparison Screen documentation.
- Review and implement the most common ways to use Onboarding Comparison Screen as described in Using Onboarding Comparison Screen Interface topic within this guide.
Executing by a Background Process
This method of execution is also considered as the automatic onboarding method. This process involves creating a new state in the Import workflow to hold a Mapper Configuration setup entity that gets automatically executed whenever there is a new import. After the file is imported in the system, the Onboarding background process runs a drill down search for the following:
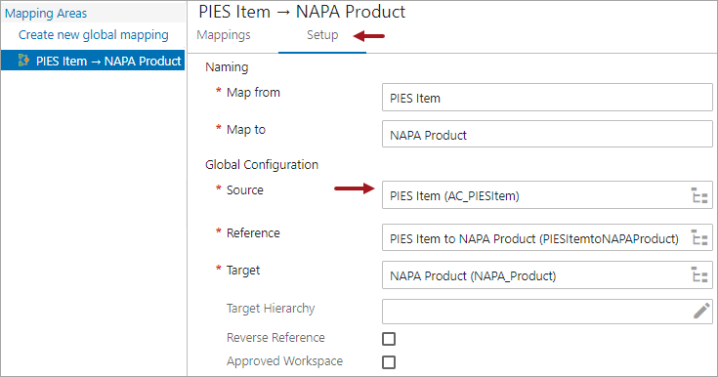
- To identify all the Source objects in the system that has the change flag attribute value set to 'true.' The change flag attribute is configured in the 'Changed attribute' parameter (explained below). The Source object(s) belong to the object type configured in the 'Source' parameter that is available within the 'Setup' tab of the Onboarding Mappings Details screen for the selected Mapper Configuration setup entity (an example shown below).
Note: When executing through this method, the background process executes the Mapper Configuration setup entity on every source objects residing in the system that has the change flag attribute value set to 'true.' Not just the source objects in the importing file.
-
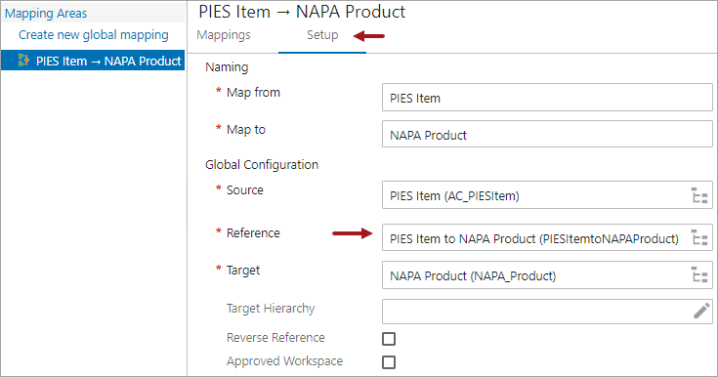
To identify the Reference type configured in the 'Reference' parameter which is available within the 'Setup' tab of the Onboarding Mappings Details screen for the selected Mapper Configuration setup entity (an example shown below).
-
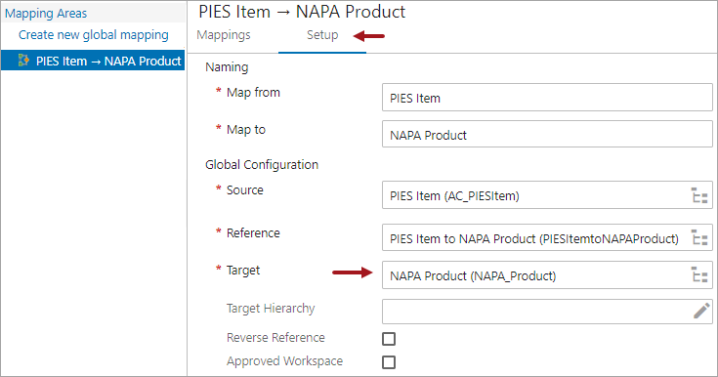
To identify the Target object belonging to the object type configured in the 'Target' parameter which is available within the 'Setup' tab of the Onboarding Mappings Details screen for the selected Mapper Configuration setup entity (an example shown below). If the Target object does not exist to run the Mapper Configuration on, then it can be made possible to create a Target object based on the condition defined in the 'Target Hierarchy' Parameter.
Once the Onboarding background process identifies the Source object, Target object, and the reference linking the Source object with the Target object, then the Mapper Configuration setup entity will be executed only on the identified results. This way, Onboarding background process eliminates execution of the Mapper Configuration on all other objects in the system than those that actually requires to be updated.
To execute the Mapper Configuration by a background process, the following configuration is needed:
These levels of configuration are explained in detail below. For more information on creating / editing the business action and workflows, refer to the Business Actions section and the Workflows section.