For outbound integrations, the SSL Client Certificates node allows full management of HTTPS connection certificates for self-signed TLS or mTLS (multiple transport layer security), without any system downtime. It also provides full visibility into all configured certificates. Self-signed certificate management functionality is useful for environments where globally signed certificates are not present, but the external site is trusted.
The 'SSL Client Certificates' editor includes these sections:
-
Trusted Certificates - manage self-signed certificates (those not globally trusted).
-
Tested URLs - verify the connectivity to a remote URL and identify errors.
-
mTLS Client Certificate - download the client public key for implementing outbound mTLS authentication.
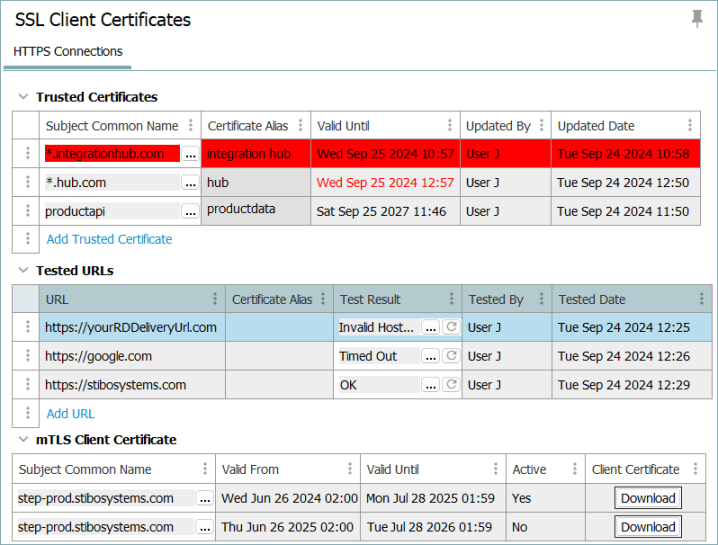
Trusted Certificates
The 'Trusted Certificates' section stores public keys that identify:
-
external sites that STEP trusts
-
sites that are using a self-signed certificate (not globally trusted by the Java Global Certificate Authority (CA))
Prerequisites
Required configuration varies based on your environment as defined in the following sections:
TrustStore Entries
When a certificate is added to the SSL Client Certificates node, it is uploaded to the truststore configured via the configuration properties.
If no truststore is configured on the environment, it is automatically created when the first certificate is imported. The properties defined below must be configured to specify where the keystore file is to be stored.
For Stibo Systems SaaS environments, a default truststore is automatically configured.
For on-premises environments, review the case-sensitive entries to identify the truststore:
-
SSL.Default.TrustStore.Location
For example:
SSL.Default.TrustStore.Location=/shared/customer-config/truststore/truststore.jks
Note: Provide a path and a file name for this property. When implementing this property, the path (/shared/customer-config/truststore/ in this example) must already exist, and the STEP application must have 'write' access to the path.
The SSL Client Certificates functionality is available with release 2023.3. If this property and a truststore (with JKS) were configured before the 2023.3 release, no changes are required, and the certificates are automatically visible in the workbench.
-
SSL.Default.TrustStore.Password
For example:
SSL.Default.TrustStore.Password=password
URL Entries
For all environments, optionally, add (or verify) the values that populate the HTTPS URL parameter in the 'New Certificate' dialog. Configure the entry that corresponds to your connection method, via the appropriate case-sensitive configuration property:
-
RESTGateway.ServerURL (as defined in the Configuring a Gateway Integration Endpoint - REST topic). For example:
RESTGateway.ServerURL=qa=http://step-qa,stage=http://step-stage
-
RestDirectDeliveryURL (as defined in the REST Direct Delivery Method topic).
For example:
RestDirectDeliveryURL = 1=http://myfirstendpoint, 2=http://mysecondendpoint
-
RESTDeliveryURL (as defined in the REST Delivery Method topic).
For example:
RESTDeliveryURL=qa=http://step-qa,stage=http://step-stage
Adding a trusted certificate
To upload a trusted certificate:
-
In the workbench on the System Setup tab, click the 'SSL Client Certificates' node.
-
In the 'Trusted Certificates' section, either click the Add Trusted Certificate link or right-click the edit row menu (
 ) and select 'Add Trusted Certificate', as shown in the Trusted Certificates editor section below.
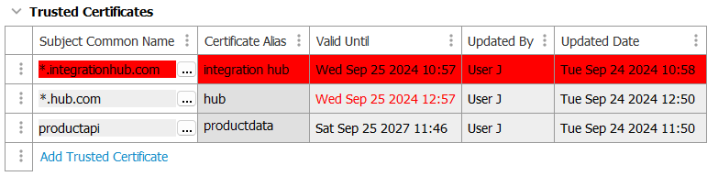
-
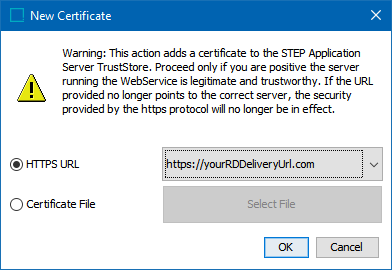
On the 'New Certificate' dialog, choose a method to add a certificate:
-
HTTPS URL - From the dropdown, select the URL for the site you want STEP to trust. The dropdown is supplied by the configuration properties URL entries defined above or URL entries that have been entered manually under the 'Tested URLs' section (for which the connection test resulted in a 'Server Not Trusted' error). Click the OK button and the connection is verified to retrieve the certificate and import it in the truststore.
-
Certificate File - click the Select File button, browse to your .crt or .cer file, and click the Open button. The file is verified, and the certificate is imported in the truststore.
Note: No action is taken when a certificate that is already trusted is selected, for example, a CA certificate.
-
-
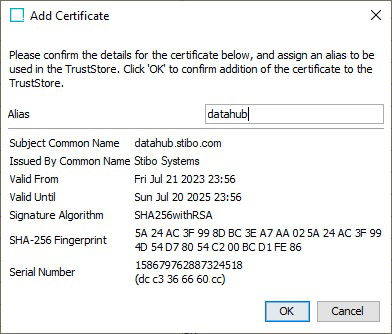
On the 'Add Certificate' dialog:
-
Review that the certificate information is as expected.
-
Add an Alias. This is a shortcut name for easy identification.
-
Click OK.
-
-
Verify the new information on the 'Trusted Certificates' section. The certificate is listed with its Subject Common Name, Alias, and the expiration date (in the Valid Until column).
-
Test the related URL(s) under the 'Tested URLS' section to confirm that a connection can now be established. After a successful test the Certificate Alias is also visible for the URL.
Trusted Certificates editor
The following alerts and functionality are available directly from the editor:
-
When the expiration date is approaching, the Valid Until column displays red text. When a certificate has expired, the row displays a red background.

-
Right-click the edit row menu (
) for the Hide, Show All Rows, Add Trusted Certificate, and Remove Certificate options. 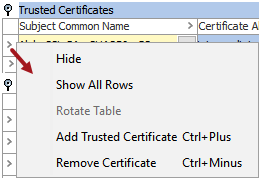
Tested URLs
This option allows you to verify the status of a URL and identify connection errors.
-
In the workbench on the System Setup tab, click the 'SSL Client Certificates' node.
-
In the 'Tested URLs' section, either click the Add URL link or right-click the edit row menu (
) as defined in the Tested URLs editor section below.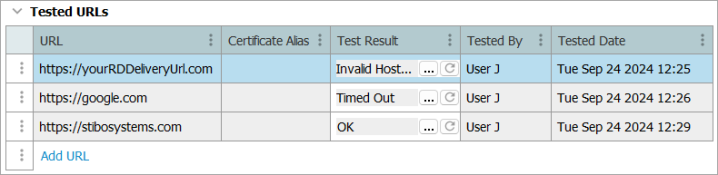
-
On the 'Add URL' dialog, choose a method to add an Https URL:
-
Type a URL into the parameter. The value must begin with 'Https'.
-
Select a URL from the dropdown (supplied by the configuration properties URL entries defined above).
-
-
Click OK.
-
Review the Test Results column for the outcome of the test. Possible results include:
-
OK - displays for sites that are globally trusted or that are tested trusted by a certificate that was already imported.
-
Malformed URL - displays for incorrectly configured URLs.
-
Connection Error - displays for a variety of errors that result in a failed connection.
-
Not a HTTPS request - displays for non-HTTPS requests; only HTTPS is supported.
-
Tested URLs editor
The following alerts and functionality are available directly from the editor:
-
Right-click the edit row menu (
) for the Hide, Show All Rows, Add URL, and Remove URL options.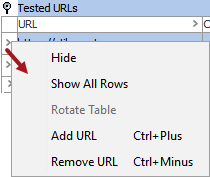
-
The Details button (
 ) displays additional information about error messages if available.
 -
The Retry button (
 ) to run the test again.
mTLS Client Certificate
This option allows you to set up mTLS authentication with an external service by downloading the STEP public key, which can be used to authenticate requests coming from STEP by an external service. This is specifically relevant for Stibo Systems SaaS environments where a customer relies on Stibo Systems to provide and configure the key. For more information on mTLS, refer to the Mutual Transport Layer Security topic.
Prerequisites
-
For Stibo Systems SaaS environments, the default and upcoming keystore properties are automatically configured.
-
For on premises environments, the following configuration properties must be set:
-
Add only one public-private keypair to the .jks file.
Note: If multiple private keys are included in the keystore, the selection is not guaranteed.
-
Add the following case-sensitive entries in the sharedconfig.properties file on the STEP application server:
-
SSL.Default.KeyStore.Location
For example:
SSL.Default.KeyStore.Location=/shared/customer-config/keystore/keystore.jks
-
SSL.Default.KeyStore.Password
For example:
SSL.Default.KeyStore.Password=password
-
-
Download a client public key certificate
Each year, Stibo Systems SaaS customers using mTLS authentication for outbound REST integrations must renew the public key certificate provided by Stibo Systems before it expires.
mTLS authentication is available for gateway integration endpoints (GIEPs) using REST and outbound integration endpoints (OIEPs) using either the REST or REST Direct delivery methods. This authentication includes a certificate provided by Stibo Systems in SaaS environments, enabling customers to verify that an incoming connection originates from their STEP SaaS environment.
To use the certificate provided by Stibo Systems, configure the REST API or endpoint that receives the connection from STEP.
When the certificate provided by Stibo Systems is in use, up to two certificates can be valid at the same time and trusted in parallel:
-
a default certificate currently in use is always displayed.
-
a certificate that will be in use when the default certificate expires is displayed starting 90 days before the 'Valid until' date of the certificate currently in use.
Both certificates are controlled by properties reserved for Stibo Systems.
To ensure a smooth transition during renewal, the upcoming certificate can and should be downloaded, registered, and trusted prior to becoming active.
Only one certificate can be active at a time. Once a certificate's expiration date is reached, the certificate is removed from the section.
To review and/or maintain the mTLS certificate(s):
-
In the workbench on the System Setup tab, click the 'SSL Client Certificates' node.
-
Review the information in the 'mTLS Client Certificate' section.

-
Subject Common Name - identifies the name assigned to the certificate.
Click the ellipsis button (
 ) to display the 'Certificate Details' dialog with additional information about the certificate.
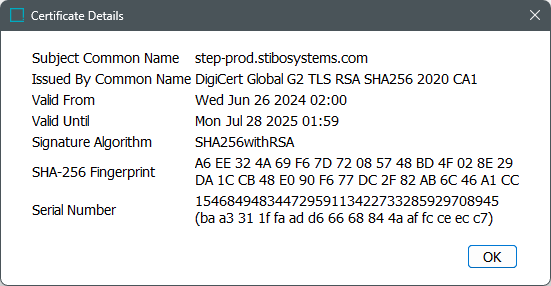
-
Valid From - displays the first date and time that the certificate can be used.
-
Valid Until - displays the date and time that the certificate expires.
-
Active - indicates if the certificate is currently in use.
-
Client Certificate - allows the selected certificate to be saved in the required location. Click the Download button to display a 'Save' dialog, set the location and file name, and click the Save button.
-
-
Add the downloaded certificate to your external service to authenticate a STEP connection.