Once a gateway integration endpoint has been created and the external system has been selected, the configuration settings allow you to identify the server housing the required data.
To use mTLS or TLS with this type of endpoint, refer to the Mutual Transport Layer Security topic.
Prerequisites
All dropdowns are system-dependent and require the following configuration properties to display dropdown options.
-
To populate the system-dependent Server URLs dropdown, edit the sharedconfig.properties file using the case -sensitive RESTGateway.ServerURL property. If necessary, use a comma to separate multiple URLs. The following is an example of a complete property entry for two systems named 'qa' and 'stage,' as well as their URLs 'http://step-qa' and 'http://step-stage':
RESTGateway.ServerURL=qa=http://step-qa,stage=http://step-stage
When configuring the Address Typeahead functionality (in the Web User Interfaces documentation), use the URL for the applicable address search service:
-
Loqate - https://api.addressy.com/
-
Google Places - https://maps.googleapis.com/maps/api/place/
-
For other address service options, refer to the service documentation for the relevant URL.
-
-
To populate the SSL trust store location dropdown, edit the sharedconfig.properties file using either the legacy RESTGateway.SSLTrustStoreLocation property or the global trust store SSL.Default.Truststore.Location property, as defined in the Mutual Transport Layer Security topic.
Note: The RESTGateway.SSLTrustStoreLocation property does not work in conjunction with an outbound mTLS or TLS certificate configured in the SSL.Default.Keystore.Location the SSL.<Alias>.Keystore.Location properties. If you need a trust store in conjunction with mTLS, it must be configured using the SSL.Default.Truststore.Location property.
- To populate the Proxy Configuration dropdown, edit the sharedconfig.properties file using the RESTGateway.ProxyConfiguration property. Refer to the Proxy Configuration Setup section below for details.
Configuration
The following steps are for REST configuration.
-
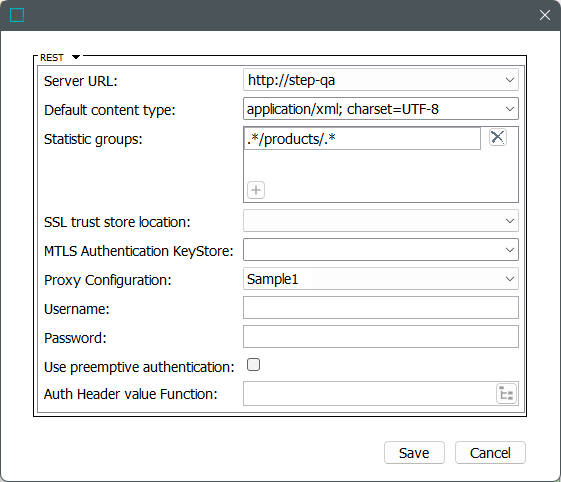
On the Gateway Integration Endpoint Configuration dialog, use the following parameters to specify the external system the gateway integration endpoint will access.
-
Server URL - The URL of the server to be accessed from the dropdown. Dropdown options are provided as defined in the Prerequisites section above.
-
Default content type - Data format or content type to be used for the endpoint. Type your own or select from the dropdown list of the most commonly used options.
-
Statistic groups - Optional. Regular expression can be used to group executed REST methods on the endpoint's Statistics tab. The regular expression must match the entire URL, for example, .*/products/.*. Use the regular expression syntax available in Java in the java.util.regex.Pattern class. For more information, refer to the Gateway Integration Endpoint Statistics topic or the Regular Expression topic in the Resource Materials online help documentation.
-
SSL trust store location - The trust store holds certificates that verify that the system can be trusted.
The gateway connection is not configured to use SSL encryption when no global trust store is configured and/or if no trust store location (set in the legacy trust store property) is selected. In this scenario, the gateway connection is established using a certificate signed by a recognized Certification Authority, such as Verisign or Thawte.
-
Proxy Configuration - Select from this dropdown if the gateway connection must first pass through a proxy server with its own login requirement.
-
-
Click Save to complete the configuration.
-
Enable the endpoint as defined in the Running a Gateway Integration Endpoint topic.
-
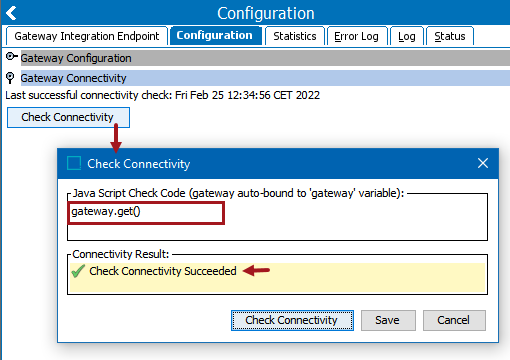
Test the connection from the gateway as follows:
-
On the Gateway Connectivity flipper, click the Check Connectivity button.
-
In the Check Connectivity dialog, in the Java Script Check Code section, add an option:
gateway.get()
gateway.put()
gateway.post()
-
Click the Check Connectivity button and verify success or make the necessary corrections to connect.
-
-
Create the following as needed:
-
JavaScript business action to access the gateway endpoint, as defined in the Gateway Integration Endpoint Bind topic of the Resource Materials online help documentation.
-
Address Typeahead to access an address search service, as defined in the Address Typeahead topic of the Web User Interfaces documentation.
-
Authentication
The gateway integration endpoint REST plugin supports both basic authentication and token-based authentication.
Basic Authentication
With preemptive authentication enabled, the basic authentication value for the Authorization header is sent with the first request to the external service instead of only sending the value after having received a basic authentication challenge from the service.
Token-Based Authentication
With the token-based authentication option, the responsibility for producing any required request headers is delegated to a business function. The business function must be configured to not expect any input and must produce a Map<String, String>, each map entry being a header to be sent with the request to the service.
The screenshot below shows the editor for a compatible business function that retrieves a token using the OAuth 2.0 client credentials flow and passes back to the gateway integration endpoint REST plugin as a value for the Authorization header.
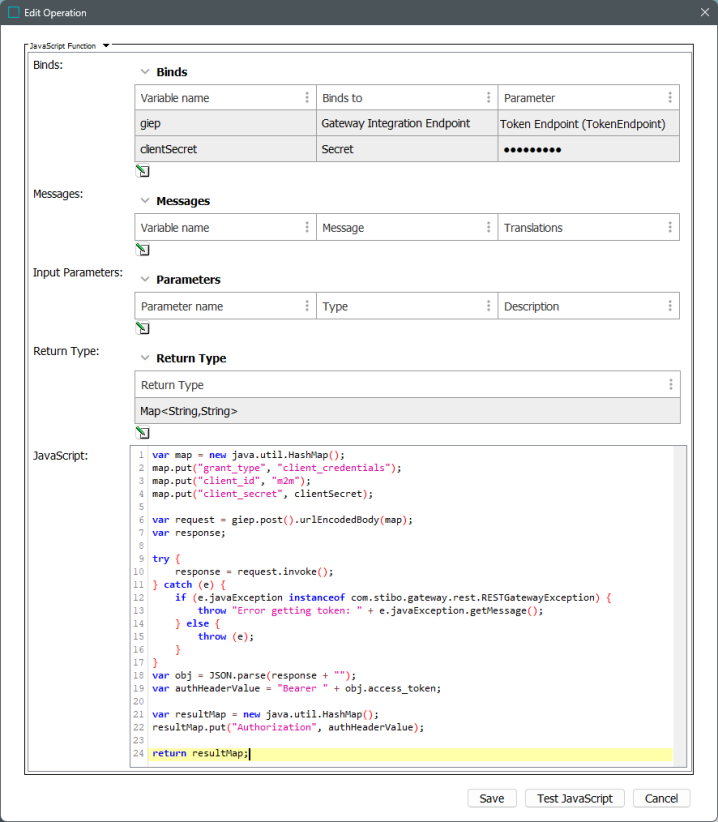
The JavaScript shown above can be copied
var map = new java.util.HashMap();
map.put("grant_type", "client_credentials");
map.put("client_id", "m2m");
map.put("client_secret", clientSecret);
var request = giep.post().urlEncodedBody(map);
var response;
try {
response = request.invoke();
} catch (e) {
if (e.javaException instanceof com.stibo.gateway.rest.RESTGatewayException) {
throw "Error getting token: " + e.javaException.getMessage();
} else {
throw (e);
}
}
var obj = JSON.parse(response + "");
var authHeaderValue = "Bearer " + obj.access_token;
var resultMap = new java.util.HashMap();
resultMap.put("Authorization", authHeaderValue);
return resultMap;The parameter for selecting the business function is the 'Auth Header Value Function.' The REST plugin automatically calls the business function when a new token is required.
Note: It is strongly discouraged to configure both basic authentication and token-based authentication since this configuration is not supported.
Proxy Configuration Setup
The following are two examples of how the dynamic RESTGateway.ProxyConfiguration property can be configured:
RESTGateway.ProxyConfiguration.1=ProxyConfig1,10.64.8.253,808,username,password
RESTGateway.ProxyConfiguration.2=ProxyConfig2,10.64.9.253,64,user10,password1
To break the first of these two properties into its component parts (each element separated by commas), refer to the screenshot and the numbered list below:

-
Required text to enable the REST Gateway Proxy configuration property
-
The name of the configuration. This is what appears in the dropdown as a selectable option, for example:

-
The IP of the proxy server being accessed
-
The port of the proxy server being accessed
-
The username for the proxy server being accessed (optional)
-
The password for the proxy server being accessed (optional)