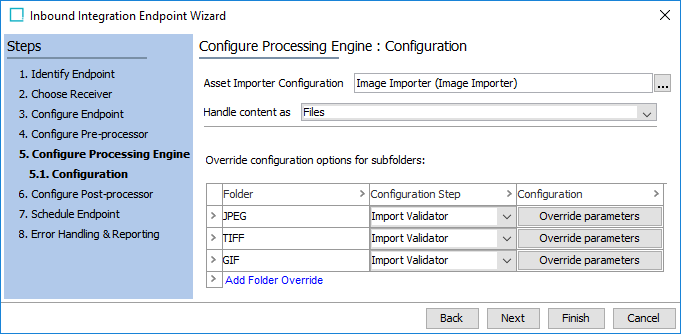
When using an Asset Importer endpoint, it is necessary to specify an asset importer configuration and define how the imported content will be received.
Prerequisites
The following settings are important when using this processing engine:
-
On the Choose Receiver step, the 'Hotfolder Receiver' option must be selected as defined in the IIEP - Choose Receiver topic.
-
If desired, folder overrides can also be configured, allowing users to replace certain aspects of the asset import configuration for sub folders within the top-level hotfolder. For required configuration, refer to the Asset Importer Configuration topic.
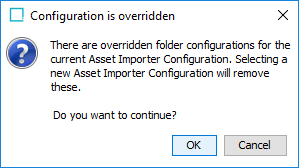
Note: Attempting to change the asset importer configuration after configuring overrides displays a prompt warning that the overrides will be removed.
Configuration
-
In the Asset Importer Configuration parameter, click the ellipsis button (
 ) and select an asset importer configuration from the node list. Click Select.
 -
In the Handle content as parameter, define how files will be delivered to the asset importer by selecting the appropriate receiver option from the dropdown.
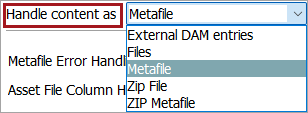
The options include:
-
External DAM entries - no additional parameters are required.
-
Files - use when importing single asset files into STEP. No additional parameters are required.
-
Metafile - use when a metadata file is necessary to supply information related to the assets, such as when the assets and metafile reside in different locations. By configuring this parameter, users can point imported metadata files to the related assets that are about to be imported or updated (via a path accessible by the STEP application server process). Refer to the Metadata File Format section below.
While importing the assets using the metafile, the following locations are required for the files:
-
Assets are placed in the default hotfolder root (not the configured asset hotfolder). For example, while adding assets on the application server, the path will be \[hotfolder for Windows system] or /upload/[hotfolder for Linux system].
-
Metafile (the .TXT file) is placed in the [configured asset folder]/IN directory.
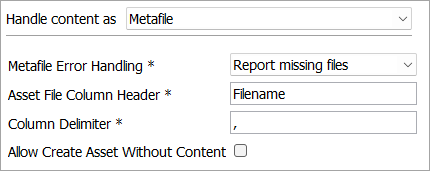
Metafile Error Handling - indicates how errors are handled.
-
'Report missing files' is the default; reports errors when the metafile references assets which cannot be found.
-
'Don't report inconsistencies' reports errors if inconsistencies between the metafile references and the assets are found.
-
'Report all inconsistencies' reports every inconsistency between the metafile references and the assets.
Asset File Column Header - specify the column heading of the metafile that contains the asset information. This includes an asset name; an external URL; or a relative path if the corresponding asset is in a subfolder below the root hotfolder directory. For example, 'Files/1234.jpg' corresponds to the asset name '1234.jpg' found within the 'Files' subfolder.
Note: Importing assets from URLs may increase the import time. Only freely accessible assets can be imported from URLs because entering a password is not allowed.
Column Delimiter - specify which character is used to separate the columns in the metafile. The default value is a comma (,) due to backward compatibility, but it is recommended to use either a semicolon (;) or a pipe (|) character, which is less likely to be included in any metadata fields.
Allow Create Asset Without Content - check to create an 'asset placeholder' when no content is available to the importer. This can happen when STEP cannot access the asset (i.e., due to an incorrect file name or blocked access to the URL). The asset is created and referenced as configured, the thumbnail shows 'No Content' instead of an image. Update the image via subsequent imports of the same asset using the 'Asset Content Replace' checkbox in the Content Importer topic.
-
-
Zip File - use when importing zip files that only contain assets. The file is unpacked during the import process and all asset files are imported according to the remaining configuration options. No additional parameters are required.
-
ZIP Metafile - use when importing a .ZIP file that contains both the metadata file and the corresponding asset file(s). When importing with this configuration, asset placeholders are created from the metafile, and assets are subsequently loaded into STEP to update the placeholder content. Refer to the Metadata File Format section below.
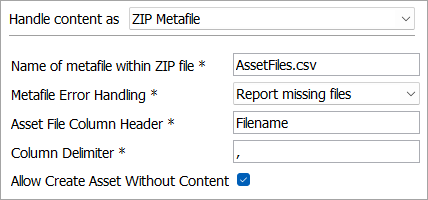
Name of the metafile within ZIP file - indicates the name of the metafile so the system can distinguish between it and the asset files. Valid file formats are .CSV and .TXT.
Metafile Error Handling - indicates how errors are handled.
-
'Report missing files' is the default; reports errors when the metafile references assets which cannot be found.
-
'Don't report inconsistencies' reports errors if inconsistencies between the metafile references and the assets are found.
-
'Report all inconsistencies' reports every inconsistency between the metafile references and the assets.
Asset File Column Header - specify the column heading of the metafile that contains the asset information. This includes an asset name; an external URL; or a relative path if the corresponding asset is in a subfolder below the root hotfolder directory. For example, 'Files/1234.jpg' corresponds to the asset name '1234.jpg' found within the 'Files' subfolder.
Note: Importing assets from URLs may increase the import time. Only freely accessible assets can be imported from URLs, entering a password is not allowed.
Column Delimiter - specify which character should be used to separate each of the columns in the metadata file. The default value is a comma (,) due to backward compatibility, but it is recommended to use either a semicolon (;) or a pipe (|) character, which is less likely to be included in any metadata fields.
Allow Create Asset Without Content - check to create an 'asset placeholder' when no content is available to the importer. This can happen when STEP cannot access the asset (i.e., due to an incorrect file name or blocked access to the URL). The asset is created and referenced as configured, the thumbnail shows 'No Content' instead of an image.
-
-
-
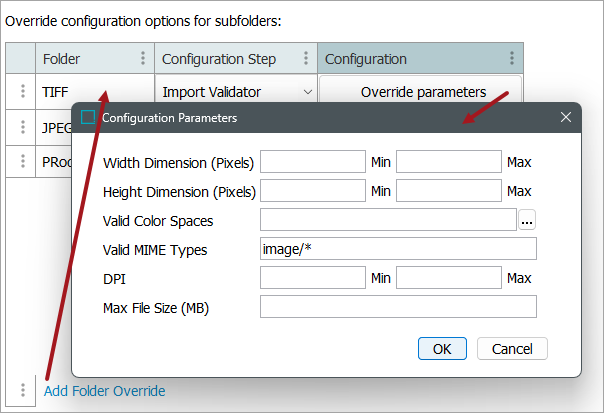
In the Override configuration options for subfolders area of the wizard, click the Add Folder Override link to add an override to the existing configuration. This adds a row to the override screen, in which an individual configuration aspect can be specified.
Note: This option is not available when using the FAB-DIS Importer processing engine.
-
In the Folder field, specify a subfolder to override. If only one configuration difference is required between the parent and child folder, only a single configuration (row) is needed for each subfolder. However, if more than one configuration difference exists between the parent and child, each difference requires an individual row to be added (with the Folder name shared between multiple rows).
-
In the Configuration Step dropdown, choose which aspect of the configuration to override. Almost every step in the Asset Importer configuration wizard is available for override, including Content Importer, Import Validator, Hierarchy Builder, Asset Matcher, Product Linker, Approver, Business Rules, Metadata Importer, and Workflow Handler. The Configuration Step selection determines the dialog displayed by the Override parameters button (below).
-
In the Configuration field, click the Override parameters button and make any of the necessary changes in the screen that appears and click OK. The parameters presented are based on the Configuration Step selection.
-
Additional options are available by clicking the arrow in the first column of the override configuration options table. This displays a menu with options including Add Folder Override and Remove Folder Override.
By properly utilizing override subfolders, a single asset importer configuration can be used to control an entire hierarchy of hotfolders. All subfolders will inherit the asset importer configuration as normal, but those configured in this way can override specific aspects of the base configuration, allowing for flexibility within a single asset importer configuration.
For example, different subfolders may be associated with different MIME Types (such as JPEG, TIFF, etc.). As part of the override configuration pictured above, this use case is addressed by overriding the 'Import Validator' step of the importer configuration and changing the 'MIME Type' parameter to '/jpeg.'
-
-
Click the Next button to display IIEP - Schedule Endpoint.
Metadata File Format
By configuring an IIEP with the Metafile or ZIP Metafile receiver options, the asset importer is able to process user-defined metadata files. To import such a file, a header row must be included in the imported file or the metadata file to be imported, and values must be provided for each column that references each asset.
The standard metafile configuration options described in the above section allow for a maximum of three data fields to be read from the file. However, if the 'Metadata Importer' is configured, the asset importer configuration can support additional columns, each representing an asset metadata attribute value to be imported. Information included in the file but that is not mapped in the metadata importer is ignored. For more information on the Metadata Importer, refer to the Metadata Importer topic.
The standard fields include:
-
File Name Field: Used in the Metafile and ZIP Metafile receiver selections to identify the file name of the asset. This field is required in each metafile and correlates the actual asset files to the content in the metafile.
-
Match Metadata Field: Used in the Metadata Product Linker configuration to specify the value for the product match criteria.
-
Reference Type Metadata Field: Used in the Metadata Product Linker configuration to specify the STEP ID of the reference that will be used to link the asset and the product.
For more information on the Product Linker, refer to the Product Linker topic.
Asset File Names Required for ZIP Metafile Option
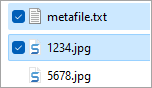
When using the ZIP Metafile option, zip files can be created by multi-selecting the metafile and the asset file(s) or they can be created by zipping a directory that includes the metafile and the asset(s).
-
When selecting one metafile in addition to one or more asset files to zip, the metafile must express the asset(s) with their respective filenames. Zipping the multi-selected files in the image below, metafile.txt must express the asset file as 1234.jpg.
-
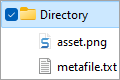
When the zip file is created by selecting a directory (folder) that contains a metafile and one or more asset files to zip, the metafile must express the asset(s) as a path that terminates with the filename. Zipping the 'Directory' in the image below, the metafile.txt must express the asset file as Directory/asset.png.
Metafile Examples
Metafile entries vary based on the ZIP creation method or location of the assets, as illustrated below:
-
Assets in the default hotfolder root - multiple lines of the same asset to create multiple product references:
-
Template: Filename;Product;Reference
-
\[hotfolder for Windows system]\1234.jpg;Item-12345;PrimaryImage
-
\[hotfolder for Windows system]\1234.jpg;Item-67890;PrimaryImage
-
-
ZIP file created from a directory - including metadata information to import (Metadata Importer):
-
Template: Filename;Product;Reference;Title;Photographer;PhotoCategory
-
Directory/asset.png;Item-12345;PrimaryImage;Glacier Bay Alaska;Peter Parker;Landscapes
-
-
ZIP file created by multi-selection - using a relative path (Metafile Receiver):
-
Template: Filename;Product;Reference
-
1234.jpg;Item-12345;PrimaryImage
-
Important: When using a zip file, the asset filename structure must reflect the zip method (either directory or multi-selection), as defined in the Asset File Names Required for ZIP Metafile Option section above.