The Attribute Validation mapping options are used to set parameters for attributes. This option is available only when Attribute is selected from the object super type 'Map to' dropdown. The attribute definitions available for import can be found in the attribute editor as defined in the Attribute Validation Info File Structure Requirements section below.
This example shows an Excel import file (although any inbound format can be used). The sample file creates multiple attributes and sets the Validation Base Type and ID for an LOV attribute. Additional attribute validation information columns can be added to the import file as needed.

The mapping instructions are the same for both the Import Manager tool and the IIEP tool. For details about starting an import, refer to Creating a Data Import or Creating an Inbound Integration Endpoint.
Verify Import File
The import file must include the attribute ID, and must follow the format defined in the Attribute Validation Info File Structure Requirements section below.
Map Attribute Validation Info
- Below the Source section, in the Map to parameter, select the Attribute super type.
- Use Auto Map to map the ID, or map it manually. For more information, refer to ID or Key - Map Inbound.
- If mapping manually, in the Source section, first select the attribute option column and then click the Map button to display the 'Map ... to' dialog. The label of the column is used within the title of the dialog.
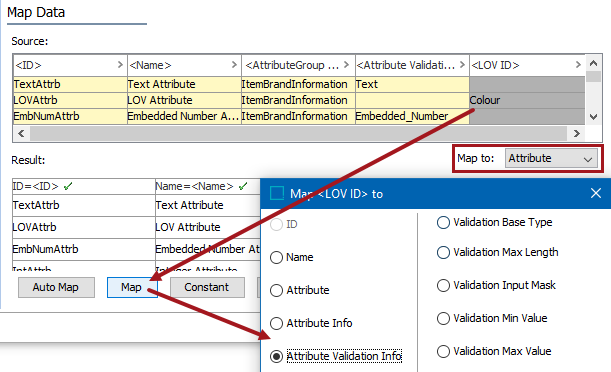
- Select the Attribute Validation Info option, then select a specific type of validation information from the radio buttons on the right panel of the 'Map ... to' dialog to enable the OK button. Each of the available options are defined in the Attribute Validation Info File Structure Requirements section below.
- Check the Mandatory option appropriately:
- If checked, imported objects must have a value for the selected attribute information in the file. If a value does not exist for an object, the object is skipped and not imported.
- If unchecked, all objects are imported regardless if the selected attribute information is specified or not.

- Click OK and the Result panel displays your attribute information values. A validated data column is marked with a green check mark as shown below.

- Complete the mapping and initiate the import.
Attribute Validation Info File Structure Requirements
On the Map ... to dialog, after selecting the Attribute Validation Info radio button, the following options are displayed.
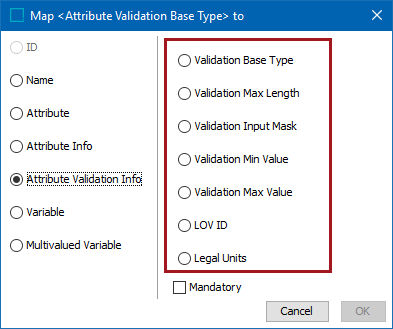
These options correspond to parameters available in the attribute editor Attribute tab, which can be set in the Attribute Validation section and the Units section.

Each available parameter for this mapping option is defined below.
- Validation Base Type sets the Validation Base Type parameter on an attribute. The following text is not case sensitive, but is required to set the validation base type. For LOVs, refer to the LOV ID section below.
Note: No spaces are included in types with multiple words. Instead, use the following list to include an underscore (_) or exclude the spaces.
- Condition
- Date
- Embedded_Number
- Fraction
- Integer
- ISODate
- ISODateTime
- Number
- NumberRange
- Numeric_Text
- Numeric_Text_Exclude_Tags
- RegExp
- Text
- Text_Exclude_Tags
- Url
For more information on validation base type, refer to the Validation Rules topic of the System Setup documentation.
- Validation Max Length sets the Maximum Length parameter which determines the number of characters allowed on an attribute. Primarily, this is used for Text, Text (exclude tags), Numeric Text, and Numeric Text (exclude tags) validation base type attributes.
- Validation Input Mask sets the Mask parameter on an attribute. For more on masks, refer to the Input Masks topic in the System Setup documentation.
- Validation Min Value sets the Minimum Value parameter for an attribute. Primarily, this is used for Number and Integer validation base type attributes.
- Validation Max Value sets the Maximum Value parameter for an attribute. Primarily, this is used for Number and Integer validation base type attributes.
- LOV ID can only be used when the Validation Base Type is List Of Values (LOV). Specify the ID of a list of values that already exists in System Setup. For more on LOVs, refer to the List of Values (LOV) topic in the System Setup documentation.
Note: The Validation Base Type column will be empty for an LOV since it is identified by the ID.
- Legal Units sets the Units parameter options and is only available attribute with Validation Base Types of number, embedded number, fraction, integer, number range, numeric text, or regular expression. For more information, refer to the Units topic in System Setup documentation.
This field is never output in any export file, and must be added manually to an input file. If more than one unit type is being imported for an attribute, then IDs should be separated with a delimiter, for example a semicolon.