Regardless of the object type or hierarchy that you are working with, the general principles of deleting objects in the workbench are the same, and are described below.
Note: All actions are controlled via privileges. Some users may not have access to create or delete objects, or may only have options to edit specific object types, hierarchies, or attribute values. The information below focuses strictly on carrying out the various actions, and assumes that all required privileges are granted. More information on privileges is available in the Privilege Rules topic in the System Setup documentation here.
Objects can be deleted from the Tree by right-clicking on the object to be deleted, or via the Maintain menu when the object to be deleted has been selected. In both cases, the Delete option is selected from the menu. Deletion of multiple objects is supported using Ctrl or Command to multiselect.
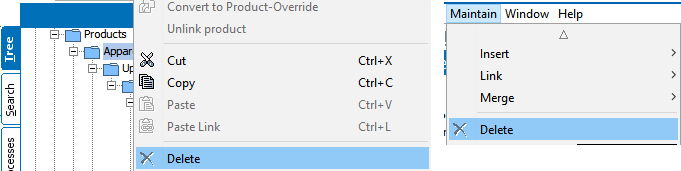
Selecting Delete opens a deletion confirmation window, which will vary slightly based on the object selected for deletion. For example, a classification provides an option to unlink child products rather than delete them, while deletion of a product automatically deletes all child objects.
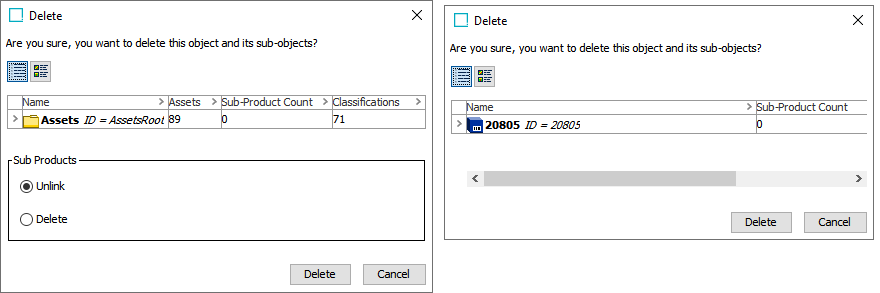
Clicking Delete attempts to delete the selected object (and delete or unlink child objects as appropriate). A confirmation window displays success or failure.
Note: To delete an object, a number of conditions must be met. For example, the object must not be referenced by any other object and must not be active in any workflow. If the deletion conditions are not met, the confirmation window displays the errors to be corrected prior to deletion of the object.
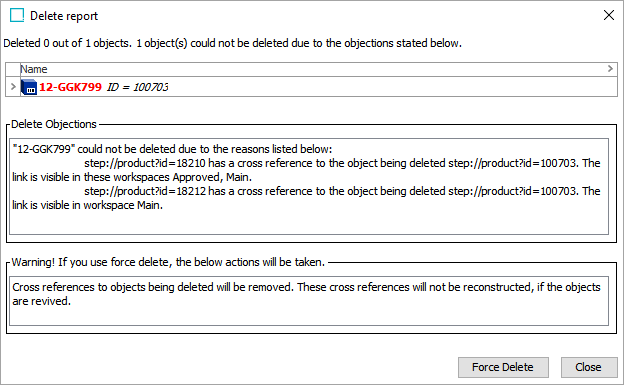
In some cases, a 'Force Delete' option is available, though it is recommended to correct the data whenever possible rather than forcing deletion.
Note: Approval may be required for the delete to take effect. For example, if an object has been referenced by another object and that reference has been approved, removing the reference must also be approved (by approving the change on the referencing object) to resolve the deletion objection.
Deleted objects are moved to the Recycle Bin for the Tree, where it can be revived if needed. To fully delete the object, the deletion must be approved and the object must be purged. Following a purge, the object cannot be revived.

For more information on the Tree recycle bin and the available actions, refer to the Recycle Bin for the Tree Tab topic here.
Important: Alternatively, an object can be deleted and purged in a single step using the 'Force Delete & Purge' option in the Maintain menu. Choosing this option bypasses the Recycle Bin and is equivalent to completing a deletion and purge all in one action. Do not use this option if deletion events are required for output to downstream systems since this option does NOT generate a DELETEAPPROVAL event.