After creating a publication object with at least one version, the next step in completing your publication is to create at least one section. Sections are required for storing mounted (actual) InDesign pages in STEP as well as creating Flatplanner planned pages (spreads).
Steps to Create a Section
- In the Tree, open the top-level node of the publication hierarchy, then navigate to the publication object in which you would like to create your section.
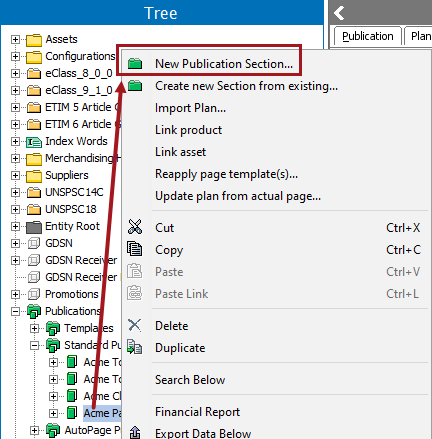
- Right-click this publication object and select New Publication Section.
- In the New Section dialog that displays, select the relevant section Object Type (only applicable if more than one section object type has been created in System Setup).
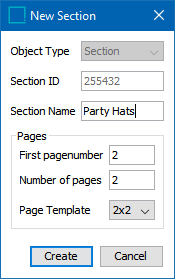
- In the ID field, type the ID of the section (if not generated automatically).
- In the Section Name field, type a name for your section. If no name is provided, STEP will automatically name the section with the STEP ID of the section surrounded by parentheses, e.g., (123005).
- If your system does not contain the Print Flatplanner publishing component, no additional configuration steps are required. Click Create to create the section.
The DTP Documents node is automatically created along with sections. The DTP Documents node is used to store mounted (actual) InDesign pages in STEP.

Additional Steps for Flatplanner Publications
For systems that contain the Print Flatplanner publishing component, the fields within the Pages section of the New Section dialog must be populated before the section can be created.
- In the First pagenumber field, type the page number at which the planned pages in the section should begin. (For new sections, the default page number is 1. For subsequent sections in the same publication, the page number will pick up after the last page number in the previous section.)
- In the Number of pages field, type desired number of planned pages that should be created along with the section.
- In the Page Template dropdown, choose the page template that should be used for the planned pages in the section. To create a section without any planned pages, enter '0' for Number of pages. (Note that planned pages cannot be named at the time sections are created. If names are required, they must be added after the planned pages have been created.)

Note: It is also possible to add sections to a Flatplanner publication using the Publication Planner. For more information about the Publication Planner, refer to Inserting Sections in the Publication Planner in the Print Flatplanner documentation
Create a New Section From Existing
Creating a new section from an existing section is a useful feature that can help reduce time spent on manual tasks such as:
- Reassigning of product templates on Flatplanner pages
- Remounting of attribute values on pages
- Re-saving of InDesign pages into STEP
Steps to Create a New Section From Existing
- In the Tree, navigate to the publication or section where you would like to create the new section.
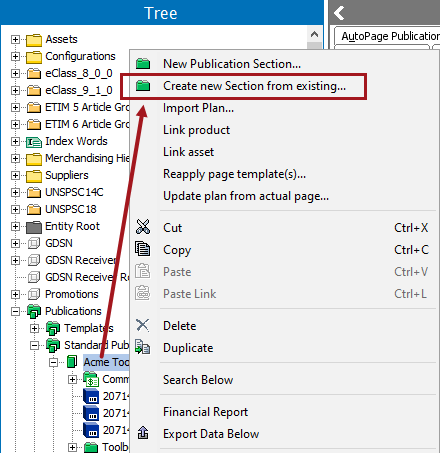
- Right-click and select Create new Section from existing….
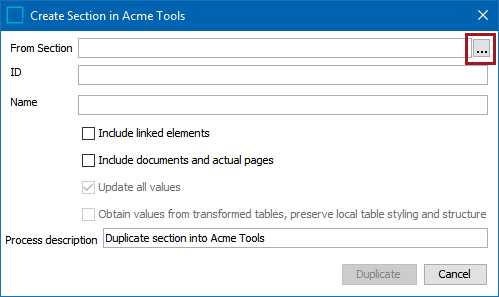
- In the Create Section dialog that displays, click the ellipsis button (
 ) by the From Section field, or, type the name or ID of the section into this field.
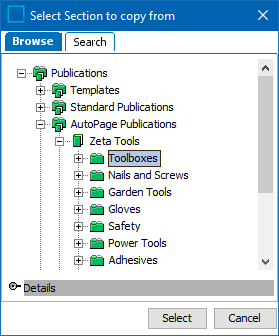
- In the Select Section to copy from dialog, browse to or search for the relevant section, then click Select.
- Type an ID in the ID field if the STEP ID for your section object type has not been set to autogenerate with an ID Pattern in System Setup. (The following screenshot shows an ID that has been created automatically.)
- Type a name for the section in the Name field.
- Select Include linked elements to carry over the product and asset objects that are linked to the source section.
- To keep all mounted (actual) pages from the original section, select Include documents and actual pages. (For Flatplanner publications, a duplicated section will still contain all planned pages even if this checkbox is not selected.)
- If Include documents and actual pages is selected, the Update all values checkbox is activated and the Destination Version and Source Version options display.
- Under Source Version, choose the relevant publication version (from the source section) from the dropdown list(s). This will essentially 'map' the actual pages from the source section into the relevant destination version in the destination section.
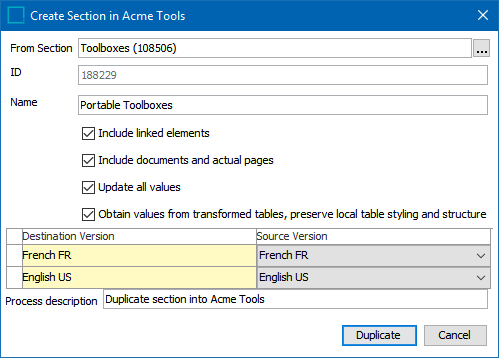
- Check Update all values if you would like the actual (mounted) pages in the new section to be updated with all changes made to attribute values in STEP since the time that the original pages were mounted.
Note: 'Update all values' will update all attributes from the original section. There is no way to choose a subset of attribute values to update when duplicating a section.
- The checkbox for Obtain values from transformed tables, preserve local table styling and structure is activated if Update all values is selected. Select Obtain values from transformed tables, preserve local table styling and structure if the following statements apply:
- Mounted tables exist on the actual pages of the original section
- Attribute values within these tables have changed in STEP since the original section was created
- You would like to update the values contained in the table cells but do not want to completely remount the tables
Updated table cell values will be populated as they exist in the resolved table in STEP, i.e., the way the table appears in STEP after all transformations have been applied.
Note: Any new transformations applied to tables since the original section was created will not be applied to the updated tables in the new publication.
If Obtain values from transformed tables, preserve local table styling and structure is not selected, all tables will be remounted in the new section. Remounting a table will update the tables with any changes made in STEP but will also cause the loss of any manual table formatting that was applied to the tables in the original section. Manual formatting includes changes such as the adjustment of column widths or addition of background shading to cells.
If the actual structure of a table itself has changed in STEP since the table was mounted in the original section, the table will be remounted in the new section regardless of whether Obtain values from transformed tables, preserve local table styling and structure is checked or not. A basic example of a structural change to a table is the addition or removal of a row or column.
Note: A configuration property can be set to allow values to update in tables—without remounting—even if structural changes are present. For more information, refer to the Preventing the Remount of Structurally Different Tables in Duplicated Publications section of the Duplicating a Publication topic
- In the Process description field, you may enter a name for the background process that will run when starting the duplication, though a name is not required.
- Click Duplicate. A 'Create Publication Section as copy of' background process starts and a Starting process dialog box appears.

- Click Go to process to monitor the background process or click Close to exit the dialog (the background process will still run).
- Once the background process has finished, the new section can be found as a child object inside the publication or section from which the duplication process was started.