The Multi-Reference Editor in Web UI has two actions unique to PLM:
- PLM Create References Action
- PLM Edit Reference Action
This topic will focus on configuring these actions within a pre-configured Multi-Reference editor.
Prerequisites
This topic assumes that the user has the necessary permissions to access the designer as well as familiarity with the Web UI designer. For more information on the designer, refer to the Design Access topic in the Web User Interfaces documentation here.
As mentioned, this topic will add actions to an existing Multi-Reference editor. For more information, refer to the Multi-Reference Editor topic in the Web User Interfaces documentation here.
This topic also assumes that the user has configured a Reference Metadata Flex Value Header component. Refer to the Reference Metadata Flex Value Header Component topic in this documentation here
Note: The maximum search results displayed for these actions can be adjusted via the case-sensitive 'DrillDownSearch.Maxresults' property in the sharedconfig.properties file. The default is 100 and consideration needs to be taken before changing the default since it will affect every dropdown in your system's Web UIs, not just for these actions. System performance may be impacted if adjusting the number higher than 100.
Configurations
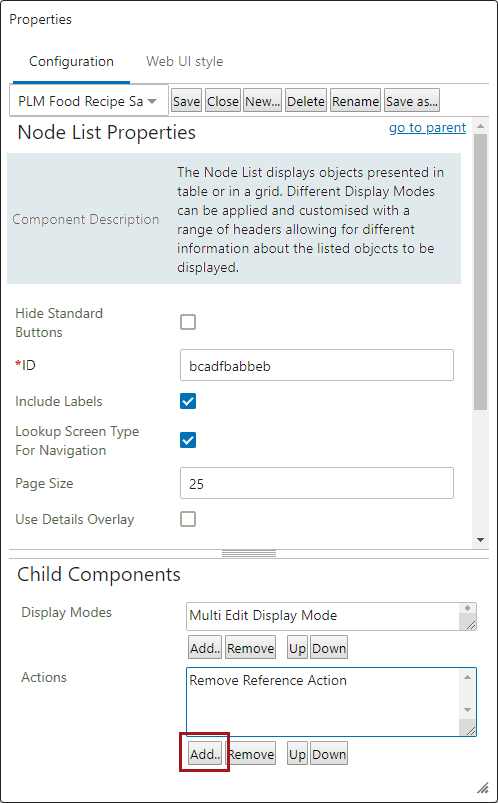
- In Web UI Designer, from a screen containing a Multi-Reference Editor, navigate to a node list screen > child components > Actions. Click Add.
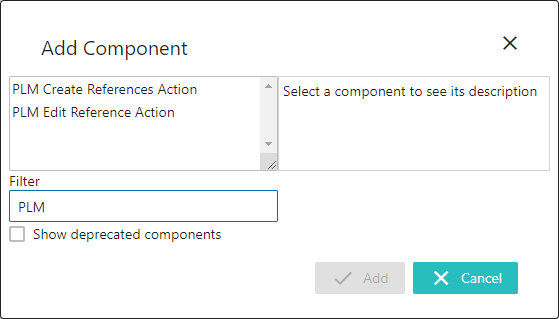
- From the 'Add Component' dialog, type 'PLM' into the Filter field below the Action box. Either select PLM Create References Action or PLM Edit Reference Action, and click Add to configure further. Refer to the below sections for details.
PLM Create References Action
The 'PLM Create References Action' allows users to configure a button that adds references to an object when used with the Multi-Reference Editor. This action can be configured to specify business rules for consistent creation, object nodes to restrict applicable references, and validation methods to ensure that the created reference is allowed.
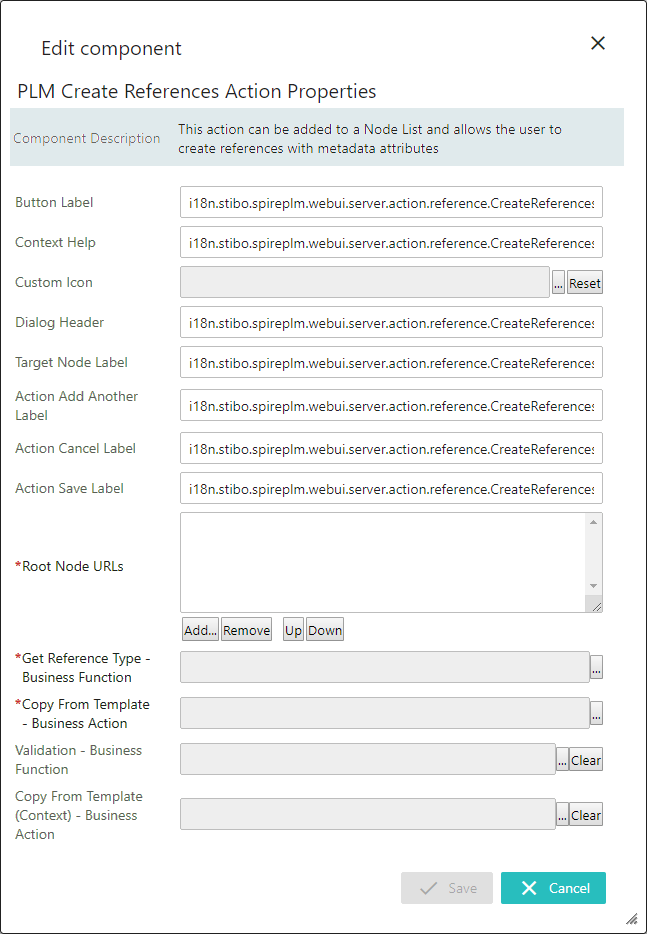
Note: While most fields are optional, the 'Root Node URLs' field, the 'Get Reference Type - Business Function' field, and the 'Copy from Template - Business Action' field are required.
- Fill out the necessary fields:
- Button Label: This field sets the displaying name for the action button. This field only works if the 'Include Label' parameter on the parent Node List is selected.
- Context Help: This field provides a description when the user hovers over the action button to assist users in the their tasks.
- Custom Icon: This allows users to select an icon to represent the action.
- Dialog Header: When the action is selected, this field will be populated as the title of the dialog that displays.
- Target Node Label: This field will is the one displayed as the title for the target node.
- Action Add Another Label: This field changes the label of the 'create another' button on the dialog that appears for this action. The default label is 'Add Another.'
- Action Cancel Label: This field changes the label of the cancel button on the dialog that appears for this action. The default label is 'Cancel.'
- Action Save Label: This field changes the label of the save button on the dialog that appears for this action. The default label is 'Save.'
- Root Node URLS: This field will establish from where the user may select the targets of the created references. This field is required.
- Get Reference Type - Business Function: This field sets which business function is used when getting the reference type ID. This is a required field.
- Copy From Template - Business Action: This field sets the business action that is used for copying the defaults to be displayed in the dialog box. This is a required field.
- Validation - Business Function: This field sets the business function that validates the data for the reference.
- Copy From Template (Context) - Business Action: This field sets the business action that is executed for copying default values from other contexts.
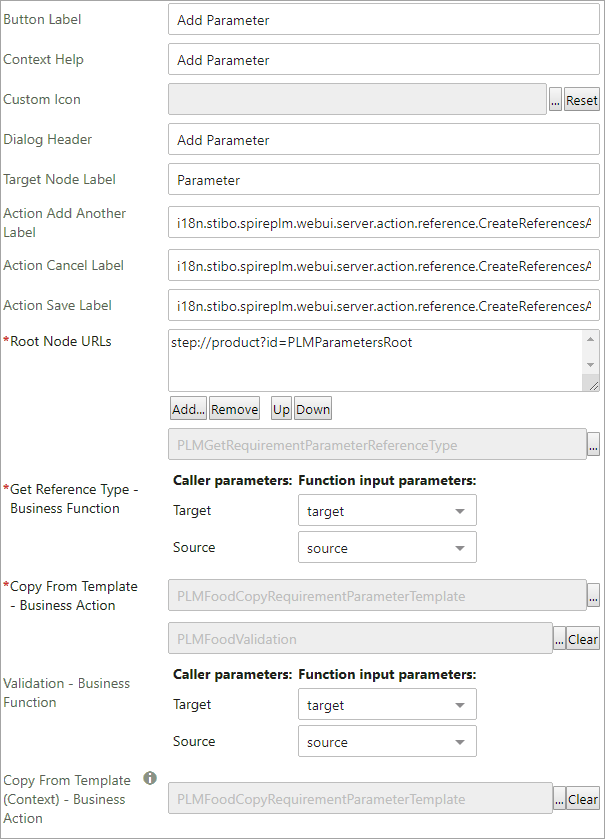
In this example, the action was titled as 'Add Parameter.' The completed configured Create Reference action looks like the following:
- Once created, under Child Components in the Rows Attributes field select 'Add.' The only option is 'PLMAttributeValue.'
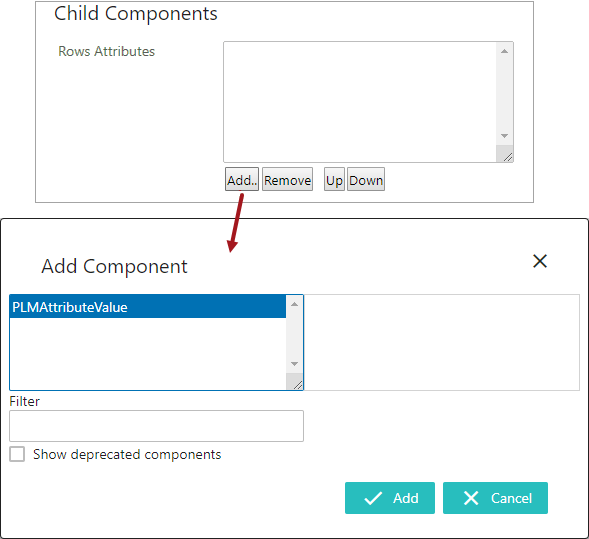
- Select 'Add,' and the PLMAttributeValue Properties dialog will display.
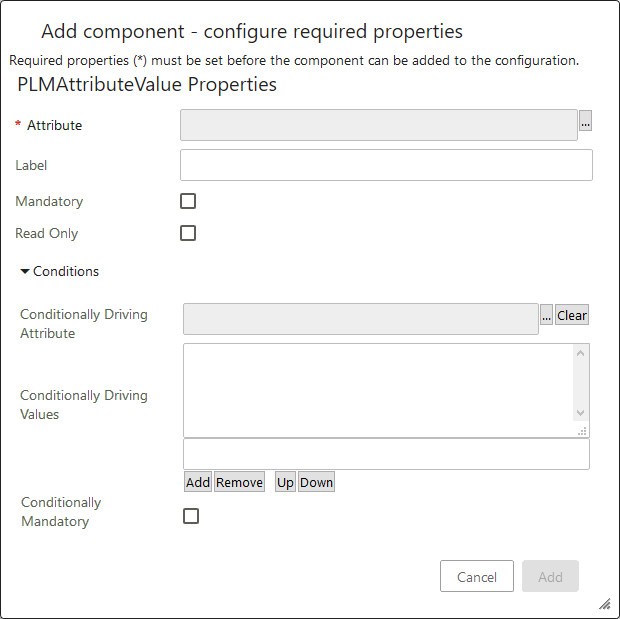
- Attribute: Select the desired attribute type to be answered.
- Label: Sets the display name for the attribute.
- Mandatory: If selected, this make the field required to fill out before a user can submit their answers.
- Read Only: If selected, this means that the field cannot be edited.
- Conditionally Driving Attribute: If an attribute is selected for this field it will only display if the attribute that was selected for the Attribute field is answered in a certain way that is determined by the Conditional Attribute Value field.
- Conditionally Driving Values:The values of the Conditionally Driving Attribute that trigger the current attribute to be displayed.
- Conditionally Mandatory: If checked, if the attribute that was selected for the Attribute field is answered in a certain way that is determined by the Conditional Attribute Value field, then the attribute set for the Conditional Attribute field will display and must hold a value before the dialog can be submitted.
Once configured as needed, the button will be ready for adding new references. For more on how to use the PLM Create References Action, refer to the Multi-Reference Editor Actions in Web UI topic in this documentation here.
For more information on how to use the Conditional settings, refer to the Setting Conditional Settings in a MRE topic in this documentation here.
PLM Edit Reference Action
The 'PLM Edit Reference Action' allows users to configure metadata to append to the dialog menu, limiting what values on an object's references may be modified.
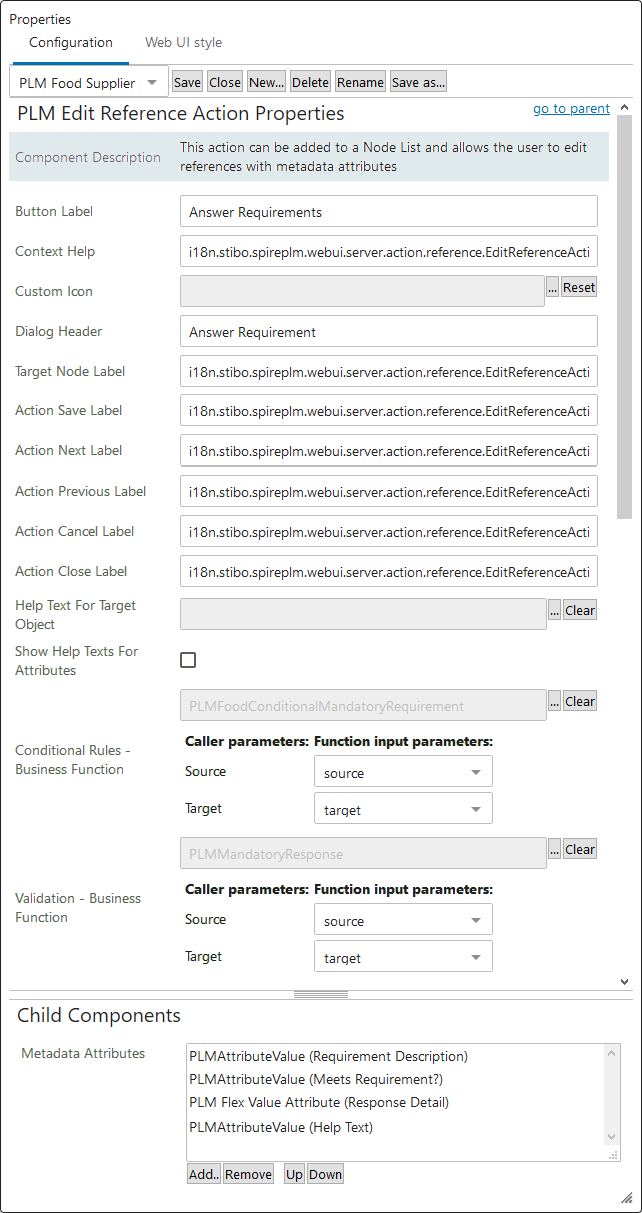
- Fill out the necessary fields:
- Button Label: This field sets the displaying name of the action button. This field only works if the 'Include Label' parameter on the parent Node List is selected.
- Context Help: This field will provide a description when the user hovers over the action button to assist users in the their tasks.
- Custom Icon: This allows users to select an icon to represent the action.
- Dialog Header: When the action is selected, this field will be populated as the title of the dialog that displays.
- Target Node Label: This field is the one displayed as the title for the target node.
- Action Save Label: This field changes the label of the save button on the dialog that appears for this action. The default label is 'Save.'
- Action Next Label: This field changes the label of the next button on the dialog that appears for this action. The default label is 'Next.'
- Action Previous Label: This field changes the label of the previous button on the dialog that appears for this action. The default label is 'Previous.'
- Action Cancel Label: This field changes the label of the cancel button on the dialog that appears for this action. The default label is 'Cancel.'
- Action Close Label: This field is for the label on the close action button. It is shown when the last reference is edited.
- Help Text for Target Object: This field selects the attribute that holds the help text value of the target object.
- Show Help Texts for Attributes: If this option is selected, then the help text metadata of the selected attributes will be included.
- Conditional Rules- Business Function: The business function that provides the conditionally mandatory rules. If a business function is configured, any values configurations configured on any of the Child Components in the Metadata Attributes section are ignored, including any parameters set for mandatory or read only.
- Validation - Business Function: This field sets the business function that validates the data for the reference.
- Metadata Attributes: This child component allows for multiple metadata attributes to be added to the edit reference dialog.
- Once created, under Child Components in the Metadata Attributes field, select 'Add.' The options to choose from are 'PLMAttributeValue' or 'PLM Flex Value Attribute.'

- For the PLM Flex Value Attribute, the following fields can be configured:
Note: When adding a PLM Flex Value Attribute you are adding a defining attribute. A defining attribute is an LOV that contains a list of other attribute IDs that are used to control the format of data in a column in a Multi-Reference Editor. Users can choose one of the LOV values to define how the attribute's format should be controlled for the supplier' response.
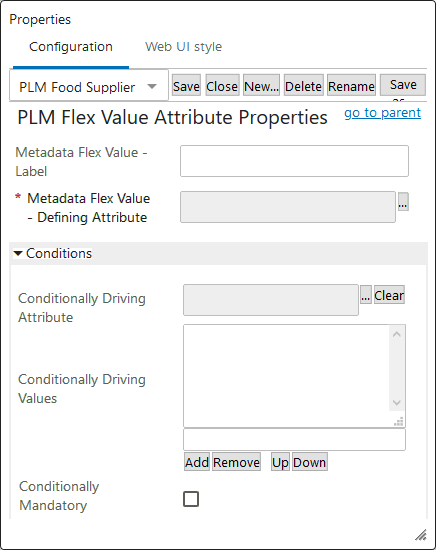
- Metadata Flex Value - Label: Sets the display name for the defining attribute.
- Metadata Flex Value - Defining Attribute: Select the desired defining attribute to be answered.
- Conditionally Driving Attribute: If an attribute is selected for this field it will only display if the attribute that was selected for the Attribute field is answered in a certain way determined by the Conditional Attribute Value field.
- Conditionally Driving Values:The values of the Conditionally Driving Attribute that trigger the current attribute to be displayed.
- Conditionally Mandatory: If checked, if the attribute that was selected for the Attribute field is answered in a certain way determined by the Conditional Attribute Value field, then the attribute set for the Conditional Attribute field will display and must hold a value before the dialog can be submitted.
For the PLM Flex Value Attribute, the following fields can be configured:

- Attribute: Select the desired attribute type to be answered.
- Label: Sets the display name for the attribute.
- Mandatory: If selected, this make the field required to fill out before a user can submit their answers.
- Read Only: If selected, this means that the field cannot be edited.
- Conditionally Driving Attribute: If an attribute is selected for this field it will only display if the attribute that was selected for the Attribute field is answered in a certain way which is determined by the Conditional Attribute Value field.
- Conditionally Driving Values:The values of the Conditionally Driving Attribute that trigger the current attribute to be displayed.
- Conditionally Mandatory: If checked, and the attribute that was selected for the Attribute field is answered in a certain way, which is determined by the Conditional Attribute Value field, then the attribute set for the Conditional Attribute field will display and must hold a value before the dialog can be submitted.
For more on how to use the PLM Edit References Action, refer to the Multi-Reference Editor Actions in Web UI topic in this documentation here.
For more information on how to use the Conditional settings, refer to the Setting Conditional Settings in an MRE topic in this documentation here.
For more on how to use the PLM Create References Action or PLM Edit Reference Action buttons, refer to the Multi-Reference Editor Actions in Web UI topic in this documentation here.