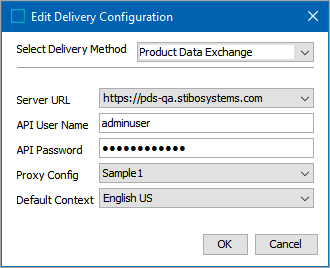
The Product Data Exchange delivery method is only available in OIEPs. STEP sends data to the Product Data Exchange (PDX) platform via the default PDX Outbound Integration Endpoint and the API.
For additional information on PDX, refer to the Product Data Exchange topic within the Data Integration documentation (here), or contact your Stibo Systems representative.
Prerequisites
Changes to the properties file, outlined below, are implemented when the server is restarted.
- Provide a selection for the Server URL parameter (image shown in the Configuration section) via the sharedconfig.properties file on the STEP application server using the case-sensitive PDS.Url property.
PDS.Url=1=https://api.pds.stibosystems.com
- Determine the API user name and password. This will be required on the Edit Delivery Configuration dialog.
- If required, provide a selection for the Proxy Config parameter. The configurations that appear in this dropdown are populated from properties added into the sharedconfig.properties file using the dynamic property 'Http.ProxyConfiguration.[name],' which has its own property for Host, Port, User, and Password.
- Perform additional configuration required in the OIEP as described in the PDX Outbound Integration Endpoint Configuration topic here.
Configuration
For information on a parameter, hover over the parameter field to display help text.
- On the Configuration tab of the OIEP, in the Delivery Method flipper, click the Edit Delivery link to display the 'Edit Delivery Configuration' dialog.
- For the Select Delivery Method parameter, choose Product Data Exchange.

- Server URL - Select the URL from the dropdown, if not preselected.
- API User Name - Provide the user name for the user that has access to the API.
- API Password - Provide the password for the user that has access to the API.
- Proxy Config - Select the desired HTTP proxy configuration if the delivery connection must first pass through a proxy server with its own login requirement.
- Default Context - Select the context from the dropdown menu that will serve as the default context.
- Click the OK button to save the delivery method.
Note: For more information regarding HTTP proxy configurations, refer to the topic HTTP Proxy Configurations in the Data Exchange documentation here.