Translations based on saved translations configurations can be scheduled to be executed at a later time, either as a recurring export, or as a one-time export. There are several different scheduling options available in the Schedule Data Translation wizard, providing users with maximum flexibility when managing translation exports.
Before a translation configuration export can be scheduled, it must be created. For information on creating a translation configuration, refer to the Starting a Structured Translation topic.
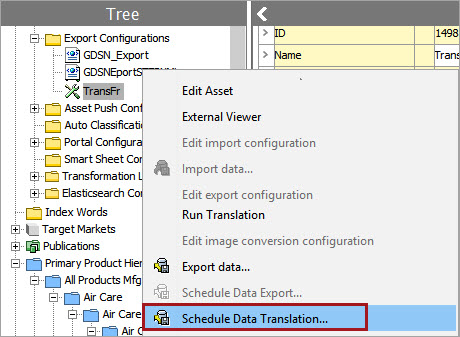
To schedule a data translation:
- Right-click the desired translation configuration and select 'Schedule Data Translation...' OR select 'File' > 'Translate' > 'Schedule Data Translation...' from the workbench menu.
![]()
The Schedule Data Translation wizard opens.
![]()
The Configuration parameter text field will populate with the name of the selected translation configuration (in this example, 'TransFr').
- To select a different translation configuration, click the ellipsis button (
 ) and select the desired translation configuration. Otherwise, click 'Next.'
The Schedule Process dialog opens.
![]()
- Select one of the options available for scheduling the data translation export. Information regarding each option is explained in detail below.
Important: Consider the time zone of the application server compared to that of the workbench (the client) where the schedule is created or viewed. When scheduling a job, the local time zone is displayed in the workbench, but the time zone of the server is used to run the background process. Although displayed, the time zone of the client is not included in the instruction to the server to run the job. This can cause confusion about when the job will run since the scheduled time is not automatically converted to accommodate potential differences in time zones.
Now - Will initiate the translation process when the user clicks 'Finish.'
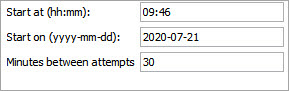
Later - Brings up two additional fields, Start at (hh:mm) and Start on (yyyy-mm-dd). The user sets the time and date and STEP completes the translation export at the configured time. An example of these fields configured is shown in the screenshot below:
![]()
Weekly - Allows the user to create a recurring export to execute once or multiple times a week. The user sets the time and date to start the recurring weekly export, the date at which the recurring weekly export will end, and then the day (or days) of the week the export should run until the configured interval has elapsed. One or all days of the week can be selected. An example of these fields configured for recurring weekly export is shown in the screenshot below:
![]()
Monthly - Allows users to set a recurring translation export once a month. The user sets the time and date to start the recurring monthly export, the date at which the recurring monthly export will end, and then which non specific day (or days) in the month the export should run until the configured interval has elapsed. For example, the monthly export can be scheduled for the first Monday of every month. An example of these fields configured for a recurring monthly export is shown in the screenshot below:
![]()
Later and repeat - Allows users to create a recurring export that can be run multiple times a day. In addition to the time and date fields, the user can set the number of minutes between auto-exports. An example of these fields configured for recurring export is shown in the screenshot below:
Note: Use the Later and repeat scheduler with caution as it is possible to set up a recurring export as often as every few minutes. If the intended interval is improperly set, the STEP system can experience negative performance issues. For instance, if the Delivery Method of the export is set to ship to an FTP for a translation vendor to retrieve, and the vendor's tasked with processing all files they retrieve, the user could incur unexpected translation costs.
- Once an option is selected, click 'Next.'
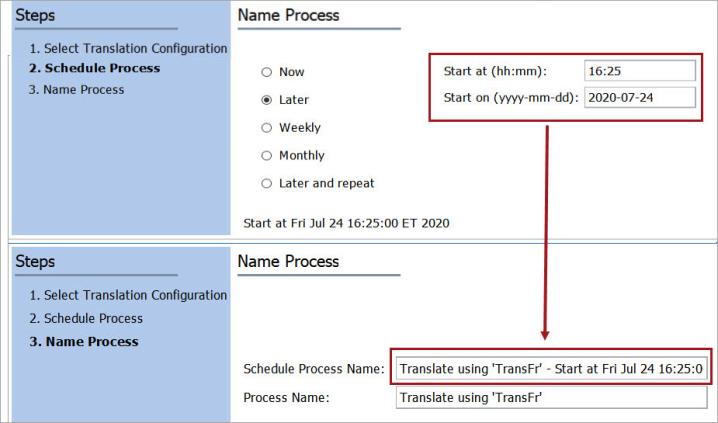
The Name Process dialog opens.
Important: The image below displays how the Name Process dialog would appear if the user selected 'Now' as a scheduling option. Selecting any other available option will result in an additional parameter within the dialog, as described in detail later in this topic.
![]()
- In the 'Process Name' field, input a name for the scheduled translation export process. By default, if no name is provided, the name of the process will be the name of the configuration selected for translation (i.e., 'TransFr').
If the user selects a scheduling option besides 'Now' in the Schedule Process dialog, the Name Process dialog will contain an additional parameter titled 'Schedule Process Name.'
The 'Schedule Process Name' parameter will contain the information provided by the user in the Schedule Process dialog. In the example below, the user selected 'Later' and provided specific details regarding the 'Start at' time and 'Start on' date in the Schedule Process dialog. These details are displayed in the Name Process dialog, which are also displayed in the image below. Similar to the 'Process Name' parameter, The 'Schedule Process Name' parameter can also be edited.
- Click 'Finish' to close the Schedule Data Translation wizard.
Reviewing Product Translation Status
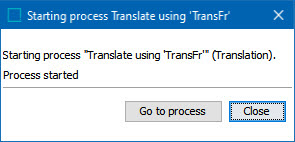
When a structured translation export process has been initiated, a few final steps must be taken in that export's background process. If 'Now' is selected as a scheduling option in the Schedule Process dialog, a small window will display showing two options; 'Go to Process' and 'Close.'
On the BG Processes tab, the Properties section includes the 'Started by' parameter which reflects the user who created the scheduled background process. To change the user for a scheduled or queued BGP, add the 'Manage Background Process Execution' Setup Action privilege to the relevant user group. This privilege enables a selector button on the 'Started by' parameter.
To review product translation status:
- Click 'Go to process' to go directly to the export's background process.
Note: To access the background process directly at a later date, in the workbench, click the 'BG Processes' tab, expand 'Translation,' and then expand 'Active Processes.' Click on the relevant process and view the Result section.
- The translation produces an Excel file listing all of the objects that are included in the export. These listed objects are the same objects that displayed on the Feedback screen. To view the spreadsheet, click the disk icon and follow the prompts.
Note: If more than one target language is selected, a background process will be created for each target language, each process creating its own file.

- A prompt below the report file asks, "Do you want to export these products for translation?" Click 'Yes' to proceed with the export. Click 'No' to abort the export. If the user has checked the box for Skip Verification on the Delivery screen, then the export proceeds directly to generating an export file, and there is no question for the user to answer.
- To export the products for translation, click 'Yes.' A zip file is created that contains the data to be translated.
If you click 'No,' the translation export is ended, and the translation status of the selected objects is not changed.
- Click the 'Save' icon to save the zipped translation file.
