The Create Table wizard enables you to build a basic table through a two-step process that involves selecting the products, then selecting the attributes that should appear in the table. This wizard enables the creation of two basic types of tables—horizontal and vertical.
Most tables that are built with the Create Table wizard will need additional configurations once created, such as the addition of plain text or images, dynamic content definitions, and transformations. However, using this wizard gets the basic structure and content of the table in place. For information on how to add these more advanced features, refer to the Content Definitions section of this guide
Prerequisites
This topic assumes the following:
- A table type has already been created and linked to the product, classification, or product-override where you will be building the table
- The table type has at least one legal column type and one legal row type
- You have determined the location in the product hierarchy where the table will be built. The creation point is important because tables are inherited downwards in the hierarchy, unless overridden by a local variation of the table. For more information on table inheritance, refer to the Table Inheritance topic in this guide here.
Create a Basic Table
- In the Tree, select the product, classification, or product-override object on which the table will be built.
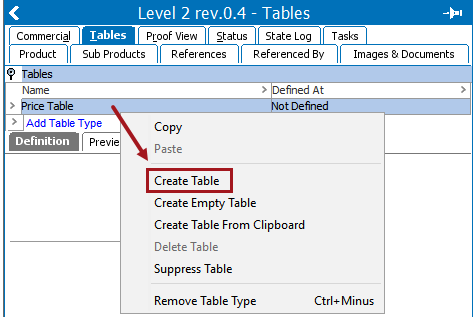
- Go to the Tables tab, then select the relevant 'Not Defined' table type.
- Right-click the table type and choose Create Table to display the Create Table wizard.
- In the Select Products step of the Create Table wizard, browse to or search for the product(s) that should be included in the table. Products can be multi-selected by holding the Shift or Ctrl key while making selections. It is possible to select products that are located at different levels in the hierarchy than where you are creating the table.
Note: A common setup for tables is to place a product, product-override, or classification object with children (e.g., a product family) into a single row, then apply a content definition to the row that will dynamically display the child objects in additional rows of the table. Refer to the Product Content Definitions topic here for more information.
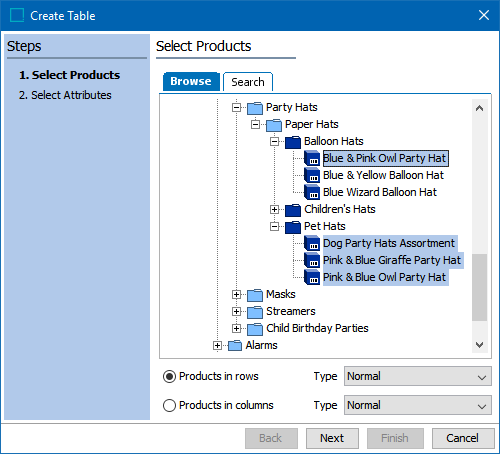
- Next, specify whether the table should be horizontal or vertical by choosing whether products appear in rows or columns.
- Select Products in rows to create a standard horizontal table where the information that relates to specific products is placed across the table, in rows. In the Type dropdown list, choose the row type to use for the product rows. The available row types are those that are legal for the table type.
- Select Products in columns to create a vertical table where the information that relates to specific products is placed from top to bottom in the table, in columns. In the Type dropdown list, choose the column type to use for the product columns. The available column types are those that are legal for the table type.
- After making the preferred selections, click 'Next' to proceed to the Select Attributes step.
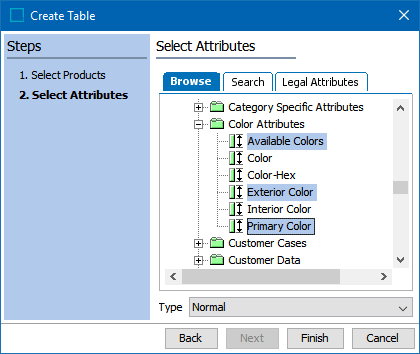
- On the Select Attributes screen, three options are available to choose the attributes for the table. You can browse to or search for attributes in the attributes hierarchy, or you can choose Legal Attributes to limit the list to the specification attributes that are valid for the products you selected in the previous step. In any of these methods, multiple attributes can be selected. The below screenshot shows how the attributes tree displays on the Browse tab.
Note: Only individual attributes can be chosen in this step; entire attribute groups cannot. Even though the system will let you choose attribute groups if you have already selected at least one individual attribute, only the individual attributes will display in the finished table.
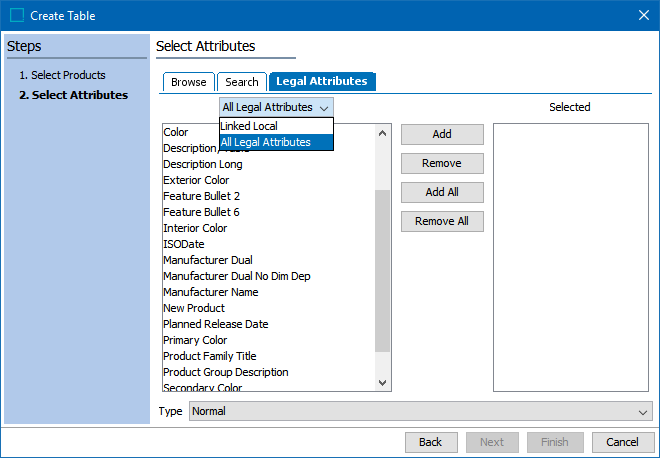
- When Legal Attributes is selected, two options are available from the dropdown:
- Choose Linked Local to view all attributes that are linked locally to the selected products. In this option, attributes inherited from a higher level are not displayed. For more information on locally linked attributes, refer to the Attribute Links section of the System Setup documentation here.
- Choose All Legal Attributes to view all specification attributes that are valid for the selected product(s). This includes both inherited attributes and attributes that are linked locally. For more information on attribute validity, refer to the Validity on Specification Attributes section of the System Setup documentation here.
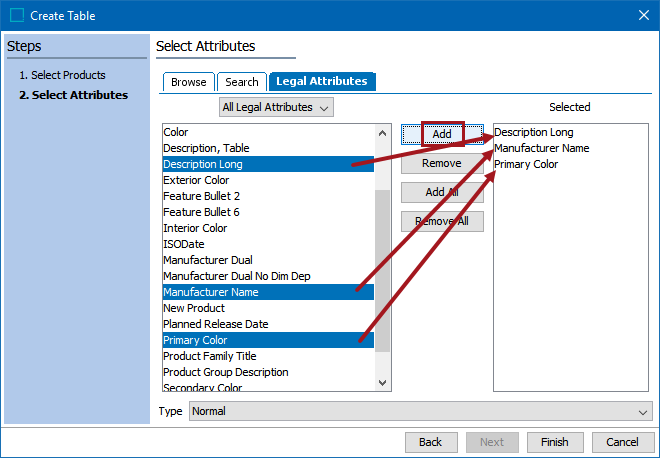
- For the Linked Local and All Legal Attributes options, select the desired attributes in the left window of the dialog and choose Add to add them to the Selected window. Attributes may be multi-selected by holding the Ctrl or Shift key while making selections. To add all of the attributes to Selected, click Add All. To remove a selection of attributes from Selected, choose the relevant attributes, then click Remove. To remove all attributes from Selected, click Remove All.
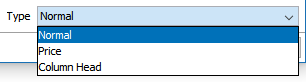
- In the Type dropdown, select the column or row type that you want to use for the attributes. The available options will be based on whether you selected 'Products in rows' or 'Products in columns' in the 'Select Products' step of the wizard. If you chose 'Products in rows,' then the dropdown list will contain column types. If you chose 'Products in columns,' the dropdown will contain row types.
- After selecting the relevant attributes, click Finish.
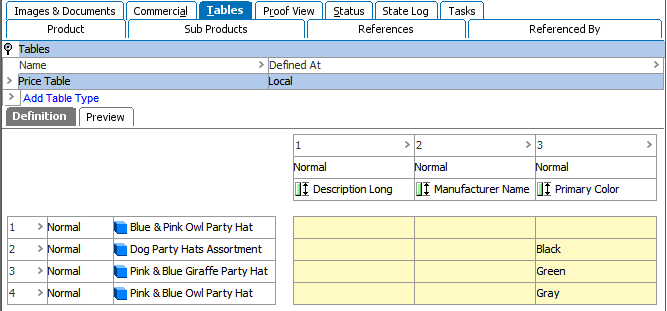
- A table is created with the selected products and attributes.