Planning for maintenance and cleanup of revisions is a critical step for all implementations and is best to be carried out early on in the setup of any system.
Any revision can be permanently removed from STEP using a purge option. Once a revision is purged it cannot be recovered. The following methods are available for purging revisions and are defined below:
- Automatic purging of revisions
- Manually purging multiple revisions
- Manually purging a single revision
A revision cannot be purged if it is the latest revision or if it is being used by STEP, for example, in an event processor or OIEP.
Automatic Purging of Revisions
The Revision Management event processor can be used to aid in cleanup and it is recommended that this be set up on all systems. For more information on this event processor, refer to the Revision Management Processing Plugin Parameters and Triggers topic in the System Setup documentation
Manually Purging Multiple Revisions
This manual revision cleanup option is recommended for ad hoc cleanup only. Additional automatic revision cleanup processes should also be in place.
- On the File menu, select Purge old revisions to display the Purge dialog.
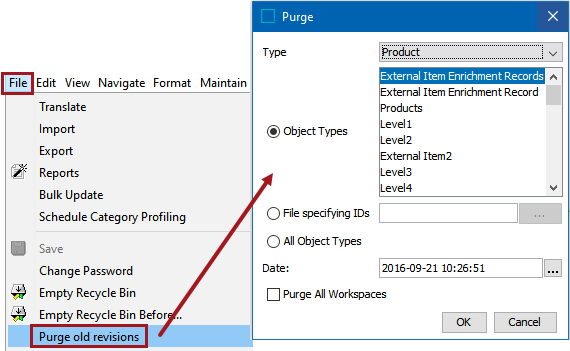
- For the Type parameter, select the single type of object for which revisions should be purged. Selecting any type filters the subsequent Object Types selection accordingly.
The available selections are Product, Classification, Asset, DTP Documents, and System Configuration.
- Select one of the following options to specify the revisions to be purged:
- Object Types: Select this radio button and select one or more object types in the list to have revisions purged for all objects of the selected type(s). Multiple object types can be selected using Ctrl + Click. The available selections are filtered using the Type dropdown above.
- File specifying IDs: Select this radio button to load a .txt file (with one ID per row) of the objects that should have revisions purged. Revision purging will be carried out only for those objects where a matching STEP ID can be found.
Take care using this option as STEP IDs are only unique within each object super type (e.g., Products, Classifications, etc.). For example, if an asset and a product can have the same STEP ID, but if the 'Product' object type is selected from the Type dropdown, then only the product would have its revisions purged. However, because both the asset and the product share the same ID, the user needs to pay attention to the 'Type' selected, or the wrong revisions could be accidentally purged.
- All Object Types: Select this radio button to have revisions purged across all objects in STEP within the 'Type' chosen from the dropdown menu.
- For the Date parameter, after selecting one of the three radio button options, specify up to what date / time the revisions should be purged. If no revision meets the date exactly, it will keep the most recent revision. For example, if the user selects today, but the last revision was yesterday. The system would keep yesterday's revision because it is most recent.
- For the Purge All Workspaces parameter, if checked, revisions made in all workspaces are purged, for example in the Approved and Main workspaces. If unchecked, revisions are only deleted from the current workspace. For more on workspaces, refer to the Workspaces topic in the System Setup documentation here.
- Click OK to perform the purge as configured, or click Cancel to close the dialog.
Manually Purging a Single Revision
This manual revision cleanup option allows a single revision to be purged. Additional automatic revision cleanup processes should also be in place.
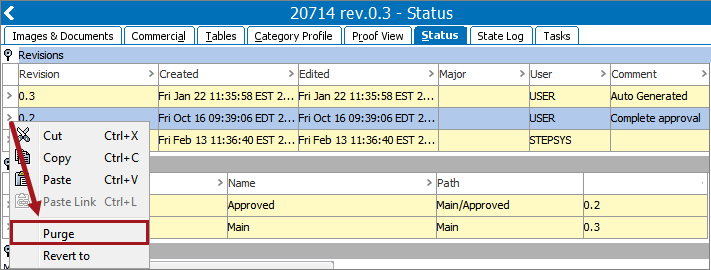
- Open the Status tab of the object.
- Click the arrow on the revision to be removed.
- From the menu, select Purge. The selected row is removed from the system.