The Execute Business Action processing plugin allows for an event processor to be configured with a predefined custom business action. The custom business action determines when and how to act upon the events from the event processor. This is useful when changes occur on objects and custom actions need to occur.
For example, when changes to relationships between objects occur, an email may be sent to a specific user or attribute values may be recalculated. Another example is when an email object is changed, the email object can then be sent to an external service for validation. By design, business actions are highly customizable.
The Parameters and Event Triggers sections below contain important information on settings that should be considered when creating an event processor using this processing plugin.
Prerequisites
This section of documentation describes configuration steps for this specific processor, but that is only one part of configuring an event processor. For the full set of instructions on configuring an event processor, refer to the Event Processors topic.
Before configuration of an event processor using the execute business action processor can occur, a business action must be created. For more information, refer to the Business Actions topic within the Business Rules documentation.
Parameters
Each of the relevant parameters for the Event Processor Wizard 'Configure Processing Plugin' step are described below. Any additional wizard parameters with importance for this plugin are also included in this topic.
To access the 'Configure Processing Plugin' parameters as shown below, the Execute Business Action processing plugin must be selected within the Select Processor parameter during the wizard step 'Configure Event Processor.'
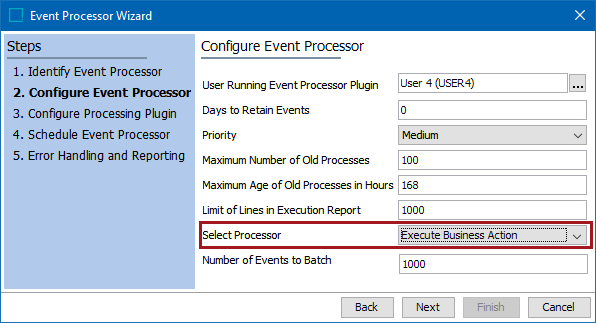
Once the Execute Business Action processing plugin has been selected, click the Next button, and the wizard step 'Configure Processing Plugin' will display.
-
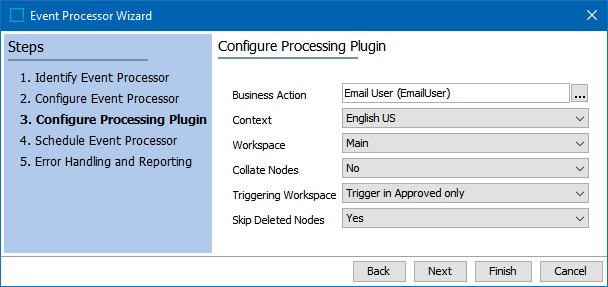
Business Action: Click the selector button (
 ) to display the Select Action dialog and select the necessary business action.
 -
Context: Select a context from the dropdown. This will determine the context in which the business action will run.
-
Workspace: Select a workspace from the dropdown. This will determine the workspace in which the business action will run.
-
Collate Nodes: When set to 'No', the business action is executed for each node in the batch, in order of appearance, even if the node occurs more than once. When set to 'Yes', the business action is executed only once for each node in the batch.
-
Triggering Workspace: Determine the appropriate triggering workspace based on your business action use case:
Important: The Business Action always reads from the configured Context / Workspace independently of how the events are triggered.
Triggering on changes in the Main workspace can lead to poor performance, particularly if you are triggering on a lot of attributes or have a high volume of data changes. Since the benefits of triggering from 'Main' can outweigh the performance risk, thoroughly test in lower environments before running in production. Alternatively, derived events can be used to trigger events prior to approval, as defined in the Derived Events topic of the System Setup documentation.
-
The 'Trigger in Main only' creates an event when a change is made in the maintenance workspace, prior to approval.
-
The 'Trigger in Approved only' creates an event when an action updates the Approved workspace.
-
The 'Trigger in both Main and Approved' option (individually defined above).
Note: To activate a change to the Triggering Workspace parameter, you must invoke the event processor with at least one event on the queue.
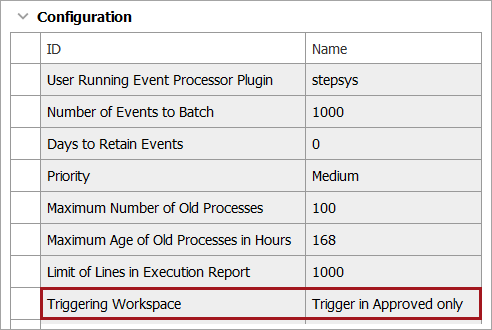
The selection made in the wizard is displayed in the Event Processor Configuration tab.
-
-
Skip Deleted Nodes: 'Yes' is the recommended setting, which means that deleted objects do not cause the EP to stop or fail.
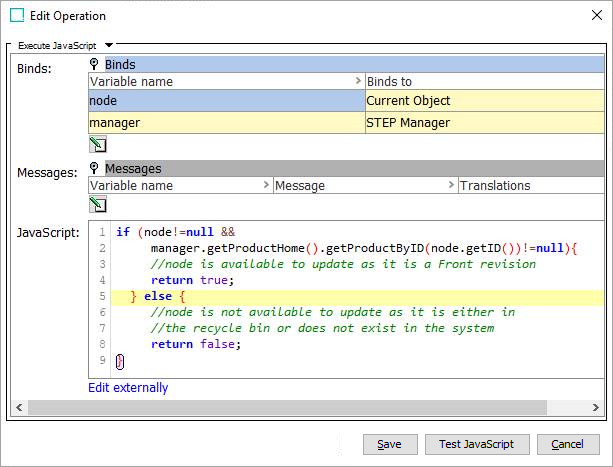
When set to 'No', either the EP fails when attempting to process events for deleted objects or the deleted object handling is addressed via JavaScript. When Skip Deleted Nodes is disabled, and the selected business rule commits changes to nodes, use JavaScript to determine if the node exists with the following considerations:
-
Knowledge of the revisability of the node will dictate if node!=null is necessary for globally revisable objects.
-
Knowledge of the node type is required to use the correct Home. For a product node type (shown below with 'manager' bind to STEP Manager), use manager.getProductHome().getProductByID(node.getID()). For a classification node type, use manager.getClassificationHome().getClasificationByID(node.getID()).
-
If the node exists, add relevant JavaScript to perform actions required on nodes that can be edited.
-
If null is returned, consider removing references on related nodes that point to the node in the recycle bin and /or other data cleanup related to a node that is no longer editable.
-
Once any required configurations are made, click the Next button to display the wizard step 'Schedule Event Processor.'
Refer to the EP - Schedule Event Processor topic of the 'Event Processors' section of the System Setup documentation.
Event Triggers
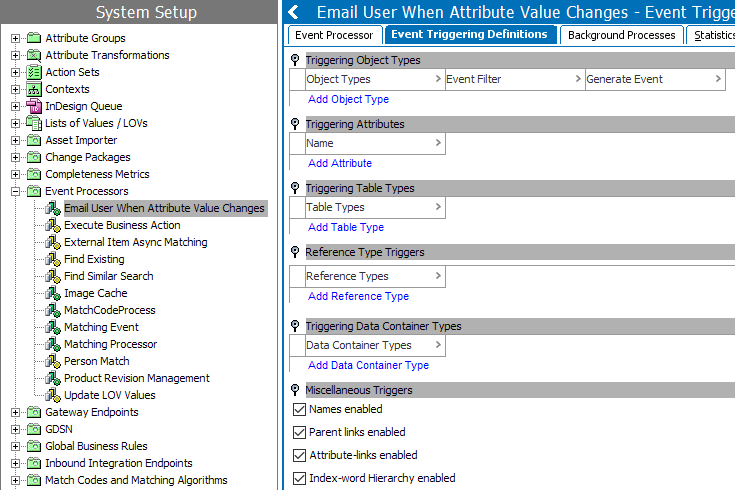
For the event processor to execute the business action, the Event Triggering Definitions tab must be correctly configured.
Select an event processor configured to use the Execute Business Action processor and click on the Event Triggering Definitions tab. Use the various triggering flippers to configure the event processor to listen for changes on anything that should cause the event processor to execute. At a minimum, an object type must be selected.
Triggering Workspace Flipper
This flipper is displayed in rare cases, specifically, only if either the 'Main' or the 'Main and Approved' option was previously selected in a release where the option was available.

Although changing the selection to the default 'Approved' radio button removes the flipper from the event processor, the setting can be observed from the Event Processor Wizard on the Configure Processing Plugin step, as defined, and further explained in the Parameters section above.
Considerations
-
Upon creation, the parameters within the Miscellaneous Triggers flipper are enabled.
-
When a configured trigger causes an event to reach the event processor queue, the business action will execute.
-
When an event batch is successfully processed, no message is written into the execution report of the corresponding background process (BGP).
-
When JavaScript is used to write the business action, the originating object of the event will be available via the 'Current Object' bind.
-
If the event processor encounters a problem processing a batch, the event processor will retry the business actions on each event in the batch until all events have been processed or the failing event is identified, in which case the event processor will enter the failed state and stop processing new events.
-
There is no guarantee that actions will not run multiple times, even when batch size is equal to one. However, the likelihood is reduced by having a batch size of one, but performance can then be affected.
Important: By default, events are discarded. For more information about the optional configuration to enable the Queue Status, refer to the 'Queue Status' section of the EP - Event Processor Tab topic.