The Stibo Systems Enterprise Platform (STEP) Reporter is a general reporting utility. A number of standard reports are available and are listed in the Available Reports topic. All reports are launched and managed from the workbench; refer the STEP Workbench UI topic for a general introduction to the workbench user interface.
The information in this topic covers how to access and use the Reports wizard.
Important: Because reporting relies on a SQL API for the database, the Reports option is only available for those systems using an Oracle database and not those running on the Cassandra database. Additionally, for those systems running on an Oracle database, the Reports option does not work with encrypted databases.
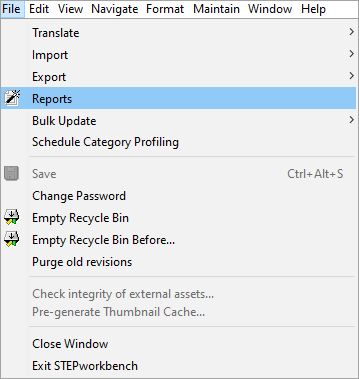
Reports Command
The Reports command is reached from the File menu.
Reports Wizard
When clicking Reports from the File menu, a Reports Wizard is launched. This wizard will guide the user through the steps required for producing a report.
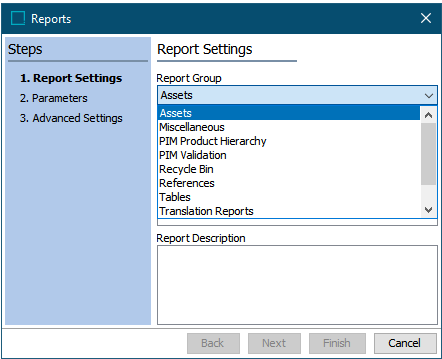
Report Settings
- Report Group: The standard reports are divided into seven report groups. From the Report Group list, a group of reports can be selected. For example, select the group 'Assets'.
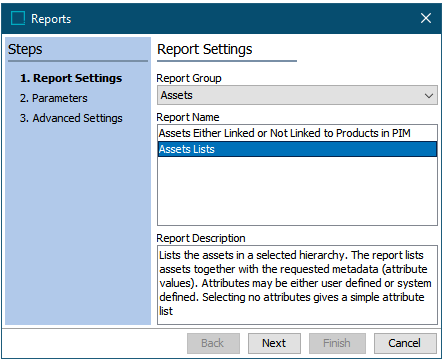
- Report Name: In the Report Name list, the reports belonging to a selected group are listed. For example, select the report 'Assets Lists'.
- Report Description: In this field a description of a selected report can be read. For example, the report 'Assets Lists' lists thumbnails of images with the selected attributes (metadata).
Parameters
The example in the following image is from the report 'Assets List'.
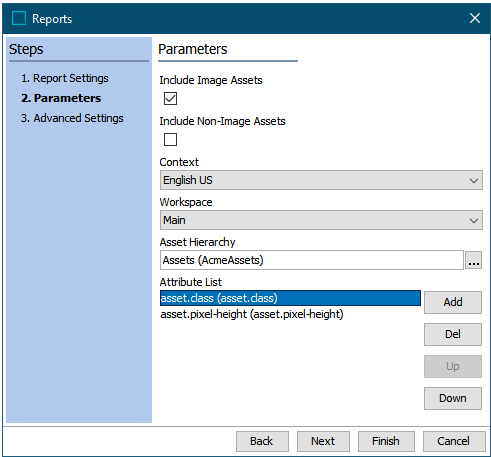
- Include Image Assets: If this checkbox is selected, then Assets of the type 'Image' will be included in the report. Otherwise, they are excluded.
- Include Non-Image Assets: If this checkbox is selected, then Asset that are not of the type 'Image' will be included in the report. Otherwise, they are excluded.
Important: You must select minimum one of the check boxes.
- Context: From this list it is possible to select in which context, the report should be run - e.g., English, German, or French.
- Workspace: From this list it is possible to select in which workspace, the report should be run - e.g., Main or Approved. Other workspaces, if they exist / were created prior to version 9.2, will also be selectable.
- Asset Hierarchy: In the hierarchy field, it is possible to select a node in the hierarchy, below which the report should run.
- Attribute List: Pressing the Add button will open a list of attributes, and you can select one or more from this list. It is also possible to remove selected attributes from the list using the Del button and to specify the sequence of the attributes in the report by using the Up and Down buttons.
Advanced Settings
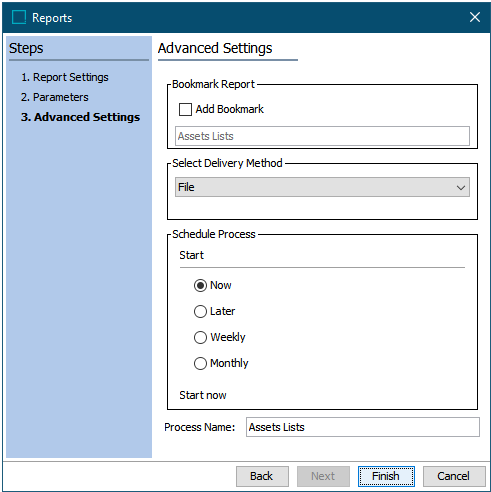
- Bookmark Report: Optional: If the Add Bookmark checkbox is selected, it is possible to save the report settings in a bookmark. In this case you can, for example, reuse the 'Attribute List' and other specific settings for a new report.
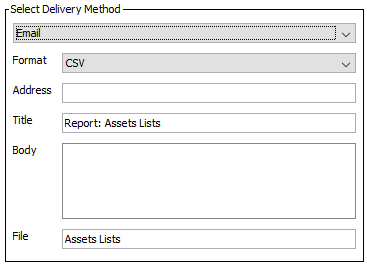
- Select Delivery Method: It is needed to select a delivery method for the report.
The are two delivery methods: File and Email.
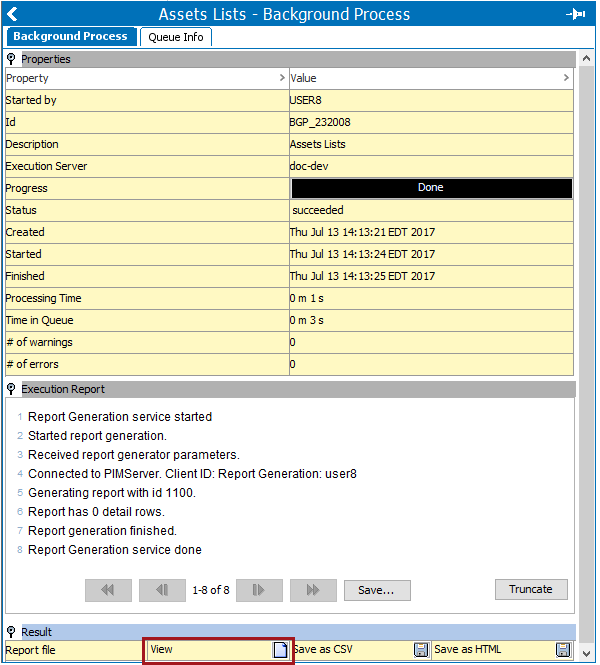
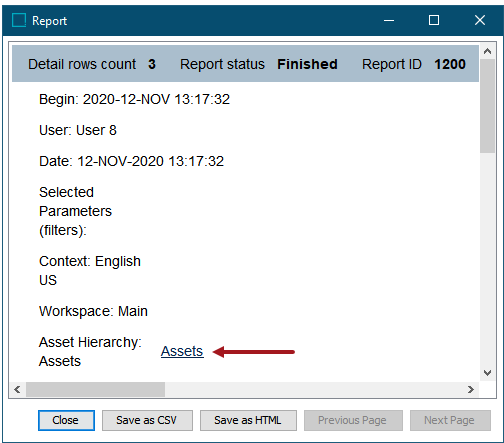
When File is selected and 'Finish' is clicked, a background process will begin. If successful, the report will be available under the Result flipper. Users can chose to View the report and then save as CSV or HTML, or save the report prior to viewing.
When clicking the View icon, the Report viewer is integrated into STEP Workbench. This means, that a click on an active link in the report viewer automatically navigates you to the selected object.
If Email has been selected, the report will be attached in an email. It is needed to specify the format of the attached report. The formats can either be CSV or HTML.
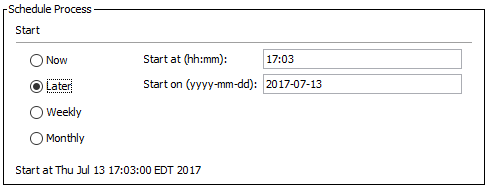
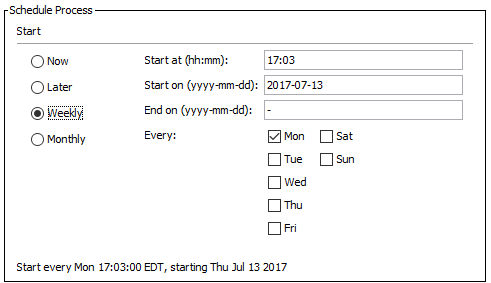
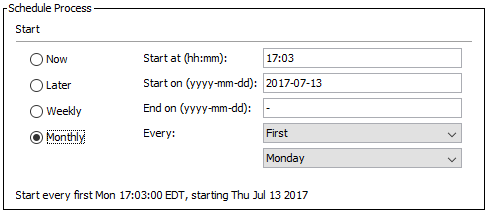
- Schedule Process: Select Now to start the process right away when you click Finish or schedule it using one of the other options.
Important: Consider the time zone of the application server compared to that of the workbench (the client) where the schedule is created or viewed. When scheduling a job, the local time zone is displayed in the workbench, but the time zone of the server is used to run the background process. Although displayed, the time zone of the client is not included in the instruction to the server to run the job. This can cause confusion about when the job will run since the scheduled time is not automatically converted to accommodate potential differences in time zones.
The options for the Later, Weekly, and Monthly selections are as follows:
Later runs the process only once at the specified date and time.
Weekly runs the process on the days select in the specified period until the process is deleted.
Monthly runs the process every month at the specified day and time until the process is deleted.
- Process Name: The wording input into this field goes into the Description of the Background Process.