The STEP Structure View InDesign panel (or panel, in InDesign terminology) is used primarily to mount product and classification objects to InDesign pages, though asset references and attributes may also be mounted. Other STEP hierarchies may also be accessed if needed (for example, entities).
The STEP Structure View is essentially a mirror of the Tree in the workbench. It allows InDesign (DTP) users to access contents of the workbench from within InDesign without having to log in to the workbench.
Most of the work in Print Publisher is carried out from the STEP Structure View, as products and other objects are dragged from the Structure View tree onto InDesign pages.
Accessing the STEP Structure View
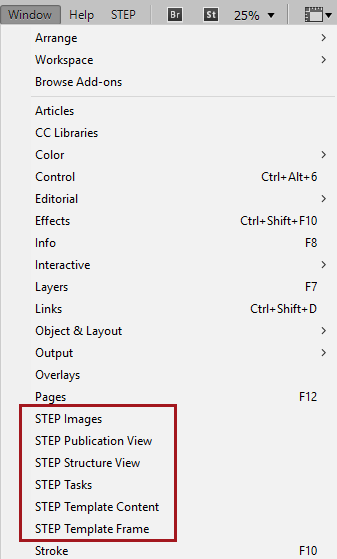
The STEP Structure View is accessed by navigating to Window > STEP Structure View from the InDesign application bar across the top of the InDesign interface.
Navigation and Search in the STEP Structure View
The STEP Structure View can be navigated by browsing or searching. To browse, hierarchies may be expanded and collapsed by clicking on the arrow signs to the left of the hierarchy levels. To search, click on the magnifying glass search icon in the lower left corner of the panel to display the Search dialog. The Search dialog can also be accessed by clicking the Options dropdown list in the upper right corner of the panel.
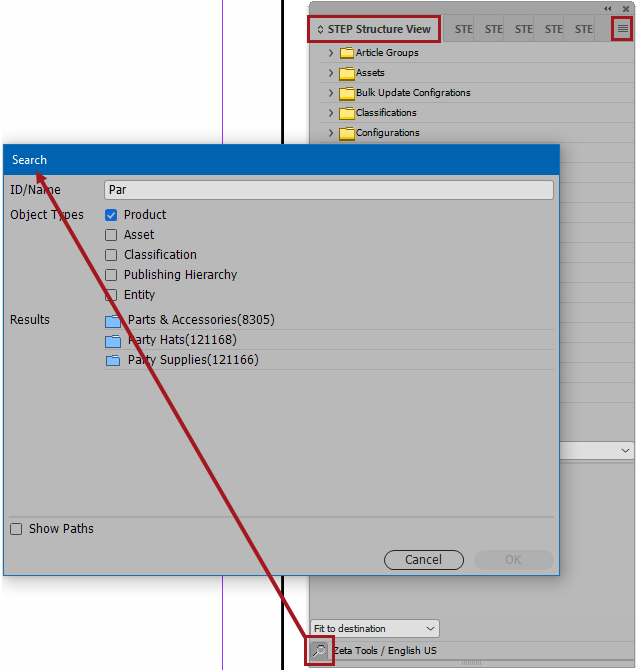
The Search dialog enables typeahead and filtered searches in the STEP Structure View. Searches are performed by Name or ID. Searches may be filtered by one or more of the following object types: Product, Asset, Classification, Publishing hierarchy, and Entity. Search is not enabled unless at least one Object Types checkbox is selected in the Search dialog.
Note: A maximum of 20 results can be shown in the Search panel. It is recommended to enter more specific search criteria if looking for an object whose Name or ID begins with commonly used characters.
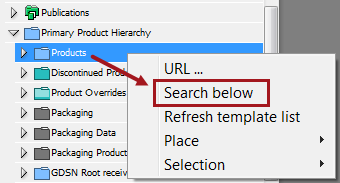
Searches in the STEP Structure View may also be limited to a specific level (node) of a hierarchy by using the Search below option. Search below is accessed through a right-click action on the chosen node.
Show Paths
The STEP Structure View panel also supports the listing of full object paths in search results. Full object paths are helpful for locating products in classification structures or when the products are children of product-overrides.
This search is accomplished in two steps, so as not to impact performance. Once the initial search has been conducted, select the object for which you would like to view the path(s). Then, check the Show Paths box to conduct a second search, which returns all file paths where the object appears in STEP. Select an object path, then click OK to close the Search dialog and be taken directly to the location of the object in the product or classification hierarchy. The 'Show Paths' section of the dialog can be collapsed or expanded as needed.

Configuring Character Minimums for Search
By default, typeahead searches begin when the first character is typed into the search field, and searches using Search below have a three-character limit before typeahead search results will populate. To change these settings, the following two configurations can be added to the inSTEPLogOptions.xml file:
<dtpDynamicConfig name="typeaheadSearchLimit" value="2" />
<dtpDynamicConfig name="typeaheadSearchBelowLimit" value="2" />
The first configuration sets the number of characters that must be entered before overall search results display. The second configuration serves the same purpose for 'search below' results. For more information on the inSTEPLogOptions.xml file, refer to the IDS Logging topic in the Administration Portal documentation here.
Additional Features of the STEP Structure View Panel
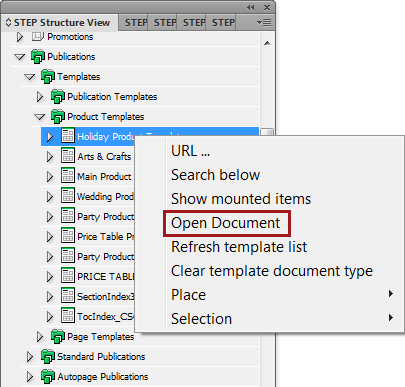
- Publication Hierarchy: Templates and actual pages that have been saved back to STEP can be opened for editing from the Publication hierarchy. To open a template or actual page, right-click on the document and select Open Document from the menu.
- Template dropdown list: When working with local product templates (as opposed to using the Default Template functionality), product templates are selected from this list. This list is populated by the product templates that are saved into the folder specified in the Template Path in the STEP Preferences menu. Refer to the Configuring the STEP Preferences Menu section of the Publisher (Adobe InDesign Integration) documentation here for more information.
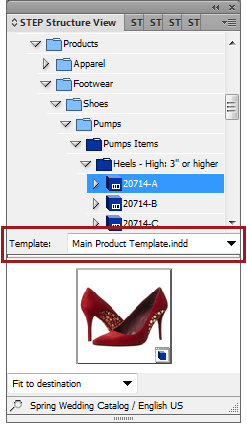
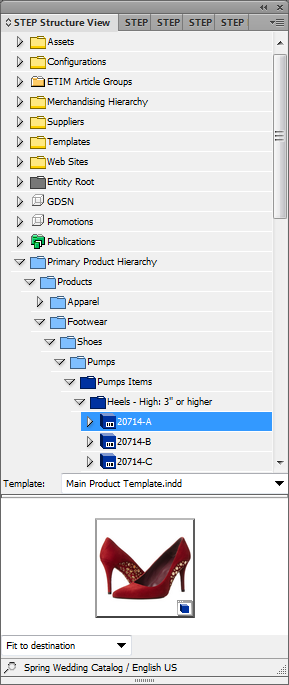
- Image display area: Appears directly below the Template dropdown list. If the selected object is referenced to a Primary Image, a thumbnail of the image will be displayed in this area. (When an attribute is selected in the Structure View, its value appears.)
- Scaling dropdown list: Appears in the lower left corner of the panel. Options in this list define the following settings for the scaling of your element when mounting attributes or asset references:
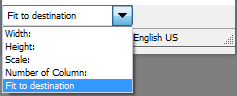
- Width: Sets the width of the text or image frame when dragging an attribute or asset reference directly onto a page (not into an existing frame)
- Height: Sets the height of the text or image frame when dragging an attribute or asset reference directly onto a page (not into an existing frame)
- Scale: Applies to images only, both when creating a frame (dragging directly onto the page) or dragging into an existing frame. Enables you to apply a scaling factor (such as 90%) for an image. The scaling factor will be applied to the image’s original (actual) size.
- Number of columns: Makes the text or image frame conform to the width of one or more columns within your active document when dragging an attribute or asset reference directly onto a page (not into an existing frame)
- Fit to destination: Causes an image reference to scale (up or down) to fit the existing frame that it is dragged into
- Status bar: Displays the name and version of the publication you are currently working with. For example, 'Spring Wedding Catalog / English US'
Options Menu
The Options menu in the STEP Structure View is accessed by clicking in the dropdown arrow in the upper right corner of the panel. It contains the following commands:
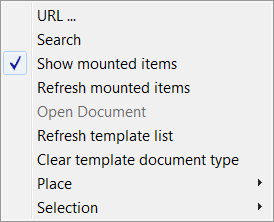
- URL: Use this option to enter a STEP URL pointing to a node in STEP. This way you can easily navigate to a specific node without browsing through the Structure View.
- Search: Click to access the Search dialog
- Show mounted items: Use this option to highlight mounted items in the STEP Structure View tree
- Refresh mounted items: Use this option if you have mounted more items (after using the Show mounted items option) and want them to be highlighted as well.
- Open document: Use this option to open an InDesign document saved in STEP (you must select the relevant document in the STEP Structure View first).
- Refresh template list: Use this option to update the product template list in the STEP Structure View.
- Clear template document type: Select this to change a template document to a standard InDesign document. A Save As dialog will appear, prompting you to save the document as a new document. The original template document will not be affected unless you save the new document over it with the same name.
Place Options
The options available in the Place sub-menu enable you to set a range of parameters for the mounting process, as follows. These options are also available in a menu that appears when right-clicking on a selected object in the STEP Structure View panel tree.
- Snap to Column: When selected, an item dropped on an InDesign page will align itself with the nearest inside column edge to the left of the object.
- Place in Galley: When selected, Print Publisher will place your galley text in the same frame when mounting products (without using Print Flatplanner). Option is disabled if Place in Free Space is selected.
- Place in Free Space: When selected, Print Publisher will place your object in the first available free space on the page, rather than placing it in the specific location where it is dropped. Option is disabled if Place in Galley is selected.
- Unplace selected object: Use this option to unmount the object selected in the STEP Structure View tree.
- Replace selected object with template selected: Use this option to recompose / reset the mounted object according to the selected product template. Use this option if, for example, you have manually changed the appearance of a mounted object on the page, but then decide to return to the original layout.
- Page Sel is part of Mount of Tree Sel: (Only relevant for Flatplanner) Use this option if you have items on the page that are not part of the product template (e.g., standalone graphics that do not exist in STEP), but you want them to be included when using a Pickup Page Layout operation in Flatplanner.
Selection Options
The options available in the Selection sub-menu enable you to perform a range of operations on the element that you have selected on your InDesign page. These options are also available by right-clicking on a selected image frame or right-clicking within the text frame of a mounted object.
- Go To Page Selection in Structure view: When selected, the element you have selected on the page will be shown in the STEP Structure View tree.
- Go To Page Selection in Workbench: When selected, the element you have selected on the page will be shown in STEP Workbench (this requires that STEP Workbench is already running on your computer).
- Go To Structure Selection in Workbench: When selected, the element you have selected in the STEP Structure View will be shown in STEP Workbench (this requires that STEP Workbench is already running on your computer).
- Update Page Selection: When selected, the element you have selected on the page will be updated with the latest value from STEP.
- Write Page Selection back to DB: When selected, the value you have selected on your page will be written back to the attribute in STEP (privilege restrictions apply).