The Industry Standard Mapping Creator is an interactive and robust tool that features an easy-to-use intelligent mapping builder interface. This interface empowers Web UI users to swiftly and effortlessly construct custom Mapper Configuration setup entities involving valid combinations of different standards or different versions of the same standard. The primary objective of this screen is to offer a user-friendly interface for easily defining mapping criteria. Upon clicking the Create button, a new Mapper Configuration setup entity is generated based on the specified criteria.
For ease of access a link to the Industry Standard Mapping Creator Screen is to be added to the Quick Links widget on the Web UI Homepage. For more information, refer to the Configuring Industry Standard Mapping Creator Screen topic. In the example below, we have configured a Industry Standard Mapping Creator Screen called ECLASS Mapping Creator and provided a link within the Quick Links widget.

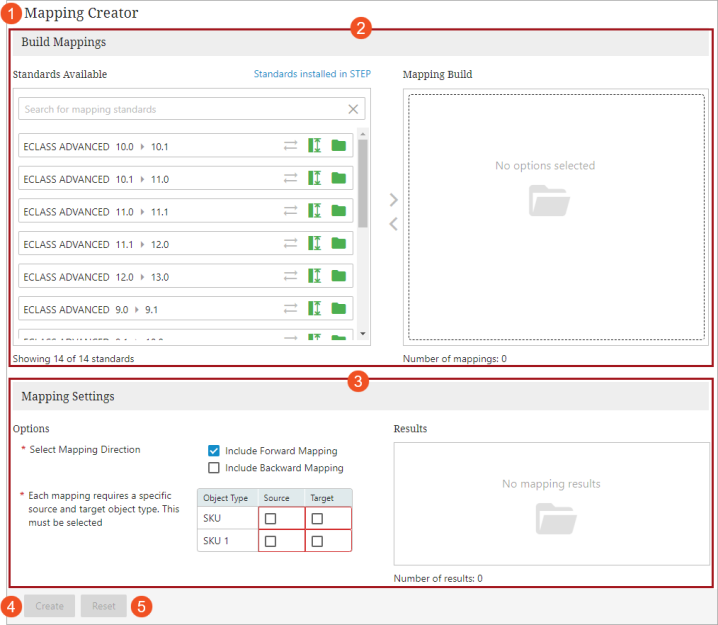
The Industry Standard Mapping Creator Screen is structured around two primary areas, each of which is not subject to individual configuration. The top half of the Industry Standard Mapping Creator Screen offers features related to defining a valid start and endpoint by specifying the 'from' and 'to' versions for mapping. The bottom half of the screen is dedicated to the additional settings related to the mapping criteria defined in the top half.
-
Title of the screen: Displays the name of the screen.
-
Build Mappings interface: Within this area, users have the capability to actively define a mapping criteria by specifying a valid start and endpoint for mapping, resulting in the creation of a Mapper Configuration setup entity. The interface is partitioned into two panels: the left panel, labeled 'Standards Available,' showcases all available mapping standards within the system, while the right panel, termed 'Mapping Build,' aids in constructing the start and endpoint of the mapping based on the options available in the left panel. The features available within this interface are described in the later section of this topic.
-
Mappings Settings interface: This area comprises additional settings relevant to the mapping criteria defined in the Build Mappings interface. Additionally, it includes a result area that displays the start point and the end point of the mapping.
-
Create button: Once all the required fields in the Build Mappings interface and Mappings Settings interface are populated, the Create button becomes activated. Clicking this button generates a new Mapper Configuration setup entity based on the criteria defined above.
-
Reset button: In any circumstances where you wish to erase all the mapping criteria defined above and start over from the beginning, click the Reset button.
Build Mappings
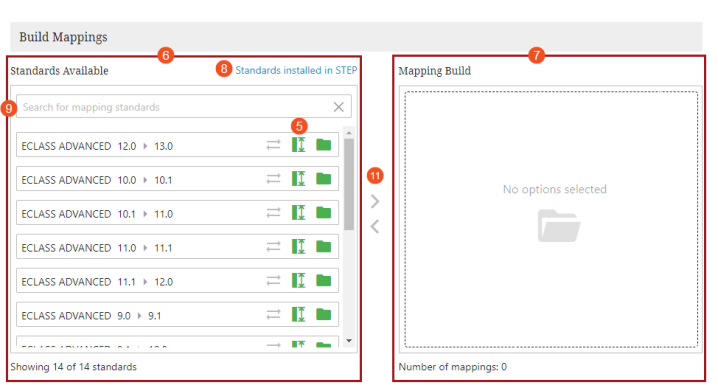
This interface basically facilitates in building a mapping criteria. It is partitioned into two panels: the left panel, labeled 'Standards Available,' showcases all available mapping standards within the system, while the right panel, termed 'Mapping Build,' aids in constructing the start and endpoint of the mapping based on the options available in the left panel. Below are the functions available within this area:
-
Standards Available panel: This panel provides users with a comprehensive view of all available mapping options in the system. Further, it aims to offer precise guidance on the sequential steps required to navigate from the starting point to the endpoint of the mapping. While this may seem less useful when upgrading within a single standard, it becomes pivotal when traversing across different standards. Once the initial selection is made, the system intelligently presents only valid options for further mapping. This area includes the following options
-
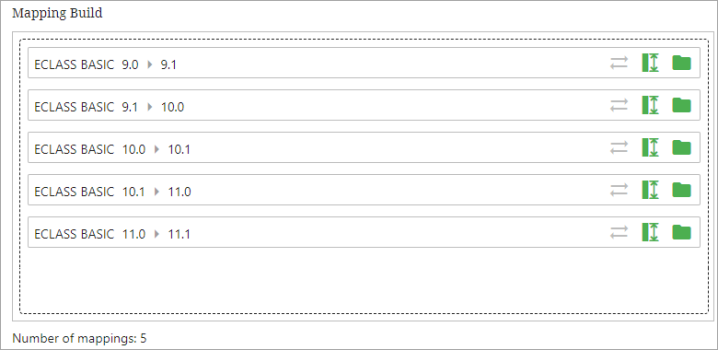
Mapping Build: This column showcases all the built mapping standards that have been moved from the Standards Available column. The mapping options displayed within this area always considers a directional flow from the old standard to the new standard. The interpretation of this mapping, including how the system should perceive it, can be precisely configured using the Select Mapping Direction field that is available in the lower left area of this screen, as detailed in a later section of this topic. Below is an example of how the mapping standard is built from ECLASS Basic 9.0 to ECLASS Basic 11.1.
-
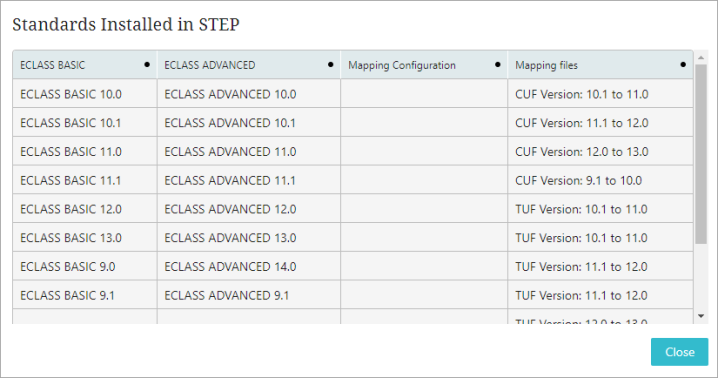
'Standards installed in STEP' link: Clicking this link opens a dialog called Standards Installed in STEP. The dialog provides a comprehensive overview of the installed standards, encompassing their respective versions. It also displays the created and the currently existing Mapper Configuration setup entity. Users are encouraged to navigate to the Onboarding Mappings Details screen for a detailed exploration and management of mappings.
-
Search field: Type in the keywords within this field to find a mapping standard that meets your requirement.
-
Status Icons: Within the Standards Available column and the Mapping Build columns, three icons are consistently visible for each mapping standard. The color of these icons, whether green or gray, indicates their status as active or inactive, respectively. The three icons displayed are as follows:

-
Mapping across a standard
 : This icon gets activated (turns green in color), only when the mapping is performed between different standards. In the example above, where the mapping is within different versions of the ECLASS standard, the icon remains grayed out.
 -
Handles Attributes
 : Activation of this icon (turning green), signifies that the mapping involves attributes in the system.
 -
Handles Classifications
 : Activation of this icon (turning green), signifies that the mapping involves classifications in the system.
-
-
Right / Left arrow: These arrows facilitate the movement of mapping standards from the Standards Available panel to the Mapping Build panel.
Mapping Settings
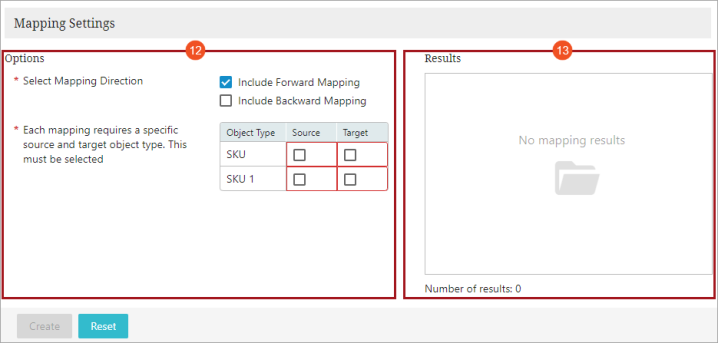
This interface serves to manage additional settings related to the mapping criteria defined in the Build Mappings interface of the screen. It is subdivided into two panels:
-
Options panel: The bottom left panel, labeled 'Options,' provides features for fine-tuning the mapping criteria built in upper half of the screen. The functions available within this panel are detailed below:
-
Select Mapping Direction: In the upper half of the screen, mapping criteria are consistently constructed from old to new standards. This signifies that a mapping always progresses from the old standard to the new standard. However, the system's interpretation of the mapping direction is configured in the 'Select Mapping Direction' field. The option selected in this field provides explicit instructions to the system on to which direction to construct the mapping. While a direction must be selected, it is also possible to construct a mapping criteria in both directions. The impact of this selection is immediately reflected in the Result panel. The selected direction instructs the system to construct the mapping in the specified direction or both directions if so desired.
-
Object Type selection: During the mapping process, the system identifies the permissible object types for both the source and the target. The presented object types in this field consistently align with the current selection made in the upper half of the screen. The system derives these permissible object types from the options allowed at the start point and the end point, as defined in the mapping criteria. This approach ensures management of internal mapping, covering scenarios of mapping to the same product, as well as mapping from one object type to another.
To construct a mapping criteria, there must be at least one valid object type for both the source and the target (though they need not be the same). If only one object type is available, it will be automatically selected and cannot be deselected. In cases where multiple object types are selected for mapping, the system dynamically generates mappings for all combinations of the selected object types.
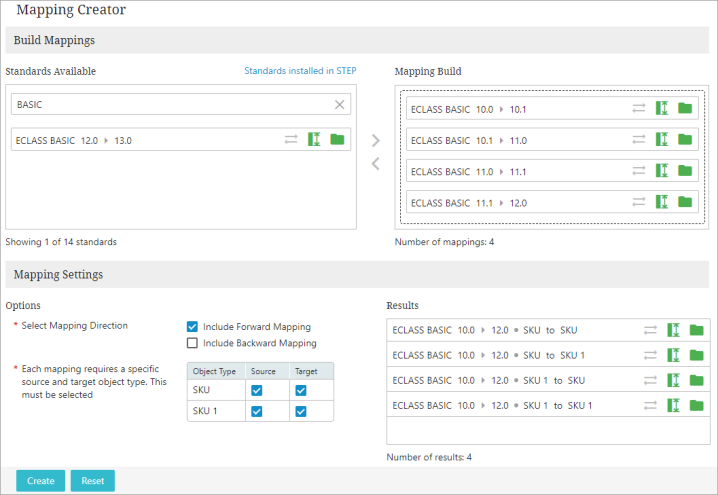
Taking the example screenshot above, where both object types are selected for both source and target, the system will dynamically generate the following combinations:
-
SKU →SKU
-
SKU →SKU 1
-
SKU 1 →SKU 1
-
SKU 1 →SKU
The impact of selecting different object types becomes immediately visible in the Results panel.
-
-
-
Results panel: The bottom right panel, termed 'Results,' displays the mapping that is built based on the current selections – if they represent valid mappings. The result panel presents the anticipated mappings based on the current settings. In the below screenshot, the result screen showcases a mapping scenario from ECLASS BASIC version 10.0 to 12.0 for both directions. However, this mapping specifically involves SKU sources, with the flexibility to map to either SKU or SKU 1 object types.
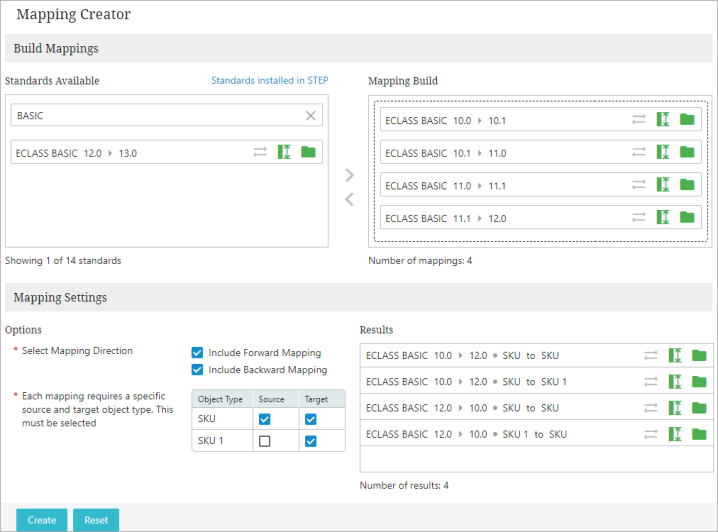
Upon populating and selecting all the necessary fields, clicking the 'Create' button, located at the bottom left of the screen, initiates the generation of a Mapper Configuration setup entity. This Mapper Configuration setup entity is crafted based on the mapping criteria defined in the other panels of the screen.
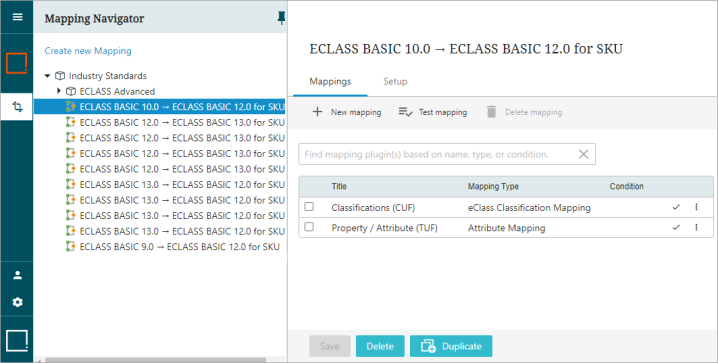
The resulting Mapper Configuration setup entity will be stored within the Setup Group folder which is defined while creating this screen in the designer.
Below is an example of a Mapper Configuration setup entity named 'ECLASS BASIC 10.0 → ECLASS BASIC 12.0 for SKU,' created for the transition from ECLASS BASIC version 10.0 to 12.0. This specific Mapper Configuration is configured with SKU as both the source and target object types, incorporating both the Attribute Mapping plugin and ECLASS Classification Mapping plugin to achieve the desired results.
Executing Mapper Configuration Setup Entity
Executing the Mapper Configurations created by the Industry Standard Mapper is just similar to the executing any other Mapper Configuration in the Data Onboarding framework. Users can adopt any of the methods from the ways described in the Executing Mapper Configuration Setup Entity topic of the Data Onboarding and Standardized Mapping documentation.
Generally, the Onboarding Comparison Screen is used if user discretion is required regarding the acceptance / rejection of the mapping changes. For more information about how to use the Onboarding Comparison Screen for executing the Mapper Configuration, refer to the Onboarding Comparison Screen topic of the Data Onboarding and Standardized Mapping documentation.