An Asset Importer configuration is a setup entity object. For details, refer to the STEP Terminology topic in the Getting Started documentation.
Setup entity definitions can be exported as comments and submitted to an external source control system for comparison purposes. For details, refer to the Configuration Management documentation.
Initial setup is required before Asset Importer configurations can be created.
- The Asset Import Compatibility Mode must be set to 'Advanced'
- A setup group must be created to hold the Asset Importer configurations
- User permissions must be established for viewing and maintaining import configurations.
Advanced Asset Import Compatibility Mode
To enable the Asset Importer functionality, the 'Asset Import Compatibility Mode' setting must be set to 'Advanced' as described below.
- Navigate to System Setup > Users & Groups, and click the System Settings tab.
- Under the 'Images & Documents Settings' flipper, select 'Advanced' from the 'Asset Import Compatibility Mode' dropdown list.
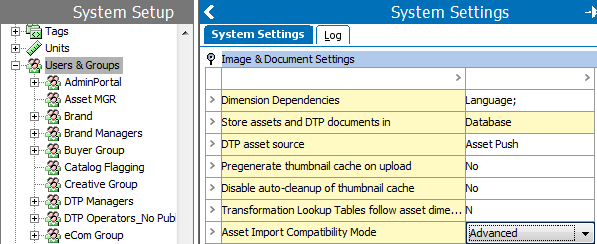
Important: If enabled, the old asset import functionality will become disabled. This will ensure a consistent method to import and update assets in STEP.
The other Asset Import Compatibility Mode is Simple. This mode is the default setting and deactivates the AI functionality. It ensures that the legacy image import is the default on existing STEP systems.
Setup Group
A setup group must be created to hold the Asset Importer configurations.
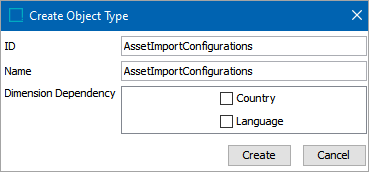
- Navigate to System Setup > Object Types & Structures, right-click the 'Setup Group type root' node and select New Object Type.
- In the window that appears, enter 'AssetImportConfigurations' in the ID parameter, then click Create. This creates a setup group in which all import configurations will reside.
Once the setup group is made, the 'Asset Import Configuration Type' basic object type must be linked to this newly created node as a child. Later, when new Asset Import configurations are created and added to the system, they will use this object type.
- Navigate to 'Object Types and Structures' > 'Basic Object Types' > 'Asset Import Configuration Type', and click the 'References' tab.
Under the 'Parents' flipper, click Add Parent, and in the node selector dialog, specify the 'AssetImportConfigurations' node created in the above step.

The next step is to create a new setup group root, where all Asset Importer configurations are to be added upon creation.
Creating a New Setup Group Root
- To create the setup group root, navigate to Maintain > Insert > Setup Group Root
- Select the 'AssetImportConfigurations' setup group.
- Specify 'ID' and 'Name.'
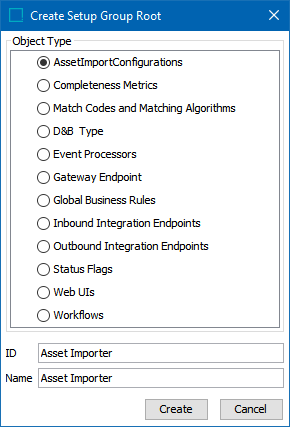
- Click Create.
The setup group 'Asset Importer' of the type 'AssetImportConfigurations' is created. From this newly created node, users can right-click and add new Asset Importer configurations.
User Privileges
User permissions must also be established for viewing and maintaining import configurations.
- Navigate to System Setup > Action Sets, right-click 'Setup Actions.'
- Select 'New Action Set.' In the window that appears, enter 'MaintainAssetImporterConfigurations' in the ID parameter, then click Create.
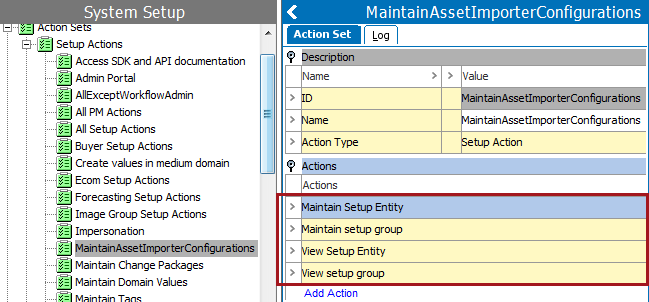
- In the 'MaintainAssetImporterConfigurations' node created in the previous step, navigate to the 'Action Set' tab, and click Add Action found under the 'Actions' flipper.
From the list that appears, choose the follow actions and click Select:
- 'View Setup Entity'
- 'View setup group'
- 'Maintain Setup Entity'
- 'Maintain setup group'
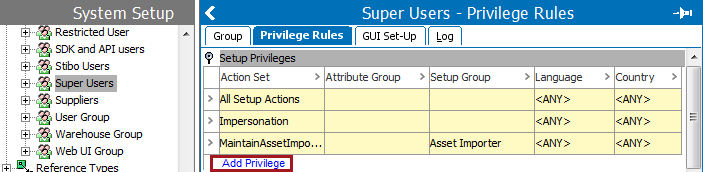
- Finally, navigate to System Setup > Users & Groups, and right-click the relevant user group.
- Navigate to the 'Privilege Rules' tab, and under the 'Setup Privileges' flipper, click Add Privilege.
- In the window that appears, click the ellipsis button (
 ) next to the 'Action Set' parameter.
 - Select the action set created in the above step. Alternatively, enter the name of the action set directly into the parameter.
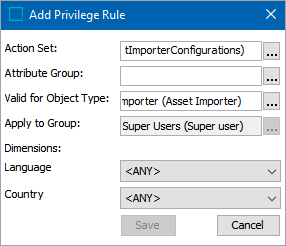
- For the 'Setup Group' parameter, specify the setup group root created in ‘Setup Group’ section. In this example, ‘Asset Importer’ is specified.
- Click Save when finished.