In the Image Size step, users can define whether images need to undergo any resizing on export. If yes, then images can be resized proportionally by specifying dimensions, scaling, print size, and resize type.
Note: The 'Image Size' step will be available only when a custom image conversion configuration is selected in the Image Conversion step and if 'Use predefined image conversion pipeline' or 'Use predefined script' are not selected in the File Format step.
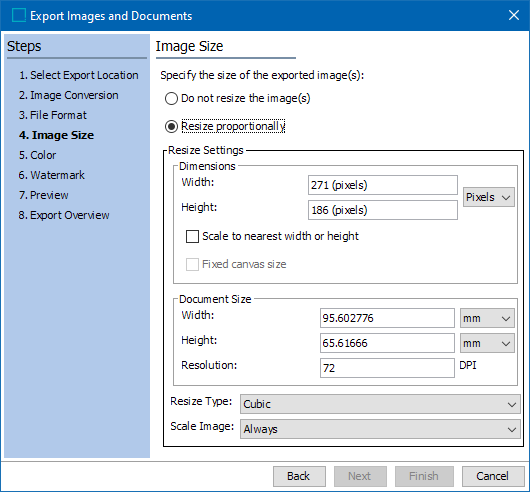
- Select Resize proportionally if you want to resize the images. If you do not want to resize the images, select Do not resize the image(s).
- For Resize Settings, use the Dimensions area. Enter the desired width or height in the selected unit of measure, which may be set in either pixels or percentages (%). Because the images are scaled proportionally, when you enter the first dimension, the other values change accordingly.
- Scale to nearest width or height – When checked, the affected image will scale to the nearest width or height in pixels. If both the height and width have values, the system will determine which maximum value is reached first, and the image conversion will complete accordingly.
- Fixed canvas size – This setting is enabled only when ‘Scale to nearest width or height’ checkbox is checked. This option scales and fills with white pixels to the desired canvas size. When 'Fixed canvas size' is checked, the 'Keep transparency from original' option on the File Format step is ignored. Refer to the Image Formats topic.
When unit of measure percentage (%) is selected, the 'Scale to nearest width or height' and 'Fixed canvas size' checkbox options are disabled.
Important: While users must set only one of the two dimension values (Width or Height) when the 'Scale to nearest width or height' option is enabled, it is good practice to also define a max value in the other field rather than leaving it empty. The reason to set both values in this way is because, without a max value set for one of these values, the image may stretch so far as to cause obvious distortion. Setting both values helps avoid this result.
- For Resize Settings, use the Document Size area to show the print size of the image and the resolution. In Resolution, specify the preferred resolution if different from the current resolution. Enter the desired height or width in the selected unit of measure. Units of measure available are mm, cm, inches, pt, and pica. Because the images are scaled proportionally, when you enter the first dimension, the other values change accordingly.
In the Resolution field, specify the preferred resolution if different from the current resolution. DPI is the available measure, which stands for Dots Per Inch.
- For Resize Type, select the preferred resize type: cubic, scale, subsample, lanczos, and default. These types are similar to those offered by Adobe Photoshop.
Note: It is easier to successfully reduce the resolution of an image than it is to increase it. Also, it is recommended to scale TIFF images by no more than 140%.
- For Scale Image, select one of the following options:
- Always: images are always scaled to the specified size.
- When Smaller: images are scaled when they are smaller than the specified size.
- When Larger: images are scaled when they are larger than the specified size.
- Click Next to continue or click Finish to start the export.