Object to Object Mapping plugin will copy the information present on the Source object or from its related object (Source STEP Path) to the Target object or to its related object. The information retrieved from the Source object could be the ID, name, attribute values, or references. The information from the Source object could be stored directly on Target object, as the child of the Target object, or as the referenced object of the Target object. The Object to Object Mapping plugin is added and configured in the Onboarding Mappings Details Screen for the selected Mapper Configuration.
To configure the Object to Object Mapping plugin, follow these steps:
-
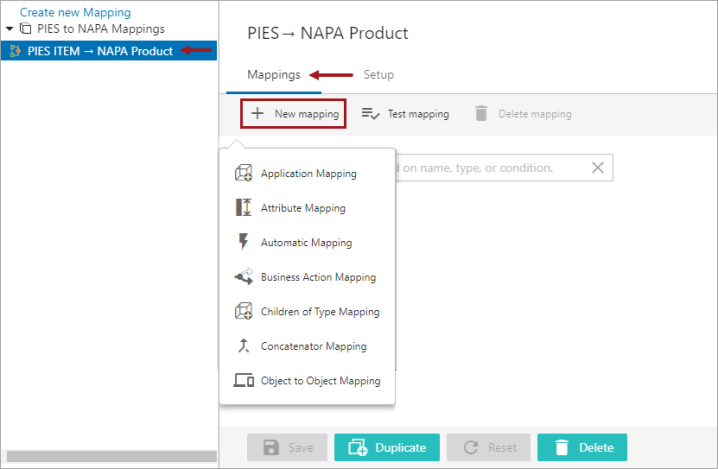
With the required Mapper Configuration selected, click on New mapping which is available on the Mappings tab of the Onboarding Mappings Details screen.
-
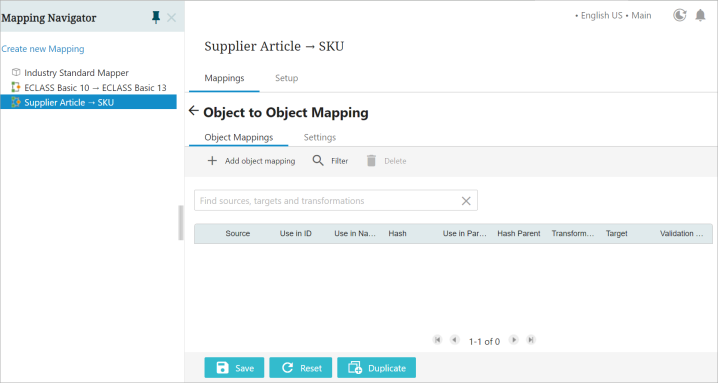
Select Object to Object Mapping option, and a new screen is displayed with the following two tabs:
-
Object Mappings: This tab includes options that allows users to establish a mapping relationship. Details pertaining to the parameters available within this tab page is explained in the later section of this topic.
-
Settings: This tab contains few basic parameters that requires to be populated before the user tries to build a mapping relationship in the Object Mappings tab. Details pertaining to the parameters available within this tab page is explained in the later section of this topic.
-
-
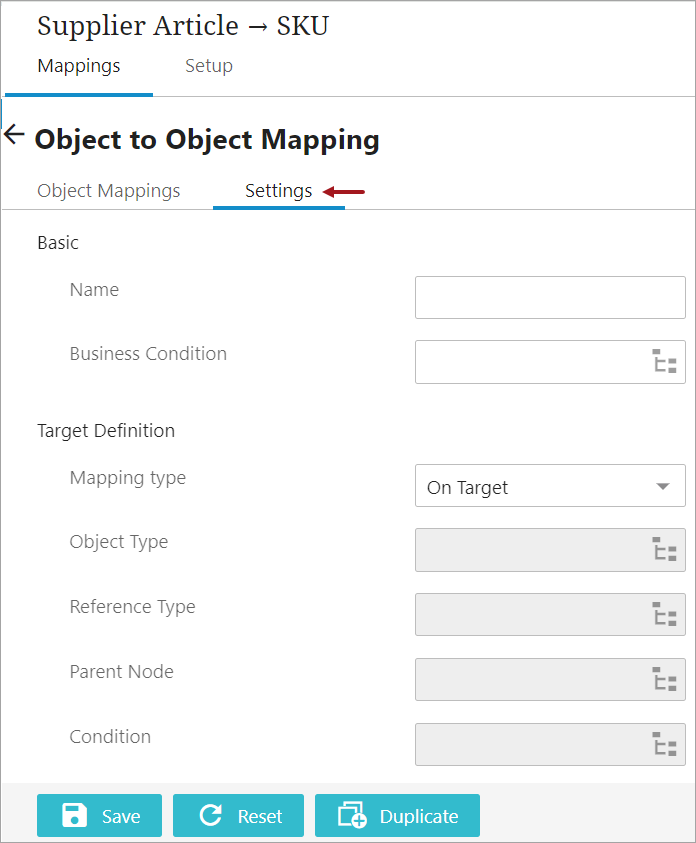
Within the Settings tab, as shown in the screenshot below, populate the following parameters:
-
Name: Type in a suitable name next to this field. This could be any unique name that clearly describes the mapping functionality.
-
Business Condition: The Business Condition parameter allows users to select a business condition. The selected business condition runs the mapper plugin only on the object if the condition is true.
-
Mapping type: This parameter defines where the retrieved information from the source object need to be stored in the target location. The available options are:
-
On Target: Selecting this option will evaluate the Source STEP Path and store the results in the Target object either as an attribute value or as a referenced object. This will not create any new objects.
When this option is selected, the Object Type, Reference Type, and Parent Node parameters available under the Target Definition flipper are grayed out and are not used with the On Target Mapping type.
-
Child: Selecting this option will evaluate the Source STEP Path in order to get the data to be used to create child objects below the Target object. The child objects that are created can either be Classification or Product objects. The data that is retrieved from the Source object can be used in the new objects as an ID, Name, attribute value, or reference. The object type to be used for the new children objects that will be created below the Target object must already exist. This object type is what will be selected in the Object Type parameter.
When this option is selected, the Reference Type and Parent Node parameters are grayed out and are not used with the Child Mapping type.
-
Reference: Selecting this option will evaluate the STEP Path on the Source object to create new objects below another object, and then establish a reference between the Target object and the newly created object. The data that is retrieved from the Source object can be used in the new objects as an ID, Name, attribute value, or reference. The new object can be created under any node (called as Parent Node) and then a reference is established between the Target object and the new object.
-
Object Type: This parameter is used when either the Child or Reference Mapping option is selected within the 'Mapping type' parameter. The user can select the object type to be used for the new objects that will be created below the Target object, or below the defined parent node if the Reference Mapping option is selected.
-
Reference Type: This parameter is used when Reference Mapping option is selected within the 'Mapping type' parameter. This parameter allows the user to select the Reference Type that should be used to establish the reference between the Target object and the newly created objects.
-
Parent Node: This parameter is only used when Reference Mapping option is selected within the 'Mapping type' parameter. The user can select the parent node under which the newly created objects will reside.
-
Condition: This parameter is used when either the Child or Reference Mapping option is selected within the 'Mapping type' parameter. The user can select a business condition that gets executed when the associated Mapper Configuration setup entity is executed. This parameter will most often be used to define a business condition that decides whether the objects related to Target is to be created or not.
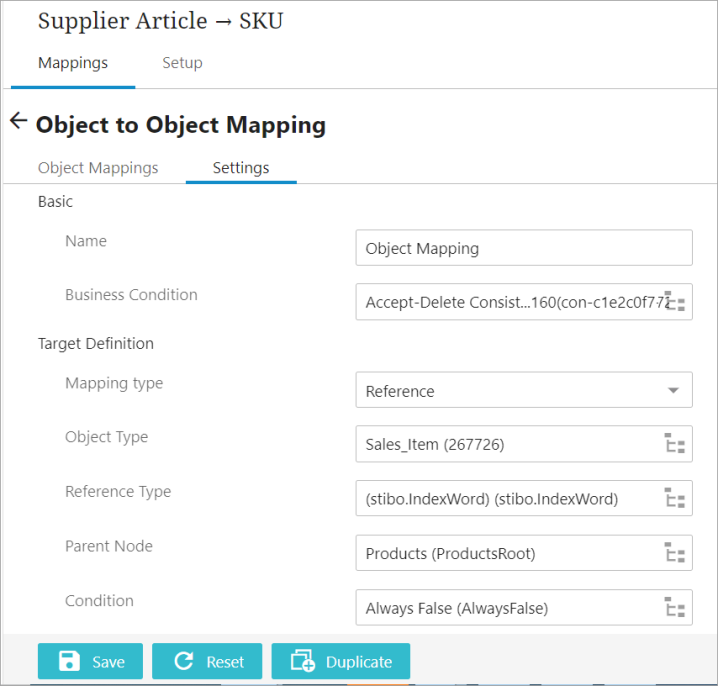
Below is an example of how the Settings tab within the Object to Object Mapping plugin is configured in the Web UI.
-
-
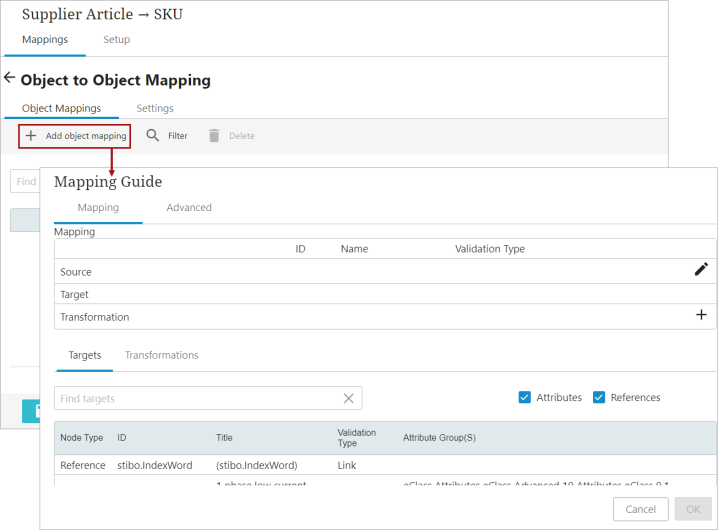
After populating all the required parameters within the Settings tab, navigate to the Object Mappings tab. and click on the ‘Add object mapping’ button.
Upon clicking the 'Add attribute mapping' button, the Mapping Guide window will display, as shown in the screenshot below. This window comprises of the following two tabs:
-
Mapping: This tab comprises of the fundamental parameters that are required for the Object to Object Mapping plugin. This involves populating the Source and Target fields along with the attribute transformations if required.
-
Advanced: The parameters available within this tab allows users to perform some advanced transformation functionalities when required. The functionalities in this tab are mainly designed to handle multivalued source attributes. The options available within this tab are explained in the later section of this topic.
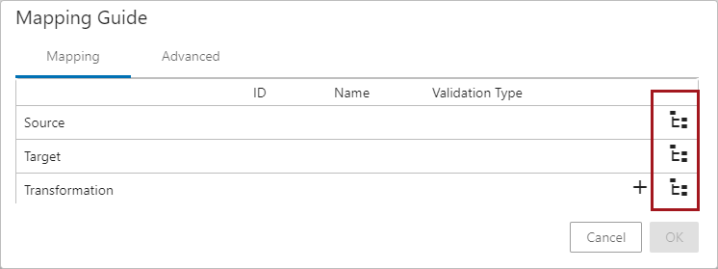
Note: It is possible in the Mapping Guide window to display the regular Node Pickers (as shown below) instead of the typeahead field. In order to use the Node Pickers in the Mapping Guide window, users need to set the following property in the sharedconfig.properties file: Mapper.MappingGuideUseStandardComponents=true.
-
-
To define which information (ID, Name, attribute values, or references) from the Source object needs to be retrieved, click on the Edit icon (
 ) in the Source field, and the Step Path Editor window will display (as shown below). The user also has the option to select specific data points from the Source object, or any of its related objects by selecting a combination of the elements available in the Keywords field and thereby creating a STEP Validation path. For more information on defining the Source STEP Path, refer to the Mapping Validation Path Functionality topic within this guide.
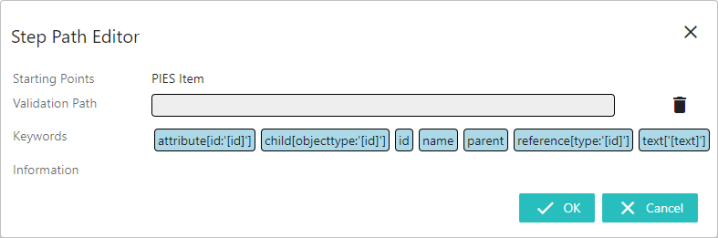
-
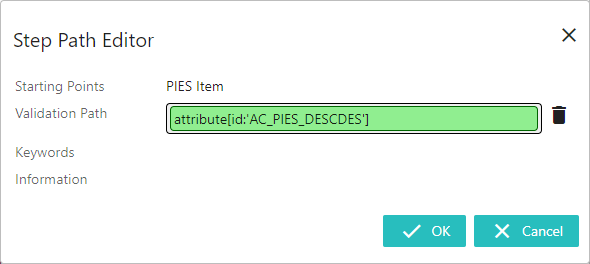
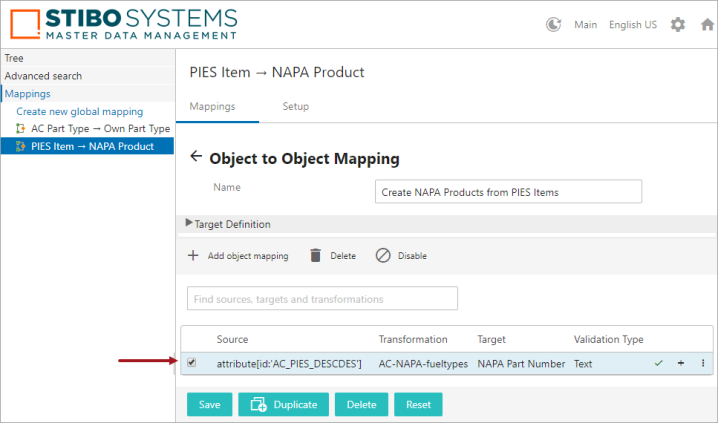
Double-click on the required element(s) from the 'Keywords' field. The selected element will be populated in the 'Validation Path' field (as shown below). The specific combination of elements are chosen depending on the unique requirements for the data being retrieved. Selecting the elements will define the Source STEP Path which describes the path from which the source data must be retrieved. Depending on the element selected, further configurations may be required. In the example below, element attribute[id:'[id]'] is selected and displays in the Validation Path field. The red colored field indicates that additional configuration is required.
Users can add one element or a combination of elements to create a Source STEP Path. For more information on creating the Source STEP Path, refer to the Mapping Validation Path Functionality topic within this guide.
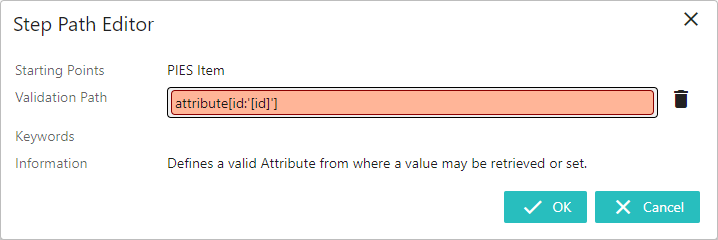
In this example, the selected element 'attribute[id:'[id]']' is configured to retrieve the value from attribute with ID 'AC_PIES_DESCDES'.
Once selected, the Source STEP Path with the defined data will be populated in the Source field.
-
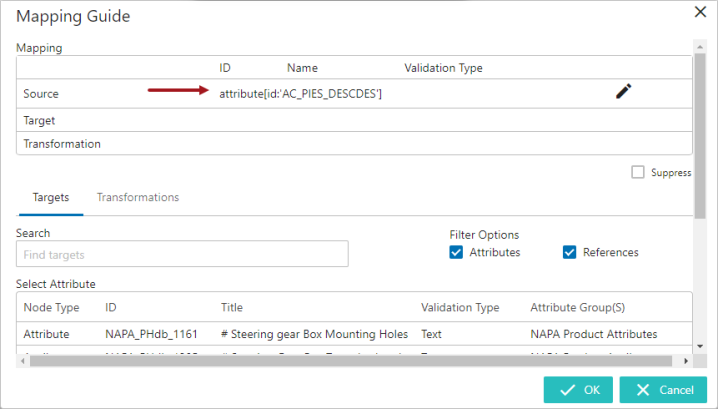
With the 'Targets' tab selected, click in the Search field and start typing the initial letters of the attribute / reference name or ID of the target attribute / reference to which the value should be copied. Select the attribute / reference from the typeahead results displayed below the search bar.
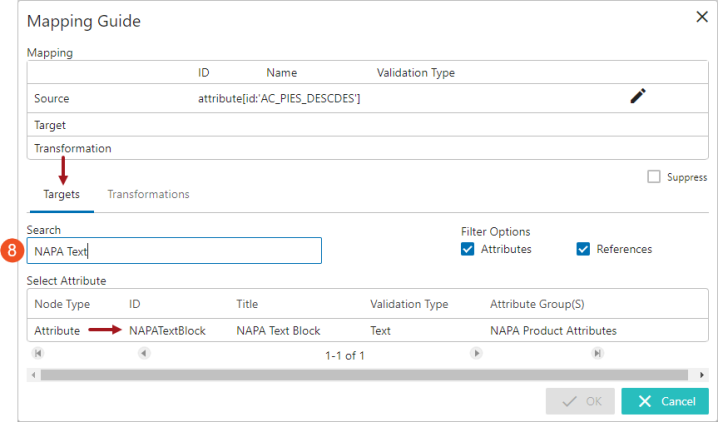
Once selected, the attribute / reference will be populated in the Target field.
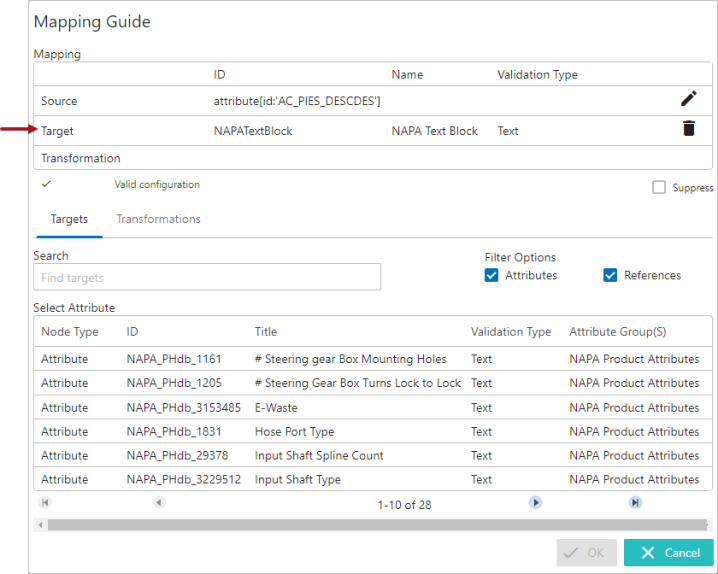
Note: Only attributes / references that are valid for the object type defined in the mapping Setup tab will be displayed as options to select on the Targets tab.
After the Source STEP Path and target attribute / reference are defined, the system evaluates the validity match between the Source STEP Path and the target attribute / reference. A hyperlink text explaining the reason for the validity match / mismatch displays. Clicking on the hyperlink opens the 'Detailed Information' dialog which displays the validity match / mismatch information of the Object to Object mapping. Below is an example of a valid match between the Source STEP Path and the target attribute displayed in the 'Detailed Information' dialog.
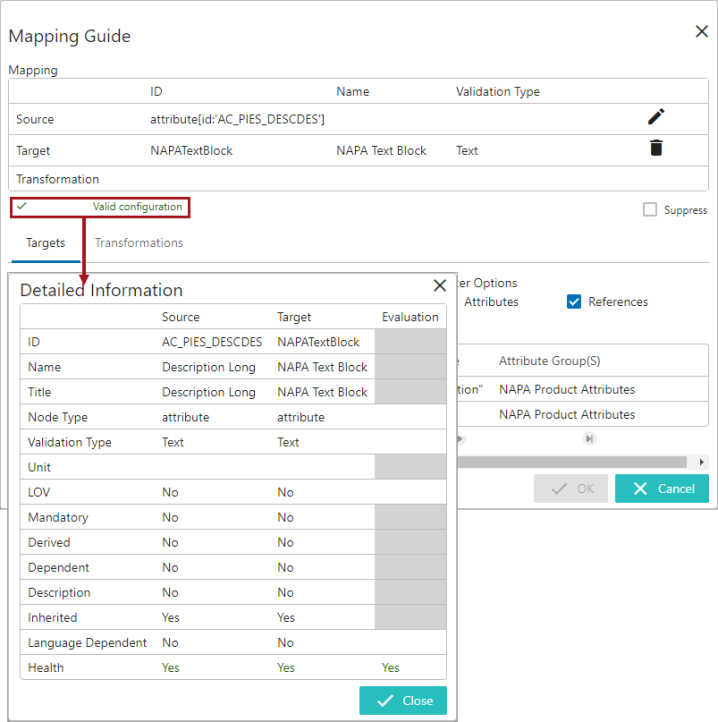
Users can suppress the validation mismatch warning message by clicking on the 'Suppress' checkbox in the Mapping Guide window. Selecting the 'Suppress' checkbox only removes the data type mismatch warnings displayed on the Mapping Guide window and does not resolve the mismatch irregularities.
-
With the 'Transformations' tab selected, click in the search field and start typing the initial letters of the transformation name or ID. This brings up a dropdown of typeahead search results listing the attribute transformations available in the system. Select the relevant transformation from the list displayed below the search bar.
Note: The transformations must be created and defined in the workbench System Setup prior to being available to be selected in the Mapping Guide.
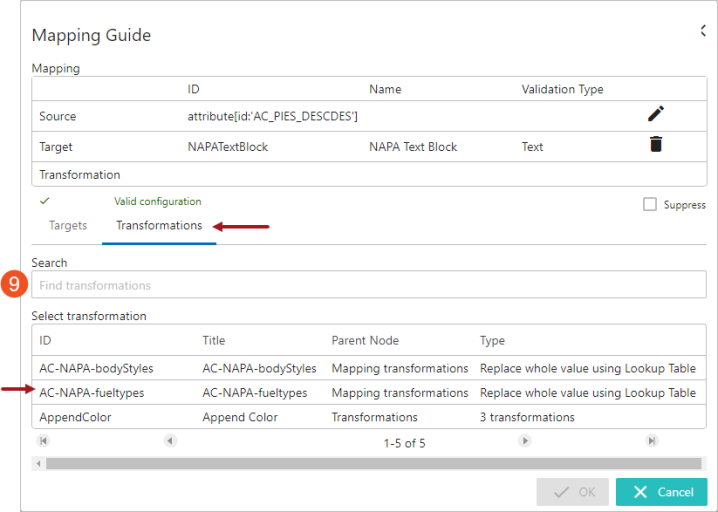
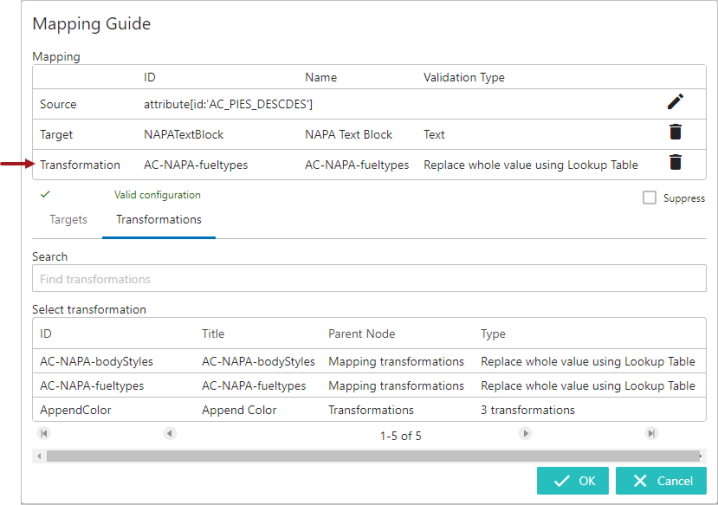
The selected transformation will be populated in the 'Transformation' field (as shown below).
For information on configuring the attribute transformations, refer to the Attribute Transformations topic within the System Setup documentation. And for details on each of the available transformation options, refer to the Transformations topic in the Resource Materials online help documentation.
The populated transformation can be deleted by clicking the delete icon (
 ) in the 'Transformation' field. Similarly the populated Target attribute / reference can also be deleted by clicking the delete icon () in the 'Target' field.
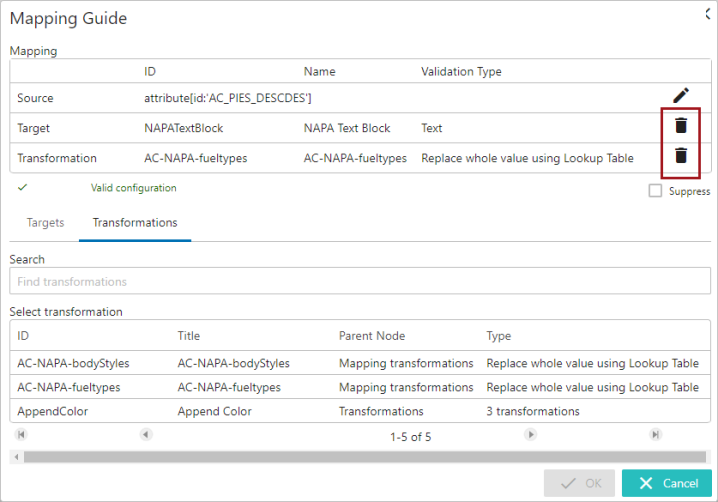
-
Click OK to save and close the 'Mapping Guide' window and then click Save to save the changes. As shown in the screenshot below, the newly added object mapping row will display. To edit the object mapping, click on the row to open the Mapping Guide window in which edits can be made.
Note: Once the user adds a mapping and selects the Source STEP Path and Target and clicks OK to close out of the Mapping Guide window, the Save button is enabled until the user clicks on Save button. If the user fails to click Save, than the mapping will be lost once user selects a new mapping configuration.
-
Repeat the above steps 4 to 9 to add more object mapping rows for the same plugin.
User can add any number of mapping rows in the mapping plugin. When there are multiple mapper rows available within the mapping plugin, the order of execution of each mapper row is based on the order in which it is listed within the mapping plugin.
The health of the mapping row is displayed next to each mapping row. Users can also add some additional information describing each of the mapper rows. The user has the flexibility to disable, delete, or rearrange the listing order of the mapper rows. For more information on handling the mapper rows, refer to the topic Modifying Mapper Rows on the Onboarding Mapping Details Screen within this guide.
Handling Multivalued Source Attributes in Object to Object Mapping
The Mapping Guide window has the Advanced tab that allows users to perform some advanced transformation functionalities when required. The functionalities in this tab are mainly designed to handle multivalued source attributes.
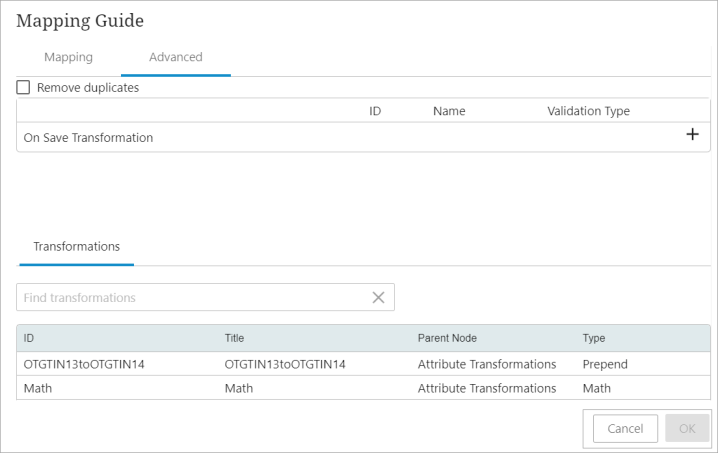
While the attribute transformation configured in the Mapping tab is applied to the values of the source attribute, the attribute transformation configured in the Advanced tab will be applied to the intermittent string that gets created during the transition of data from the source attribute to the target attribute.
This allows to simplify more complex mapping relationships between source and target attributes. When configured, the Object to Object Mapping plugin can handle a multi-valued source attribute and transform the values before populating them into a single-valued target attribute. In this case, the system can extract a specific value from a string of multiple values and apply additional transformations before the final value is populated in the target attribute.
For example, consider that data is being onboarded into a single-valued target attribute (named 'Body Color') from a multivalued source attribute (Color) with an attribute transformation that changes the value from the upper case to the lower case. The source attribute Color has three values, RED, BLUE, and BLACK. If the attribute transformation was set in the Transformation field of the Mapping tab, the target attribute Body Color would be populated with a value 'black' (because the target attribute can accommodate only one value).
However, before it populates this value in the target attribute, it is to be known that in the background, the system creates an intermittent string called 'red<multisep/>blue<multisep/>black' and extracts only the value 'black' out of this string to populate on the target attribute.
The Transformation field in the Advanced tab helps to configure and apply another attribute transformation on this string, and users can transform and retrieve the desired data from this string to be populated in the target attribute value.
For example, if the On Save Transformation field is populated with an attribute transformation that replaces the '<multisep/>' substring into the hyphen '-', then the final value in the target attribute will be populated as 'red-blue-black'.
Along with the functionality described above, the Advanced tab can ensure that no duplicate values are populated in the target attribute by selecting the 'Remove duplicates' checkbox.