As described within each of the mapping plugin topics, the user can add any number of mapping rows in the mapping plugin. When there are multiple mapper rows available within the mapping plugin, the order of execution of each mapper row is based on the order in which it is listed within the mapping plugin.
The user has the flexibility to disable, delete, or rearrange the listing order of the mapper rows. The health of the mapper row is displayed next to each mapper row. Users can also add some additional information describing each of the mapper rows. In the following image, the various functionalities are numbered.
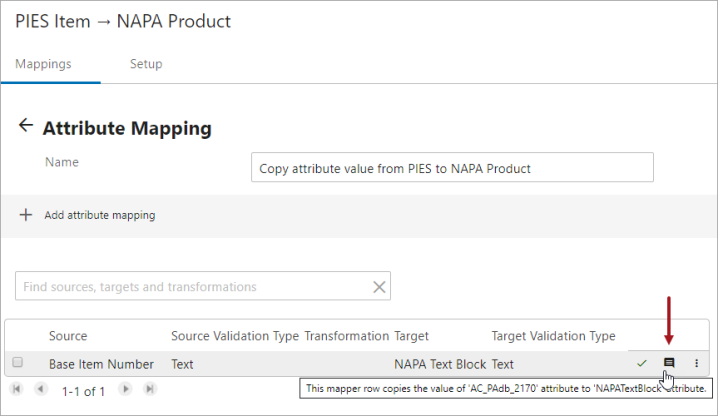
In the image below, the Attribute Mapping plugin is configured to perform multiple mapping functions. Each of the mapping functions is displayed as rows, and are called mapping rows.
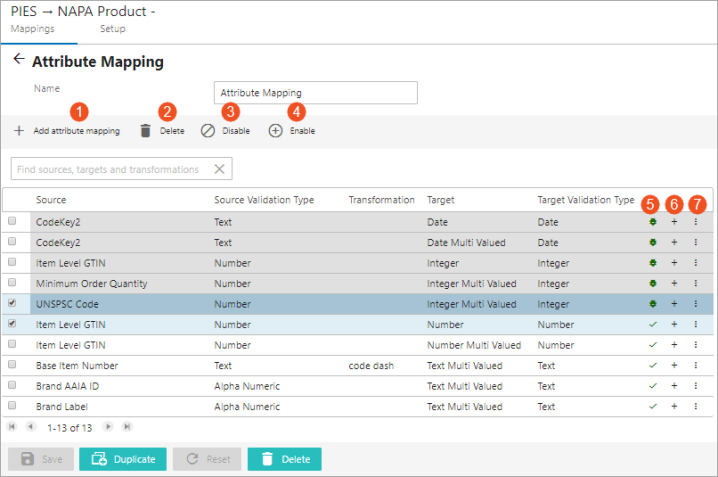
The available modifications defined below include:
- Add a mapper row to the mapping plugin
- Delete a mapper row in the mapping plugin
- Disable a mapper row in the mapping plugin
- Enable the disabled mapper row in the mapping plugin
- Check the health of the mapper row
- Add a description to the mapper row
- Change the order of the mapper row in the mapping plugin
Add a Mapper Row to the Mapping Plugin
Details on how to add the mapper rows are provided within each of the mapping plugin topics. For more information about how to add these mapper rows, refer to the Mapping Plugins topic.
Delete a Mapper Row in the Mapping Plugin
Deleting a mapper row allows you to no longer display (and execute) the mapper row for the selected plugin in the Onboarding Mappings Details screen when it is no longer required.
- For the selected Mapper Configuration setup entity, on the Mappings tab, open the mapping plugin for the mapper row that should be deleted.
- Select the checkbox that is available on the left of the mapper row that is intended to delete. This makes the Delete button visible in the toolbar.
- Click the Delete button. This removes the mapper row from the Onboarding Mappings Details screen in Web UI and also removes the functionalities defined in that particular mapper row from being executed when the user executes the Mapper Configuration setup entity.
- Save the configuration after the row has been deleted.
Disable a Mapper Row in the Mapping Plugin
The execution of the mapper rows within the plugin can be controlled. The rows displayed within the plugin can be disabled as needed, and the disabled mapper row lies in a deactivated state on the mapping plugin. Disabling a mapper row allows you to no longer execute (unless enabled) the mapper row for the selected plugin in the Onboarding Mappings Details screen when it is temporarily not required. By default, all the newly created mapper rows remain activated / enabled.
- For the selected Mapper Configuration setup entity, on the Mappings tab, open the mapping plugin for the mapper row that should be disabled.
- Select the checkbox that is available on the left of the mapper row that is intended to be disabled. This makes the Disable button visible in the toolbar.
- Click the Disable button. This disables the particular mapper row from being executed when the user executes the associated Mapper Configuration setup entity.
- Save the configuration after the row has been disabled.
The mapper row turns gray when disabled.
Enable the Disabled Mapper Row in the Mapping Plugin
The disabled mapper row can be enabled (reactivated) as per the user requirement. Enabling a mapper row allows you to execute the mapper row for the selected plugin in the Onboarding Mappings Details screen. By default, all the newly created mapper rows remain activated / enabled.
- For the selected Mapper Configuration setup entity, on the Mappings tab, open the mapping plugin for the disabled mapper row that should be enabled.
- Select the checkbox that is available on the left of the disabled mapper row that is intended to be enabled. This makes the Enable button visible in the toolbar.
- Click the Enable button. This enables the particular mapper row to be executed when the user executes the associated Mapper Configuration setup entity.
- Save the configuration after the row has been enabled.
Check the Health of the Mapper Row
The health of the mapper row is displayed by a unique type of icon that is visible next to each mapper row. The following are three different types of icons that depict the health of the mapper row. Click any of the below-mentioned icons to view the health of the mapper row.
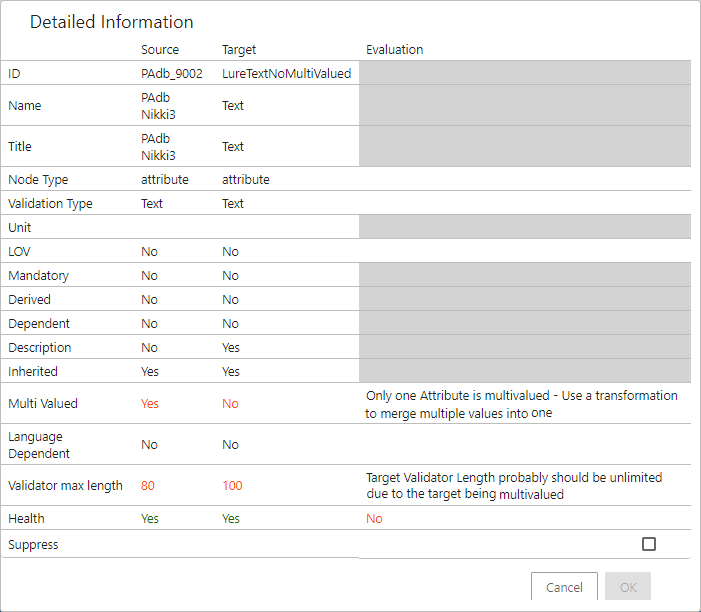
- Red bug icon

This icon denotes the mapper row as unhealthy and includes some flaws. Clicking on the icon displays a 'Detailed Information' dialog.
Users can suppress the mismatch warning message by clicking on the 'Suppress' checkbox in the Mapping Guide window. Selecting the 'Suppress' checkbox only removes the data type mismatch warnings that is displayed on the Mapping Guide window and does not resolve the mismatch irregularities.
- Green bug icon

This icon denotes the mapper row as unhealthy with some flaws but the user has decided to suppress the warning message. Clicking on the icon displays a 'Detailed Information' dialog.

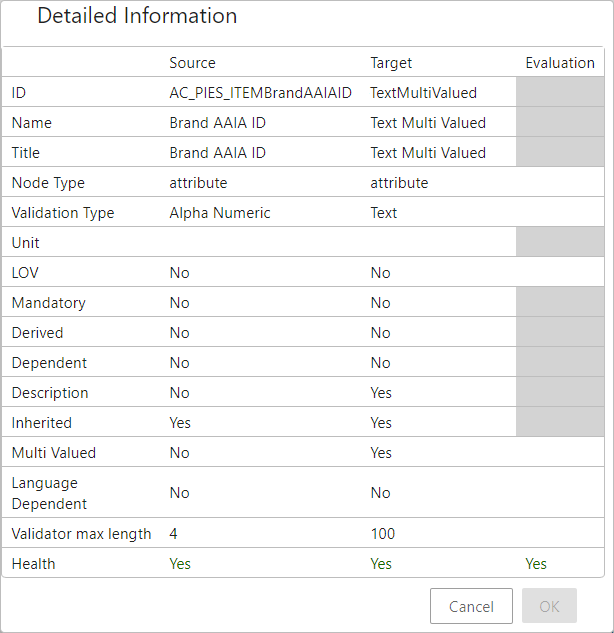
- Green check

This icon denotes the mapper row as healthy without any flaws. Clicking on the icon displays a 'Detailed Information' dialog.
Add a Description to the Mapper Row
Users can add any information as text that helps explain the mapper row functionality. Below is the detailed procedure to add a description to the mapper row.
- For the selected Mapper Configuration setup entity, on the Mappings tab, open the mapping plugin for the mapper row that should be described.
- Click the Add Description icon (
 ) that is available to the right of the mapper row. This will display the Edit Information dialog.

- Type in the required text and click OK to save and close the dialog.
After the description has been entered, the icon style will be changed from (![]() ) to (
) to ( ) symbolizing the presence of some information within the icon. The description will be visible when the user clicks or hovers over the () icon.
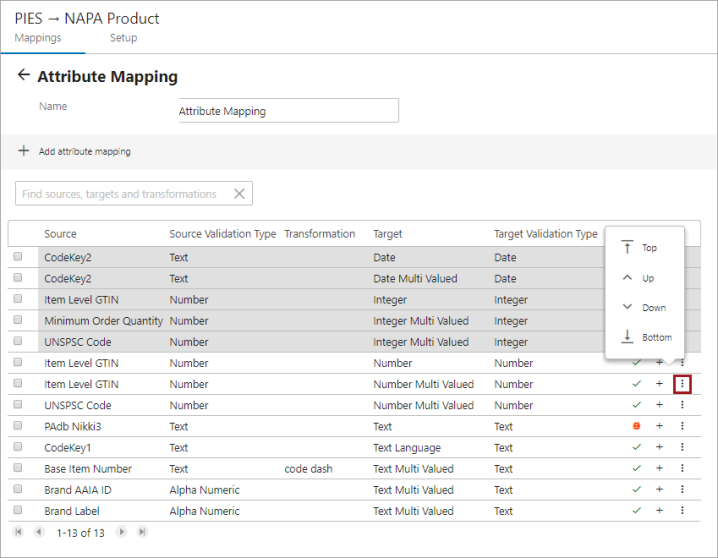
Change the Order of the Mapper Row in the Mapping Plugin
When there are multiple mapper rows available within the mapping plugin, the order of execution of each mapper row is based on the order in which it is listed within the mapping plugin. The user can rearrange the order of the mapper row. Below is the procedure to rearrange the order of the mapper row.
- For the selected Mapper Configuration setup entity, on the Mappings tab, open the mapping plugin for the mapper row that the order should be rearranged.
- Click the three-dotted icon (
 ) that is available in the right of the mapper row. This will display the rearranging dialog. The user can select the Top, Up, Down, or Bottom button to rearrange the mapper row accordingly.