The Concatenator Mapping plugin allows users to combine multiple source values into a single target attribute while applying different texts that can be prepended or appended to the concatenated values, or used to separate those. The plugin is configured on the Onboarding Mappings Details Screen for the selected Mapper Configuration.
Before following the steps described below to configure this plugin, users must first determine which target attribute will be populated with the concatenated value, and then define the source attributes. So, it is advised to follow the steps mentioned below to avoid confusion. To configure the Concatenator Mapping plugin, follow these steps:
-
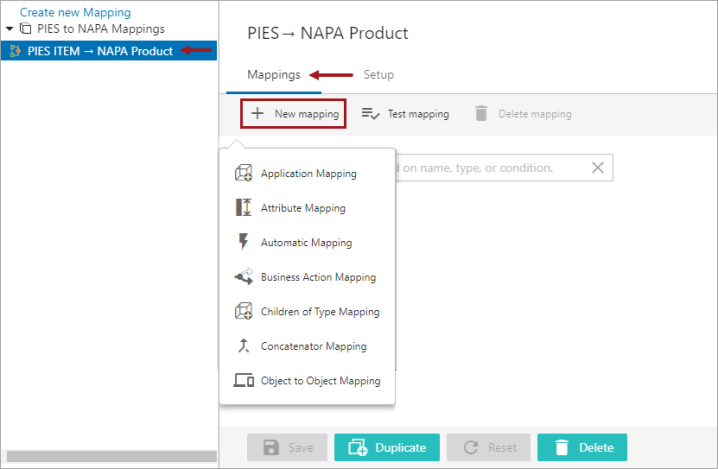
With the required Mapper Configuration selected, click the New mapping button found at the top of the Mappings tab on the Onboarding Mappings Details screen.
-
Select Concatenator Mapping from the New mapping button's dropdown, and a screen displays with two tabs, Source Mappings and Settings.
-
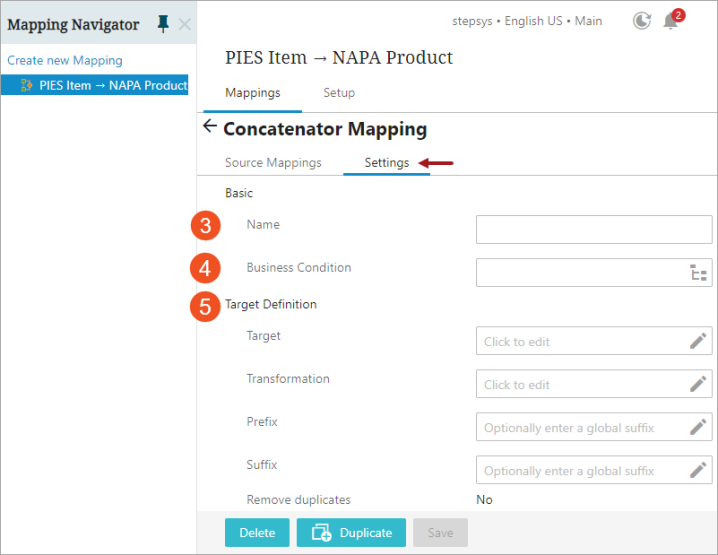
On the Settings tab, type the desired name in the Name field. This could be any unique name that describes the mapping functionality.
-
If needed, add a business condition in the 'Business Condition' parameter that defines running the mapper plugin only on the object if the condition is true.
-
Populate the parameters in the Target Definition section.
To configure the five parameters available under the Target Definition field (Target, Transformation, Prefix, Suffix, and 'Remove duplicates'), users must access the Target Mapping Guide window. Click on the edit icon (
 ) available next to any of the parameters to access this window. The same parameters will be available for editing within the Target Mapping Guide window, as shown in the screenshot below.
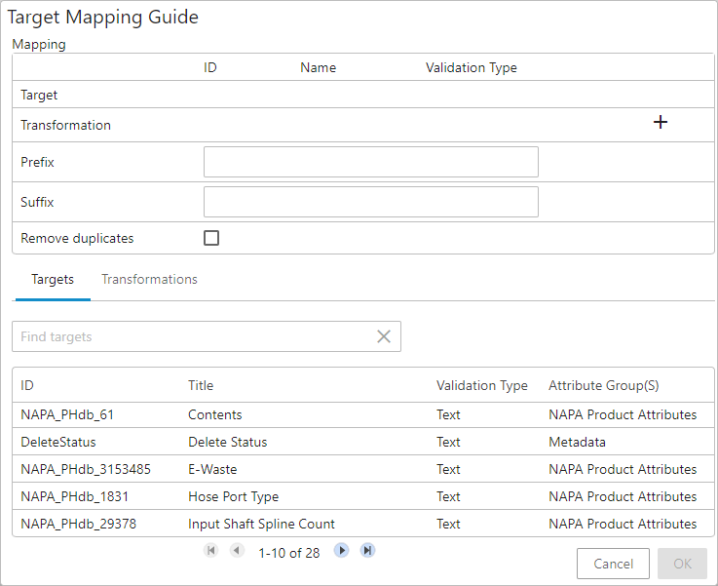
Below are the details about these parameters:
-
Target: Displaying at the top of the Mapping table, the Target parameter displays the ID, Name. and Validation Type of the Target object attribute. Multiple values retrieved from the source object are concatenated and copied to this attribute. To display a target attribute in the Mapping table, users must select an attribute listed in the table on the 'Targets' tab displayed in the lower half of the window (as shown below). A search bar above the table enables typeahead searching, which allows users to type in the few characters of the attribute name, and then select the desired target attribute from the results.
It is mandatory to have an attribute defined in the Target parameter.
Note: The Concatenator Mapping plugin can have multiple source attributes but not multiple target attributes.
-
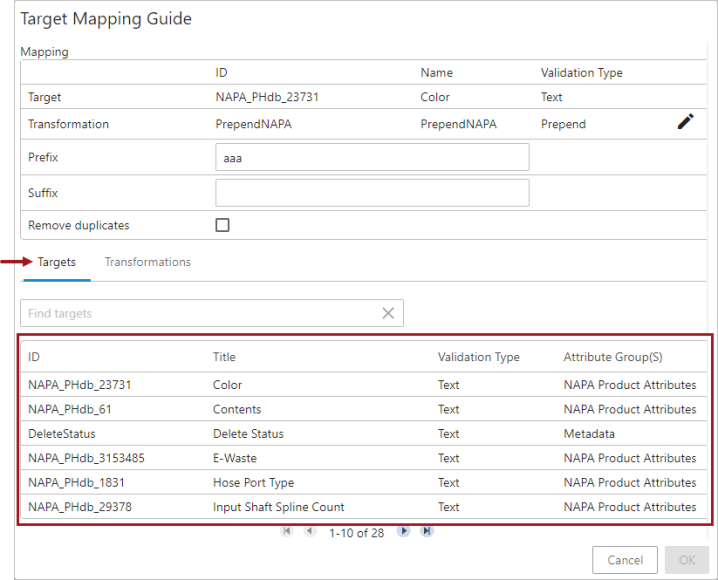
Transformation: This field allows users to add an attribute transformation. The attribute transformation added within this parameter will be applied to the final concatenated value and not the individual values retrieved from multiple source attributes. Users can either use an existing attribute transformation in the system or create a new one by clicking the 'Create new transformation' icon (
 ) available within the Transformation field. To configure an existing attribute transformation, users should select an existing attribute transformation listed in the 'Transformations' tab displayed in the lower half of the window (as shown below).
 Clicking on the 'Create new transformation' icon (
) available within the Transformation field will open the Transformation Overview window where the user can create a new attribute transformation. For details about creating an attribute transformation standing on a Mapping Guide window, refer to Creating Attribute Transformations Through Mapping Guide Window topic within this guide.The populated transformation can be edited / removed by clicking the edit icon (
) in the Transformation field.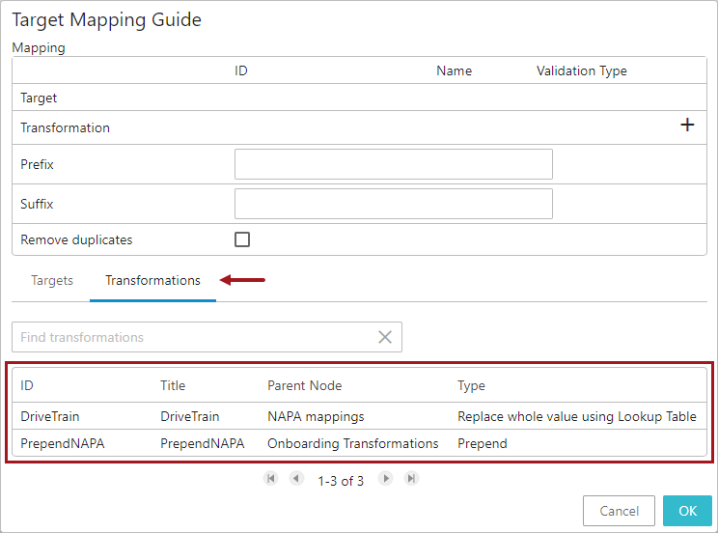
-
Prefix: If the onboarding process requires any prefix to be prepended to the target attribute value, the user can enter a prefix into the Prefix field. The specified prefix will be applied to the final concatenated value and not on the individual values retrieved from multiple source attributes.
-
Suffix: If the onboarding process requires any suffix to be appended to the target attribute value, the user can enter the suffix to the Suffix field. The specified suffix will be applied to the final concatenated value and not on the individual values retrieved from multiple source attributes.
-
Remove Duplicates: Checking the box for this parameter will ensure that only one value of any identified duplicates is populated in the target attribute.
Important: As the Concatenator Mapping plugin allows users to retrieve values from multiple source attributes and copy them to one target attribute, any configuration settings (transformation, prefix, etc.) made within the Target Mapping Guide will only be applied to the final concatenated value on the target attribute and not on the individual values retrieved from the source attributes.
Once all the parameters within the Target Mapping Guide window are populated, click the OK button at the bottom right of the window to close the window. All the values populated within the Target Mapping Guide window will be reflected accordingly within the five parameters (Target, Transformation, Prefix, Suffix, and 'Remove duplicates') available under the Target Definition field.
-
-
Once all the necessary parameters in the Settings tab are populated, click the Source Mappings tab to define the source attributes. Then click the Add Source Mapping button to open the Source Mapping Guide window.

The Source Mapping Guide window allows users to define a source attribute, and configure the value retrieved from the defined source attribute.
Below are the details about these parameters:
-
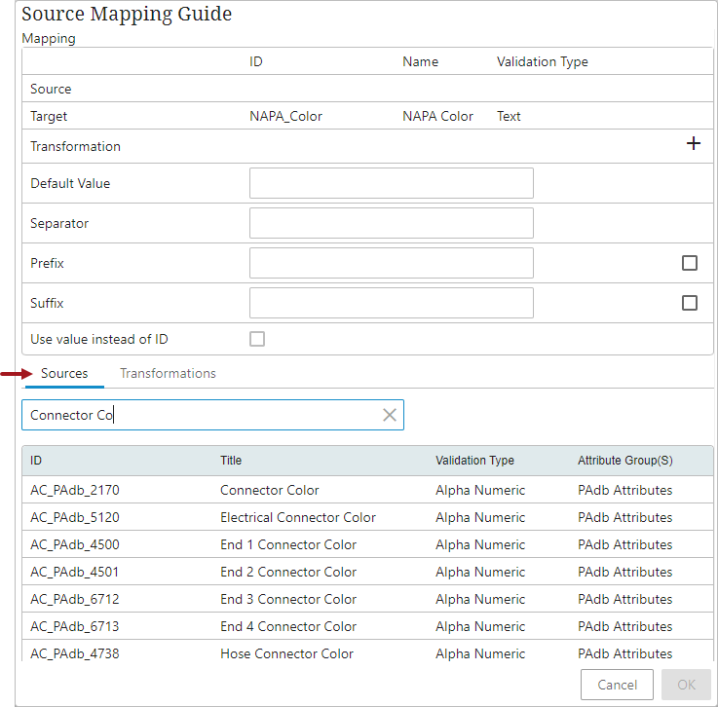
Source: The Source row displays the attribute belonging to the Source object from which the value is retrieved. To configure a source attribute to this field, users should select an attribute from the table on the 'Sources' tab found in the lower half of the window (as shown below). A search bar above the table enables typeahead searching, which allows users to type in the first few characters of the desired source attribute name, and then select the desired source attribute from the results. Further, users can take the help of the typeahead field to type in the few characters of the attribute name to find their appropriate source attribute. It is mandatory to have an attribute defined in the Source parameter.
-
Target: This field displays the target attribute where the retrieved value is copied to. Users should access the Target Mapping Guide window as defined in step 5 of this document to edit the target attribute.
-
Transformation: This field allows users to add an attribute transformation. The attribute transformation added within this parameter will be applied to the selected source attribute's value and not the final concatenated value. Users can either use an existing attribute transformation available in the system or create a new one by clicking on the 'Create new transformation' icon (
) available within the Transformation field. To configure an existing attribute transformation, users should select an attribute transformation that is listed in the 'Transformations' tab displayed in the lower half of the window (as shown below).Clicking on the 'Create new transformation' icon (
) available within the Transformation field will open the Transformation Overview window where the user can create a new attribute transformation. For details about creating an attribute transformation standing on a Mapping Guide window, refer to Creating Attribute Transformations Through Mapping Guide Window topic within this guide.The populated transformation can be edited / removed by clicking the edit icon (
) in the Transformation field.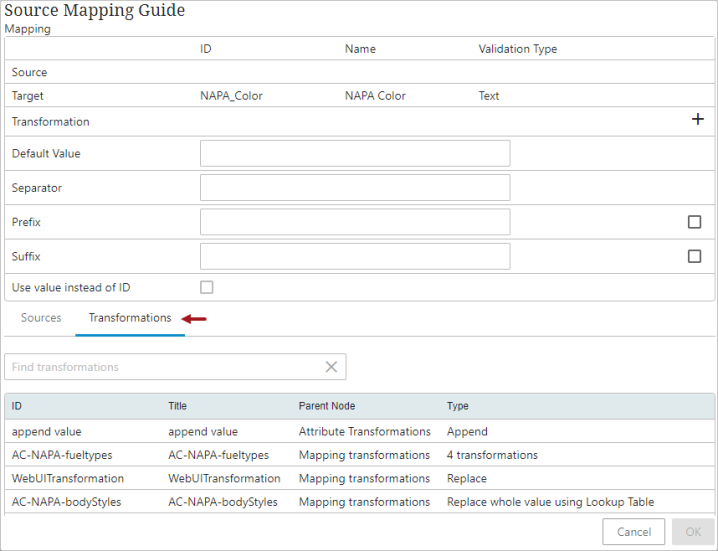
-
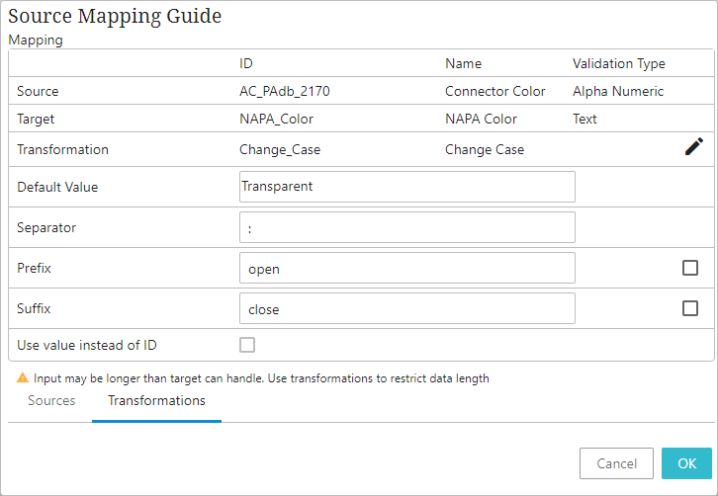
Default Value: This field allows users to enter a text which needs to be populated within the target attribute value when the source attribute remains empty for the executed source object. This gets only relevant if the source attribute you are mapping is empty. Otherwise, the default value will not function.
-
Separator: Any character entered in this field will be a value delimiter when the Concatenator Mapping plugin has multiple source attributes or a single source attribute with multiple values.
-
Prefix: Any character entered in this field will be placed before the retrieved source attribute value. This gets only relevant if the source attribute you are mapping has any value in it. Otherwise, the prefix will not be set on an empty attribute. In addition, if the Default Value parameter includes any characters, then the prefix will be set on the default value.
-
Suffix: Any character entered in this field will be placed after the retrieved source attribute value. This gets only relevant if the source attribute you are mapping has any value in it. Otherwise, the suffix will not be set on an empty attribute. However, if the Default Value parameter includes any characters, then the suffix will be set on the default value.
-
Use Value instead of ID: This option gets only relevant if the source attribute is of LOV validation type. Otherwise, the checkbox will be grayed out. The default is set to retrieve the ID of the populated LOV from the source attribute and not the LOV value. However, selecting this checkbox will retrieve the LOV value from the source attribute for mapping.
Below is an example screenshot of the Source Mapping Guide window when the parameters are populated:
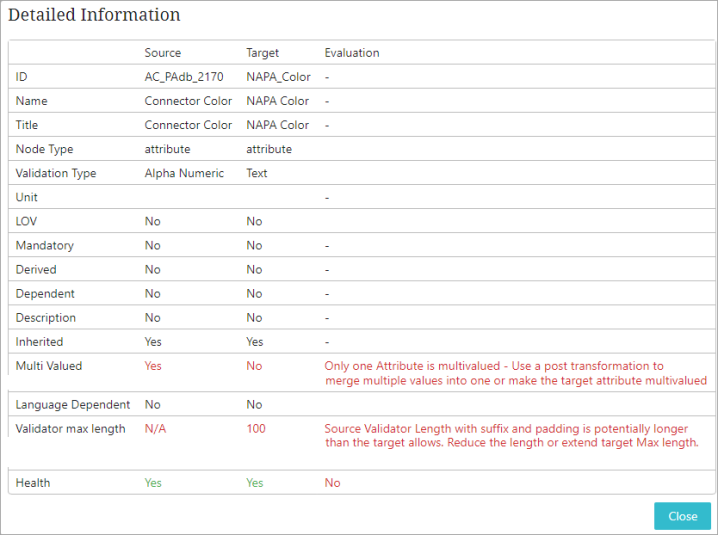
After the source and target attributes are defined in the Source Mapping Guide window, the system evaluates the validity match between the source and the target attributes. A hyperlink text explaining the reason for the validity match / mismatch gets displayed in the middle of the window. Clicking on the hyperlink opens the 'Detailed Information' dialog (shown below) and displays the validity match / mismatch information of the mapper. Below is an example of a validation mismatch between the source and the target attribute displayed in the 'Detailed Information' dialog:
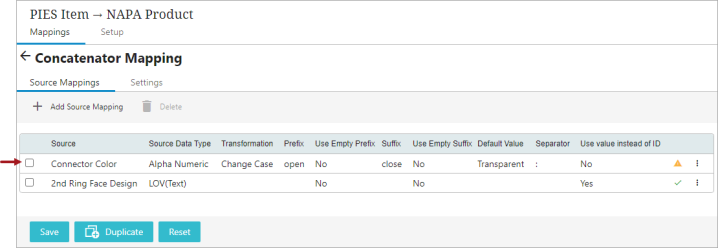
Once all the necessary parameters within the Source Mapping Guide window are populated, click OK to close the Source Mapping Guide window and then click Save to save the changes. All the values populated within the Source Mapping Guide window parameters will be displayed as a mapper row in the table within the Source Mappings tab (as shown below). To edit the source attribute selections, click on the row, and it will open up the Source Mapping Guide window in order to make edits.
Note: After the user edits and closes the Source Mapping Guide / Target Mapping Guide window, the Save button remains enabled until the user clicks on the Save button. If the user fails to click Save, then the mapping changes will be lost if the user navigates out of the selected Mapper Configuration.
-
-
Repeat step 6 to add more source attributes to concatenate the values for the defined target attribute.
Users can add any number of mapper rows (source attributes) in the mapping plugin. When there are multiple mapper rows available within the mapping plugin, the order of execution of each mapper row is based on the order in which it is listed within the mapping plugin.
The health of the mapper row is displayed next to each mapper row. Users can also add additional information describing each of the mapper rows. The user has the flexibility to disable, delete, or rearrange the listing order of the mapper rows. For more information on handling the mapper rows, refer to the topic Modifying Mapper Rows on the Onboarding Mapping Details Screen within this guide.