The preferred method for file transfer protocol (FTP) delivery is the SFTP secure delivery method. The SFTP delivery method allows an exported file to be delivered to an external system and is often used when the output files are large or when a different or remote system is in use.
The SFTP (Deprecated) delivery method allows only RSA encryption and there is no timeout, and parameters require that text be manually entered.
The SFTP Delivery Method allows use of Ed25519, ECDSA, RSA-SHA2-256, and RSA-SHA2-512 cryptographic keys and includes an automatic 30-second timeout to prevent indefinite attempts, and incorporates dropdown selections to ensure correct entries.
For information on the OIEP FTP delivery method, refer to the FTP Delivery Method topic.
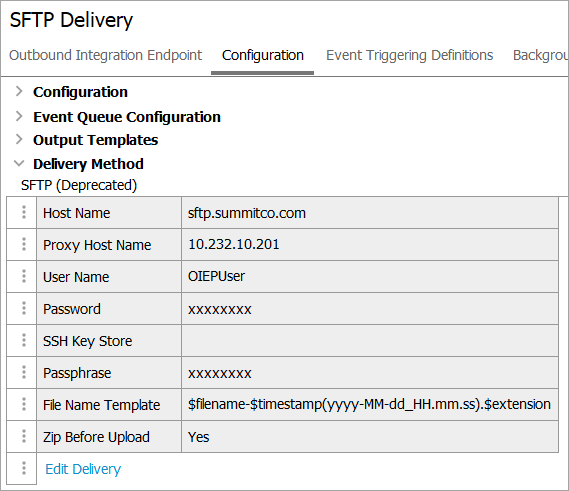
In an OIEP, the delivery method is displayed on the Configuration tab of the editor in the Delivery Method section.
This delivery method is also available in Export Manager as defined in the SFTP Delivery Method topic.
Prerequisites
Prior to configuration, clicking the Host name dropdown parameter displays the required property name. Provide a selection for the dropdown parameter via the case-sensitive FTPDeliveryHostName configuration property. The required format of the property is (square brackets not included): FTPDeliveryHostName=1=[host1],2=[host2] where additional entries can be added following this pattern.
The host name shown in the image below was selected from the two options configured using the following entry in the properties file:
FTPDeliveryHostName=1=sftp.vertexinc.com,2=sftp.summitco.com,3=sftp.apexinc.org
Configuration
For information on a parameter, hover over the parameter field to display help text.
-
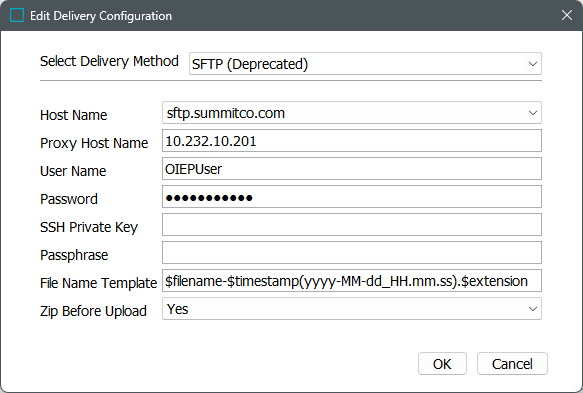
Click the Select Delivery Method list to display the dropdown and select SFTP (Deprecated).
-
In Host Name, from the dropdown, choose the host name of the SFTP server to be used for the delivery.
-
In Proxy Host Name, enter the host name to be used for the server proxy. This field is optional.
-
In User Name, enter the user name that has access to log on to the FTP server.
-
In Password, enter the password that will be used to log on to the FTP server. If using the SSH Private Key, leave this field blank.
-
In SSH Private Key, enter the full path to the Secure Shell (SSH) key file, if using. If you added a password in the Password field, leave this field blank.
Note: This SSH key must be an RSA private key in the OpenSSH PEM format. Other SSH key types or those generated in the new OpenSSH format (the default used in OpenSSH 7.8+) are not currently supported and will result in an SFTPException: invalid privatekey error.
-
In Passphrase, enter the passphrase that accompanies the SSH key entered, if applicable. If the 'SSH private key' does not have a passphrase or you are not using an 'SSH private key', leave this field blank.
-
In File Name Template, to create the file name used for the output, enter template variables (identified with a $), static text, or use a combination of both. The default template is $filename-$timestamp(yyyy-MM-dd_HH.mm.ss).$extension. Depending on the settings of the configuration, the default template outputs a file name similar to 'GenericXML-2020-07-30_14.07.44.xml.'
Note: The 'Zip before upload' parameter also has an impact on the file name.
Each variable is described below:
-
$filename: This variable is replaced with the extension of the output file based on the selected format in the Output Templates section (as defined in the OIEP - Event-Based - Output Templates Section or the OIEP - Select Objects - Output Templates Section topics). For XML-based formats, the output file is set with the .XML extension, while Excel files use .XLS, and comma-separated values use .CSV. For event-based OIEPs with the STEPXML format, the first and last Event IDs are used. For example, the output file name could be '1804038-1804038.xml' to indicate that STEPXML was used for a single event.
-
$timestamp: This variable is replaced with the time in year-day-month-hour-minutes-seconds-milliseconds, excluding the dashes. For example, 20161511094709625 is used for an export on 15 NOV 2016 at 9:47:09:625 AM.
Adding a definition for the arrangement of the date / time elements provides a way to generate a more readable date. Static characters can be included to separate the timestamp elements and individual elements can be ordered as required, as shown below.
Note: To revert the $timestamp variable so that it uses the legacy definition (milliseconds between January 1, 1970, and the time when the file is uploaded), contact Stibo Systems Support.
$timestamp(ddMMyyyy): The timestamp is modified to display day-month-year (excluding dashes) and is output as '15112016' for 15 NOV 2016.
$timestamp(yyyy-MM-dd_HH.mm.ss): The timestamp is modified to display year-month-day_hour.minutes.seconds (including the dashes, underscore, and periods) and is output as '2016-11-15_09.32.43' for 2016 NOV 15 at 9:32.43 AM.
-
$extension: This variable is replaced with the extension of the output file based on the selected format in the Output Templates section. For XML-based formats, the output file is set with the .XML extension, while Excel files use .XLS, and comma-separated values use .CSV.
-
$uuid This substitution variable represents a universally unique identifier (UUID). A UUID typically follows this format: d36c9b1a-4c69-47e2-baa8-336af2e299e8. The variable can be used to generate unique filenames in delivery plugins, effectively preventing duplicates. This is particularly important in scenarios where multiple batches are processed, as it ensures that each filename remains distinct.
Note: The File Name Template does not support conversions of file formats and can only be used to deliver files in the format specified on the Configuration tab > Output Templates section of the outbound integration endpoint.
-
-
In Zip Before Upload, select an option from the dropdown to specify if the output file should be delivered in a .ZIP (compressed) file format.
-
Yes uses 'result_0' before the timestamp variable and the extension ZIP. For example, a zipped STEPXML output with the default File Name Template exported on 30 JUL 2020 results in an output .ZIP file named 'result_0-2020-07-30_14.07.44.zip.' The contents of the ZIP file would follow the $filename variable applied in the 'File name template' parameter.
-
No uses the 'File name template' for the file name along with the appropriate extension for the selected data format.
-
-
On the Edit Delivery Configuration dialog, click the OK button to save the delivery method.