The Data Container Attribute option allows you to map data container attributes and references types to specific (new or existing) data containers when mapping to entity or product objects.
The mapping instructions are the same for both the Import Manager tool and the IIEP tool. For details about starting an import, refer to Creating a Data Import or Creating an Inbound Integration Endpoint.
Map Data Container
- Below the Source section, in the Map to parameter, select the Entity or Product super type.
- In the Source section, select the column of data containing the first attribute of the data container, and click the Map button.
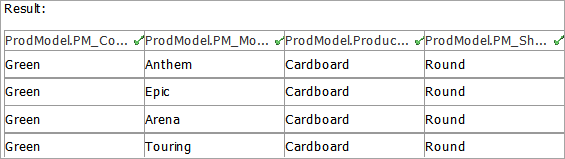
In the example below, the 'PM_Model' column will be mapped to the appropriate data container type and attribute.
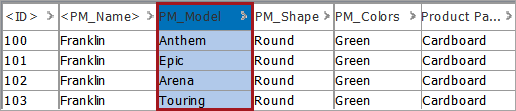
Unless configured with auto-ID, a data container ID source column (or variable) must also be mapped to the Data Container ID column. In this example, the '<ID>' column represents the data container IDs being imported.
Explicitly setting an ID for each data container in this way allows for subsequent imports to update the data container instances. If data container IDs are not provided as a source column in the imported file, a variable may be created to serve in its place. This is especially helpful when importing and updating single instance data containers.
For more information on variables, refer to the Variable - Map Inbound topic.
- In the 'Map ... to' dialog, select the Data Container radio button. This option is only available when the Entity or Product super type is specified in the 'Map To' dropdown.

- For Data Container type, Click the ellipsis button (
 ) and select the data container type associated with the attribute column being mapped.
 - With the attribute radio button engaged, select the Attribute using the dropdown. Only attributes valid for the data container type mapped in the previous step will display.
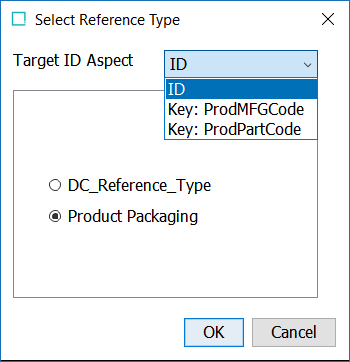
- With the reference radio button engaged, click the ellipsis button () and select the reference type that should be associated with the source column being mapped. Use the appropriate target ID aspect for identifying the target object of the selected reference type. Only reference types valid for the data container type mapped in the previous step will display.
Note: If an attribute and/or reference type that was selected as a data container key for the selected data container type is not mapped and the user selects 'Next' to advance to the 'Identify Objects' dialog in the Import Manager, a warning dialog pop-up will appear. For more information on data container keys, refer to the Data Container Keys topic in the System Setup documentation.
- The Match value ID in LOV parameter (shown in the image below), is only displayed if the data container attribute holds an LOV where:
- Users are not allowed to add values (a hard domain LOV) and
- The LOV uses Value IDs
In this case, the attribute column in the import file can include the value IDs. Check the box if the IDs in the Excel sheet should be matched against the IDs in the LOV, and values applied based on the match. For more information on hard domain LOV, refer to the List of Values (LOV) topic in the System Setup documentation.
- For Data Container ID column, use the dropdown to select the header of the data container ID column applicable to the data container attribute being mapped.
Note: All source column headers and configured variables are listed in the dropdown.
- For the Use Auto-ID parameter, check the box to assign automatic IDs to data containers if you do not want to manually map an ID column. If a data container ID column is selected this box will become unchecked.
- Add a separator symbol in the Data Container separator field, if applicable. This only impacts data container types configured to allow multiple data containers. The separator signals to the STEP system that there are multiple data containers for a single entity so that attributes are created or updated accurately.
Note: All attributes being mapped to a specific data container type must use the same ID column or an error will display.
- Check the Mandatory option appropriately:
- If checked, imported objects must have a value in the file. If a value does not exist for an object, the object is skipped and not imported.
- If unchecked, all objects are imported regardless if a value is specified or not.
- Click OK and the Result panel displays your selection.