This document describes how to transfer configuration and sample data from one STEP system (the source system) to another (the target system).
It is assumed that the target system is either empty or, configuration-wise, closely resembles the source system. Trying to update a target system that configuration-wise is far from the source system via STEPXML export / import will most likely lead to numerous errors during import.
It is recommended to transfer configuration and sample data separately, and the two tasks are covered in separate sections below.
Two template export configurations are supplied with this guide: a 'Configuration-Export' export configuration for exporting the STEP configuration included in the 'Configuration-Export.xml' file and a 'ProductDataSample-Export' export configuration for exporting sample product data included in the 'SampleProductData-Export.xml' file (refer to the Sample Data: Export and Import section below for details on how to export Customer MDM sample data).
System Configuration Export and Import
Important: The 'STEPXML Configuration Export' format significantly reduces the need for manual work when exporting the configuration from a STEP system. Refer to the STEPXML Configuration Export Format topic in the Data Formats section of the Data Exchange documentation. When using this format, the steps described below in the sections 'Importing the Configuration-Export Export Configuration' and 'Using the Configuration-Export Export Configuration' can be skipped.
This section describes how to export the configuration from one STEP system to STEPXML, producing a file that can be imported on an empty STEP system or a system with a very similar configuration without errors.
'Configuration,' as referenced in this document, is understood as the STEP system configuration stored in the STEP database accessible via the workbench System Setup tab, i.e., all object type definitions, attribute definitions, business rules, workflows, etc.
A template export configuration 'Configuration-Export' is supplied with this guide in the STEPXML file 'Configuration-Export.xml,' linked in the section above.
The following sections explain how to import, modify, and use the export configuration on the system from which the configuration should be exported (source system) and how to import the produced file on the target system.
Note: Prior to exporting and importing the STEP configuration, it is important to ensure that the same STEP software components (non-baseline components and extensions) installed on the source system are also installed on the target system. Additionally, the same licenses must be enabled. Importing the configuration for features not available in the target system will lead to errors during import.
Importing the Configuration-Export Export Configuration
Follow the steps below to import the Export Configuration on the source system.
-
The Export Configuration will by default be imported in the STEP Context with the ID 'Context1' (a context existing by default in newer STEP systems). If you do not have a Context with this ID in the source system, open the 'Configuration-Export.xml' file in a text or XML editor, change the value for the 'STEP-ProductInformation' element 'ContextID' attribute to the ID of the Context to import into and save the changes.

All contexts in a STEP system are displayed in the Contexts editor of the System Setup tab in the workbench.
-
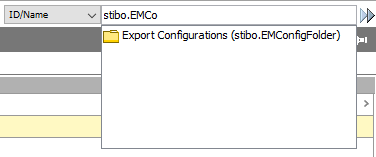
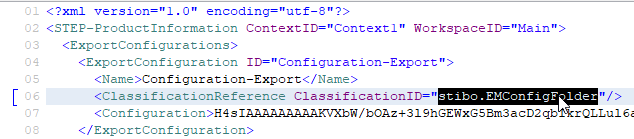
The Export Configuration will be imported below a Classification with ID 'stibo.EMConfigFolder.' This classification exists by default in all STEP systems; however, it could have been deleted. Check that the classification exists via the workbench Search field as shown below.
If the classification does not exist, open the 'Configuration-Export.xml' file in a text or XML editor, change the value for the 'ClassificationReference' element 'ClassificationID' attribute to the ID of the Classification to have the Export Configuration imported into and save the changes.
-
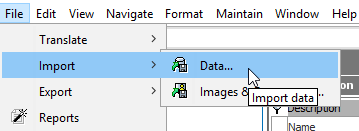
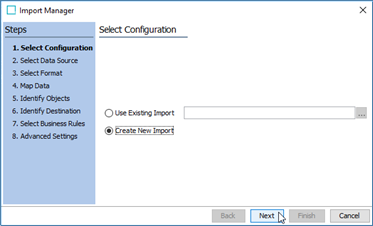
In the STEP Workbench, from the File menu select Import and then select Data….
-
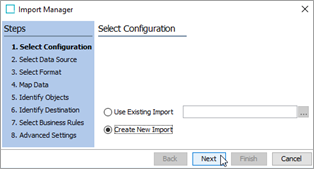
In the Select Configuration step of the Import Manager, click the Next button.
-
In the Select Data Source step of the Import Manager, click the ellipsis button (
 ), browse to where the 'Configuration-Export.xml' file is saved, select it and click the Next button.
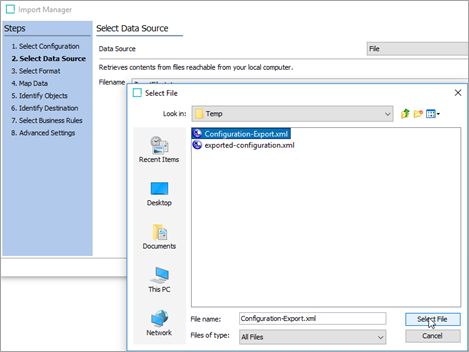
-
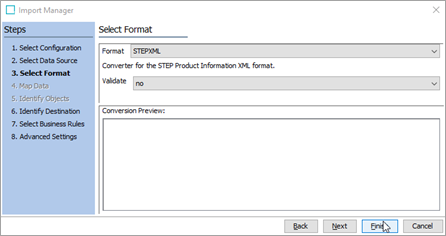
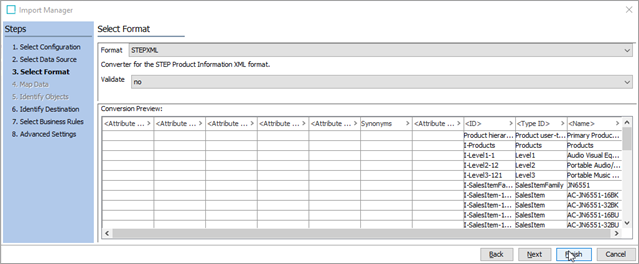
In the Select Format step of the Import Manager, STEP should automatically recognize the file as a STEPXML file. Confirm that Format is 'STEPXML' and click Finish.
-
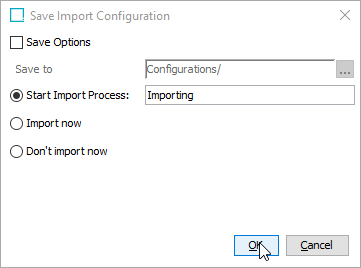
In the Save Import Configuration dialog, uncheck Save Options if selected and click OK to start the import process.
-
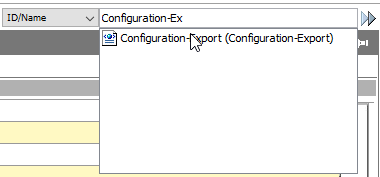
After the import process has finished, locate the 'Configuration-Export' Export Configuration. For example, you can use the STEP Workbench Search field as shown below.
Using the Configuration-Export Export Configuration
The 'Configuration-Export' export configuration must be modified so that the exported STEPXML file will include all objects required for the file to be imported on the target system without errors. Follow the steps below to configure and run the export.
-
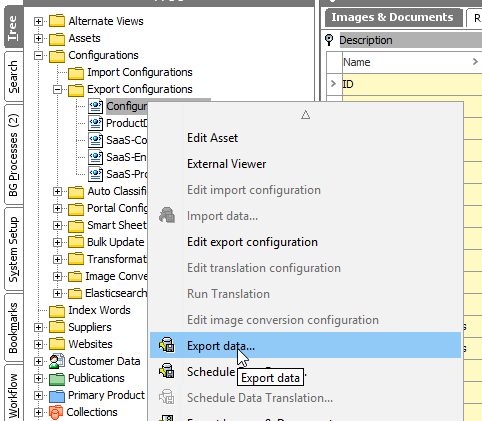
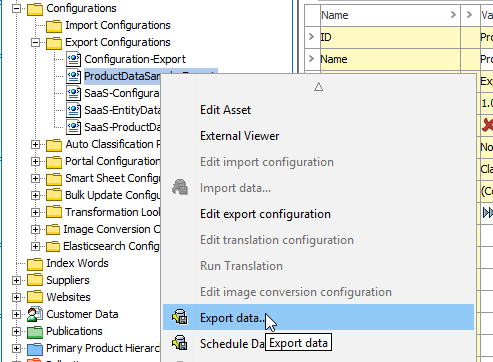
Locate the 'Configuration-Export' file in the STEP Workbench Tree, right-click it, and select Export data….
-
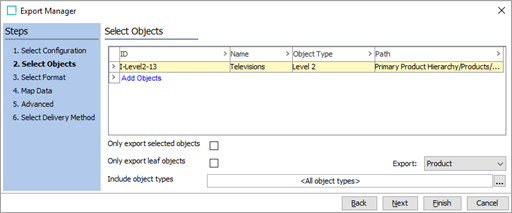
In the Select Objects step of the Export Manager, data nodes (Classifications, Entities, and Products) that are required for the configuration to be successfully imported on the target system must be added. For this exercise, launch an additional workbench instance so that you can add objects in the Export Manager in one and browse the Tree and System Setup in another. The nodes that must be added are:
-
All Classifications holding Export Configurations (immediate parents)
-
All Classifications holding Import Configurations (immediate parents)
-
All Classifications holding Bulk Update Configurations (immediate parents)
-
All Classifications holding Image Conversion Configurations (immediate parents)
-
All Classifications holding Transformation Lookup Tables (immediate parents)
-
All Classifications / products / entities referenced by Privilege Rules on User Groups (it is not necessary to add the super type specific root nodes 'Product hierarchy root,' 'Classification 1 root,' 'Entity hierarchy root,' 'CollectionGroup root,' 'eCatalog root,' etc. that will exist in advance on the target system)
-
Entities and Products referenced from Match Codes (Category)
-
All Classifications referenced directly from Supplier User Groups (Supplier section on the Group tab for Supplier User Groups)
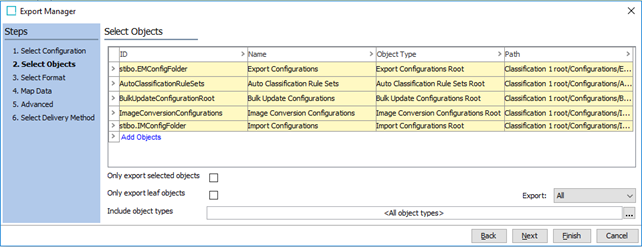
Note: With this export configuration, only the IDs and Names of these nodes and their ancestors up to the type specific root will be exported (i.e., no attribute values, references, etc.).
Click Next after adding all required nodes.
-
-
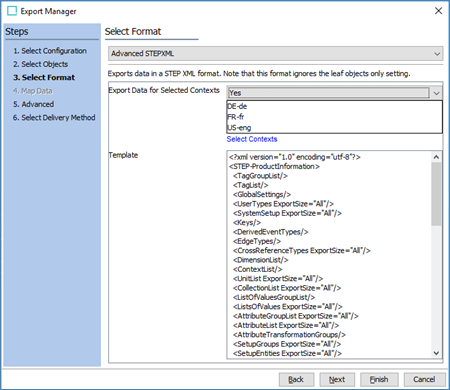
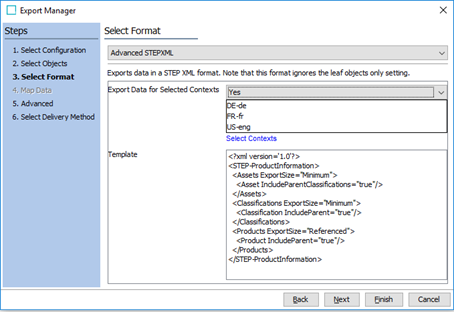
In the Select Format step of the Export Manager, under 'Export Data for Selected Contexts,' select the Contexts for which data should be exported. Notice that this is only relevant if the configuration objects and data nodes are dimension dependent (e.g., language-specific attribute names and LOV values). Click Next to continue.
-
In the Advanced step of the Export Manager, make sure that Workspace is set to Main and click Next.
-
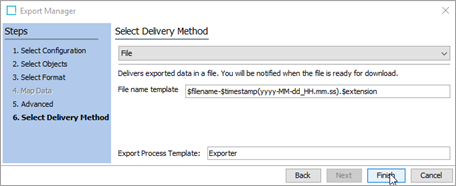
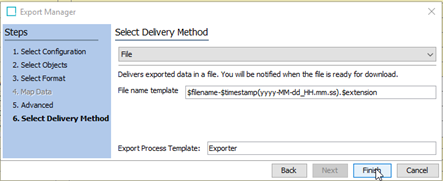
In the Select Delivery Method step, ensure that the 'File' option is selected and click Finish.
-
Select the Save Options checkbox to save the configuration changes for later use and click OK to start the export process.
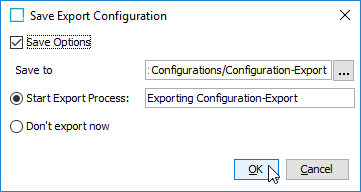
-
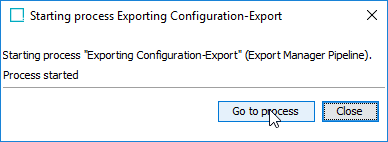
Click Go to process in the dialog that appears.
-
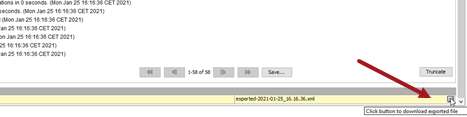
When the export process has completed, click the save icon in the lower right corner of the background process editor to save the file locally.
Importing the Configuration on the Target System
This section describes how to import the exported STEP configuration on the target system. Follow the steps below to import the configuration on the target system.
-
Assuming that the target system has not earlier been used, only a single Context with ID 'Context1' will exist in advance, and if the exported STEPXML file was not exported from a Context with the same ID, the STEPXML file must be modified. Open the exported STEPXML file in a text or XML editor. If the value for the 'STEP-ProductInformation' element 'ContextID' attribute is not 'Context1,' change it to be so and save the modified file.

-
Launch the STEP Workbench for the target system, from the File menu select Import and then select Data….

-
Click Next in the Select Configuration step of the Import Manager.
-
In the Select Data Source step of the Import Manager, click the ellipsis button (
), browse to where you have saved the STEPXML file exported from the source system, select it, and click Next.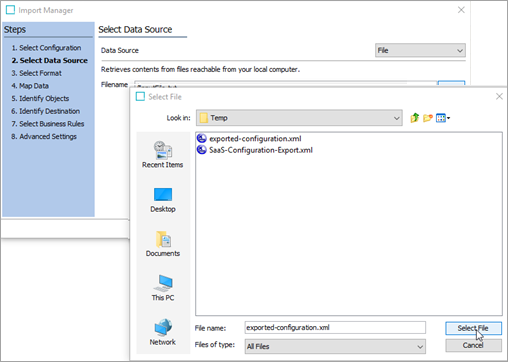
-
In the Select Format step of the Import Manager, STEP should automatically recognize the file as a STEPXML file. Confirm that Format is 'STEPXML' and click Finish.
-
In the Save Import Configuration window, uncheck Save Options if selected, and click OK to start the import process.

-
Click Go to process in the dialog that appears and inspect the execution report for warnings and errors.

Taking Post Import Actions
After the configuration has been imported, it may be necessary to perform a number of additional manual steps as described below.
-
Configuration created by a CSV import file must be recreated in the target system. For example, collections created by a file or a value generator that uses an imported list.
-
User objects maintained in STEP that are referenced from Integration Endpoints and Event Processors and used for M2M integrations can be created via import with a temporary password automatically assigned by the system, which must be reset by the user in Web UI or by an administrator. Users can also be created manually after import. It is expected that User objects representing human users will be automatically created in the target system via an IdP integration with user synchronization.
-
Scheduled background processes must be recreated on the target system. This includes scheduled exports, scheduled data profiling and Workflow deadline monitoring.
-
If the configuration has been imported on an empty target system, all integration endpoints, event processors, gateway integration endpoints, and keys are disabled and must be enabled manually. When importing changes to an existing key, the key must be disabled prior to installation.
-
Prior to enabling integrations with external systems, check that the target system is configured to receive from / publish to the correct external system. Any passwords stored in these configurations must be re-entered manually.
-
As data is imported in the Main workspace, data nodes must be approved to also be reflected in the Approved workspace.
-
The deletion of system configurations or removal of associations is not supported.
Sample Data: Export and Import
This section describes how to export sample data from the source system and subsequently import it on the target system.
A template export configuration 'ProductDataSample-Export' is supplied with this guide in the STEPXML file 'ProductDataSample-Export.xml.' As the name indicates, the export configuration is meant to be used for exporting product sample data with related classifications and assets, meaning that it is not directly applicable for Customer MDM systems. A separate section 'Exporting Customer MDM Sample Data' describes how to export Customer MDM sample data.
Importing the ProductDataSample-Export Export Configuration
The 'ProductDataSample-Export' export configuration supplied in the STEPXML file 'ProductDataSample-Export.xml' can be imported on the source system following the same procedure used for importing the 'Configuration-Export' export configuration. Refer to the Importing the Configuration-Export Export Configuration section above.
Using the ProductDataSample-Export Export Configuration
The ProductDataSample-Export export configuration makes use of the Advanced STEPXML export format with the following instructions.
<?xml version='1.0'?>
<STEP-ProductInformation>
  <Assets ExportSize="Minimum">
    <Asset IncludeParentClassifications="true"/>
  </Assets>
  <Classifications ExportSize="Minimum">
    <Classification IncludeParent="true"/>
  </Classifications>
  <Products ExportSize="Referenced">
    <Product IncludeParent="true"/>
  </Products>
</STEP-ProductInformation>
When one or more products are selected as the root objects for the export, these instructions will cause the following objects to be exported:
-
The selected product objects
-
All ancestors for the selected products up to the product hierarchy root
-
All descendants of the selected products
-
All products referenced from the selection or descendants and the ancestors for these referenced products up to the product hierarchy root
-
All classifications that the selected products and their descendants are linked into and the ancestors for these classifications up to the classification hierarchy root
-
All assets referenced from the selected products and their descendants (asset objects, no content)
-
Further, if the export is run on an In-Memory enabled system, all classifications that the referenced assets are linked into and their ancestors up to the classification hierarchy root
If the sample product data references entities, referenced entities and their ancestors can be included by extending the output template to be:
<?xml version='1.0'?>
<STEP-ProductInformation>
  <Assets ExportSize="Minimum">
    <Asset IncludeParentClassifications="true"/>
  </Assets>
  <Classifications ExportSize="Minimum">
    <Classification IncludeParent="true"/>
  </Classifications>
  <Entities ExportSize="Minimum">
    <Entity IncludeParent="true"/>
  </Entities>
  <Products ExportSize="Referenced">
    <Product IncludeParent="true"/>
  </Products>
</STEP-ProductInformation>
When importing a file produced with the ProductDataSample-Export export configuration, it is expected that the import process will report errors for missing reference and product classification link targets. Thus, while the template will cause referenced objects and their ancestors to be included in the export, the template will not be applied recursively to the referenced / linked objects. That is, the objects that these exported objects reference are not included in the produced file. As a result, these objects will be missing from the imported file.
There are multiple different ways to make the initial sample product selection. This guide focuses on two.
The first option is to select one or more category / family product nodes. With the template export configuration, all product nodes below the selections will be exported, so use the workbench Search Below feature to ensure that the number of product objects below the selections is not too large.
![]()
If a wider spread of product sample data is required, you can use a collection to select a category higher in the hierarchy which can contain too many product objects to be exported fully but instead use a sample below that level that to use as the selection. Follow the steps below to create a Collection with the sample products.
-
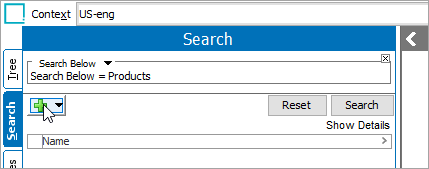
Right-click the desired category in the STEP Workbench Tree and select Search Below from the context menu (as shown above).
-
In the Search tab, click the button with the green plus sign to add another criteria to the search.
-
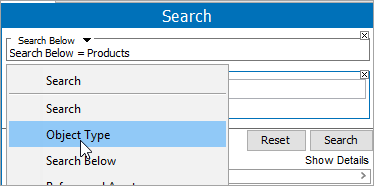
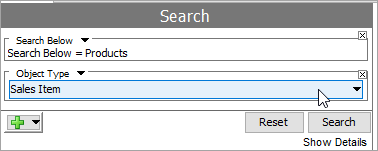
Click the search criteria type selector and choose Object Type from the menu.
-
Select your leaf product object type.
-
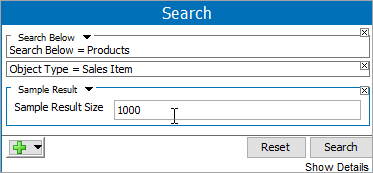
Add another criteria of the type Sample Result, and set the desired sample result size.
-
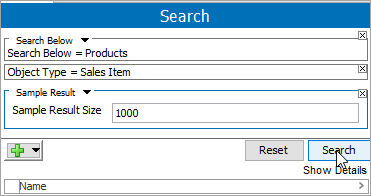
Execute the search.
-
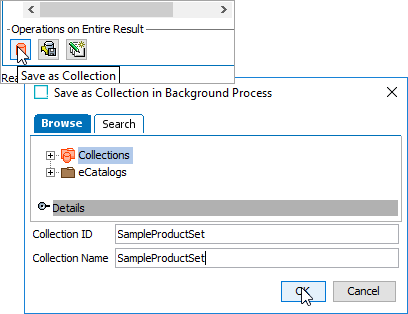
Click the Save as Collection button at the bottom of the search panel to store the result in a Collection.
After deciding which approach to use (and creating the collection with sample data, if desired), follow the steps below to export the sample data.
-
Locate the imported 'ProductDataSample-Export' export configuration in the STEP Workbench Tree, right-click it and select Export data….
-
In the Select Objects step of the Export Manager, depending on which approach you have chosen, either select the root nodes for the sample product hierarchies you would like to export or select the Collection created earlier and click Next.
-
In the Select Format step, under Export Data for Selected Contexts, select the Contexts for which data should be exported if there is dimension dependent data. Click Next to continue.
-
In the Advanced step, make sure that Workspace is set to Main and click Next. It might be relevant to export data from Approved, but this then requires that the produced STEPXML file is manually modified prior to being imported.
-
In the Select Delivery Method step of the Export Manager, ensure that the File option is selected and click Finish.
-
Select the Save Options checkbox to save the configuration changes for later use and click OK to start the export process.
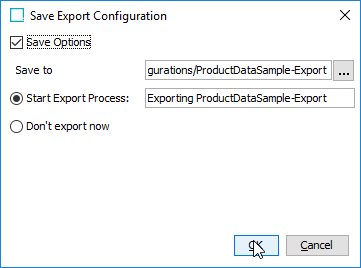
-
Click Go to process in the dialog that appears.
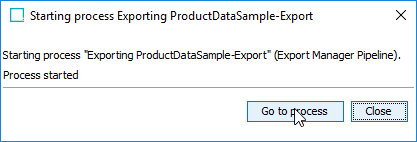
-
When the export process has completed, click the save icon in the lower right corner of the background process editor to save the file locally.

Exporting Customer MDM Sample Data
If sample data instead needs to be exported from a Customer MDM system where data primarily is modeled using entities, use the same export configuration and replace the Advanced STEPXML instructions like the following.
<?xml version='1.0'?>
<STEP-ProductInformation>
  <Entities ExportSize="Referenced">
    <Entity IncludeParent="true"/>
  </Entities>
</STEP-ProductInformation>
Notice that, depending on the data model, it may be relevant to use a combination of these instructions and the product sample data instructions in the template (if the entities, for example, have referenced assets or reference classifications).
As Customer MDM setups often have large amounts of entities below the same parent node (e.g., all customer contacts below the same parent node), it is advanced to always use the sample search approach described above using a search that samples entities instead of products.
Importing the Sample Data on the Target System
The exported sample data can be imported on the target system in exactly the same way as the configuration. Refer to the Importing the Configuration Export on the Target System section above.
Note: The configuration must be imported before sample data.
For more information, also refer to the Maintaining Partial Data Sets on Lower Level DTAP Environments topic.