This section explains how you can keep Dev / QA / Sandbox systems up to date since these systems typically need all of the System Setup but only a small, representative subset of the data from your production environment. Since you only transfer a subset of the data, this makes it much faster and easier to keep these systems up to date and also reduces the hardware requirements for these systems.
Important: Oracle Data Pump exports and imports cannot be used to maintain partial data sets since this technology does not allow, for example, only exporting certain hierarchies or data from certain STEP contexts. Further, Oracle Data Pump imports overwrite any data created or modified in the target environment, which is often not desired. Instead, the recommendation is to use STEPXML for transferring data.
STEPXML Export Basics
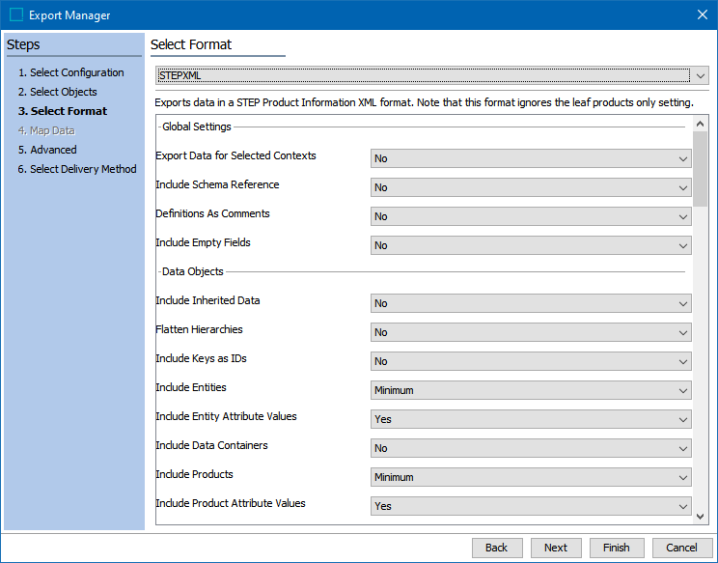
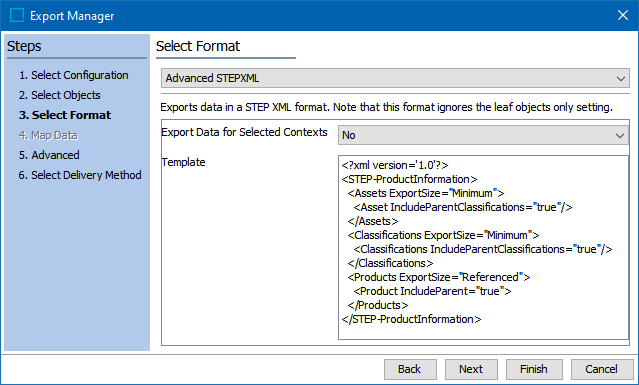
STEPXML can be exported from a STEP system via the Export Manager using either the 'STEPXML' or the 'Advanced STEPXML' format. Both options produce the same format but differ in how you configure the export, i.e., how you decide what data should be included in the exported file. The Advanced STEPXML format makes use of an XML 'output template' sometimes also referred to as a 'recorder file' while the STEPXML format allows for the export to be configured via a UI with a large number of drop-down menus with the selections that allow for behind-the-scenes mapping to an output template. The Advanced STEPXML option is generally harder to work with but offers greater flexibility in configuring the export.
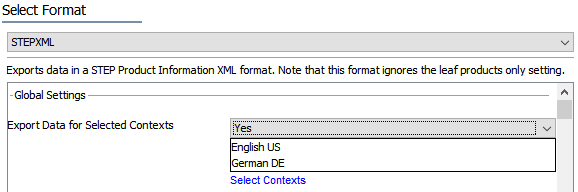
This is an Export Manager example with STEPXML:
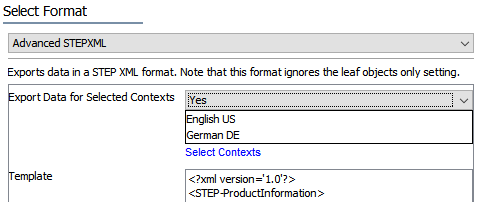
This is an Export Manager example with Advanced STEPXML:
Regardless which STEPXML format is used, a key concept to understand when exporting STEPXML is 'export size.' When exporting data, it is typically not feasible to individually select all the objects that should be exported. Instead, a few objects are selected and the export size then determines which objects should be included in addition to the selected objects.
With the STEPXML format, the export size is specified per super type via a dropdown, as for products shown below:
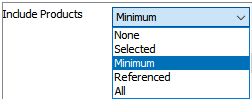
With Advanced STEPXML, the export size is set via a super type-specific attribute as shown below:
<Products ExportSize="Minimum">
    <Product IncludeParent="true"/>
</Products>
The export sizes relevant in this context are described below.
Export Size: Selected
The ‘Selected’ export size, as the name suggests, indicates to the system that the data for the objects selected is to be included in the export.
When using the STEPXML format and selecting the option for products, classifications, and entities, additional objects will be included. Namely, all descendants of the selected object, and for classifications, all classification objects above the selected ones in the hierarchy. This is because choosing ‘Selected’ for products, classifications, and entities causes the output template shown below to be used for the export. For classifications, this template specifies that ancestors should be included (IncludeParent="true"), and since no detailed specification is given for the ‘Classification’ element (no nested elements specifying exactly what should be exported for a classification), descendants are also included. For products and entities, the presence of ‘Product’ and ‘Entity’ elements inside the outer ‘Product’ and ‘Entity’ elements similarly causes descendants to be included in the export.
<?xml version="1.0" encoding="utf-8"?>
<STEP-ProductInformation ResolveInlineRefs="true">
  <Classifications ExportSize="Selected">
    <Classification IncludeParent="true"/>
  </Classifications>
  <Products ExportSize="Selected">
    <Product>
      <Name/>
      <AttributeLink/>
      <DataContainerTypeLink/>
      <ClassificationReference/>
      <Product/>
      <ProductCrossReference/>
      <AssetCrossReference/>
      <EntityCrossReference/>
      <ClassificationCrossReference/>
      <Values/>
      <OverrideSubProduct/>
    </Product>
  </Products>
  <Entities ExportSize="Selected">
    <Entity>
      <Name/>
      <AttributeLink/>
      <ClassificationCrossReference/>
      <Entity/>
      <ProductCrossReference/>
      <AssetCrossReference/>
      <EntityCrossReference/>
      <ContextCrossReference/>
      <Values/>
    </Entity>
  </Entities>
</STEP-ProductInformation>
Export Size: All
The ‘All’ export size is straightforward in that it disregards the export selection and indicates to the system that all objects of a given super type are to be included in the export.
Export Size: Minimum
When focusing on a single super type (like products), the ‘Minimum’ export size works similarly to ‘Selected’ in that it indicates that the selected objects are to be exported, and dependent on the output template, includes descendants and ancestors.
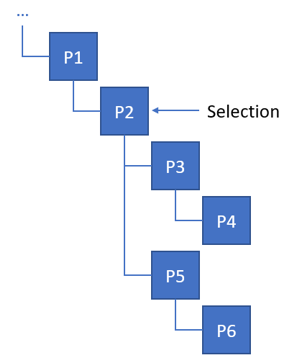
For instance, with the example product hierarchy shown below, if P2 is selected for export and the export size ‘Minimum’ is used for products with the default output template, the exported file will contain data for P2, P3, P4, P5, and P6.
The difference between ‘Selected’ and ‘Minimum’ is that the ‘Minimum’ option works across super types. Assume you are working from a product hierarchy like the one above, but this time the selected product P2 is linked into a classification (C2) and further has a reference to an asset (A1) while the descendant product P4 is linked into the classification C5.
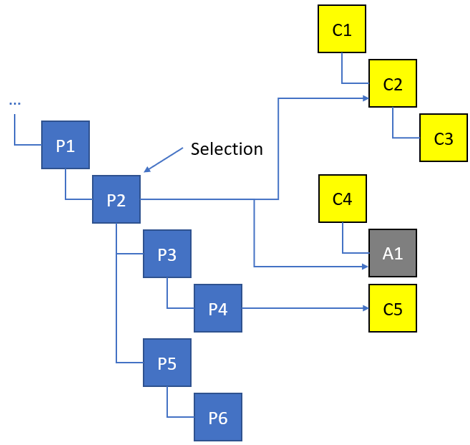
Running an export with just P2 selected and the ‘Minimum’ option specified only for products will cause the same product objects to be exported as in the example above. However, if ‘Minimum’ is also specified for classifications and assets and the default output template is used, the export will include asset A1 and classifications C1, C2, and C5, as well as the products. To summarize: the objects directly referenced / linked from the selection and its descendants will be included. In addition, the default template for classifications specifies that ancestors should be included; therefore, C1 is also included. The template is not applied recursively for non-selected objects when it comes to descendants, so C3 is not exported.
The ‘Minimum’ option can also be used to include configuration objects used by exported data in the exported file. As an example, the output template shown below will cause attributes, attribute groups, units, and lists of values (LOVs) relevant for the product selection to be included in the exported file.
<?xml version='1.0'?>
<STEP-ProductInformation>
  <AttributeList ExportSize="Minimum"/>
  <AttributeGroupList ExportSize='Minimum'/>
  <UnitList ExportSize='Minimum'/>
  <ListsOfValues ExportSize='Minimum'/>
  <Assets ExportSize="Minimum"/>
  <Classifications ExportSize="Minimum"/>
  <Products ExportSize="Minimum"/>
</STEP-ProductInformation>
To be more precise, if an export is run with P2 (from the example above) as the selection and the output template is used, in addition to data objects, the following configuration objects will be exported:
- All attributes used on the exported data objects
- All units used by the exported attributes
- All attribute groups that exported attributes are present in (and by default, all attribute groups up to the ‘Attribute group root’)
- All LOVs used by exported attributes
Note: The logic for including configuration objects is applied recursively. For instance, you will get definitions exported for attributes that are used for metadata on other configuration objects.
Export Size: Referenced
The ‘Referenced’ option is similar to ‘Minimum,’ but the option further prompts objects referenced from the selection or descendants to be exported.
Consider the following setup where the selection only contains product P2, which has a reference to product P8:
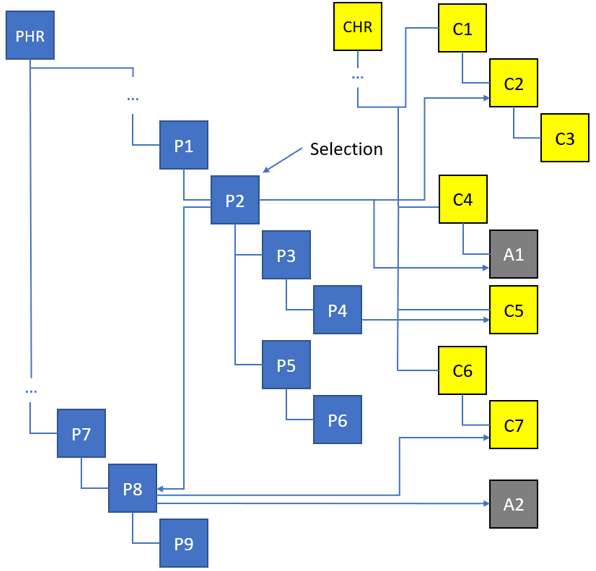
With this data, an export with the following output template:
<?xml version = "1.0" encoding = "utf-8"?>
<STEP-ProductInformation ResolveInlineRefs="true">
  <Assets ExportSize="Minimum"/>
  <Classifications ExportSize="Minimum"/>
  <Products ExportSize="Referenced"/>
</STEP-ProductInformation>
…produces the following objects in the export:
Products: P2, P3, P4, P5, P6, P8
Classifications: C2, C5
Assets: A1
To illustrate, in the diagram below, nodes that are not exported have been dimmed:
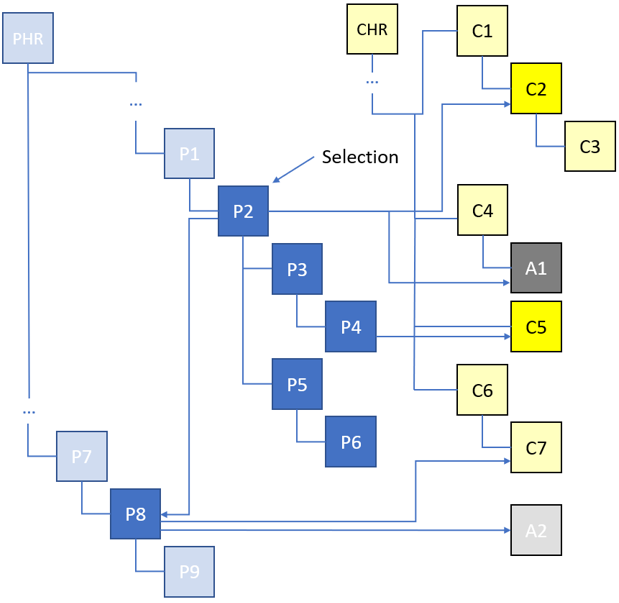
The logic is not applied recursively. In this example, the classification C7 that P8 is linked into and the asset A2 that the product references are not included in the export. Also P9, which is a child of P8, is not included.
Including Ancestors
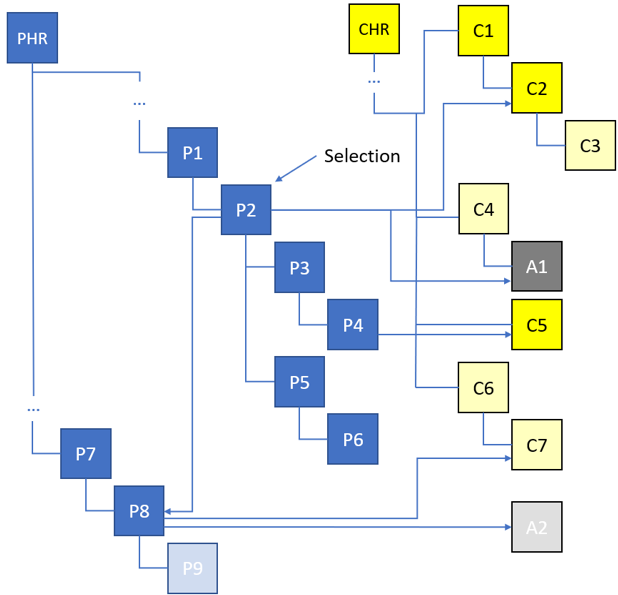
Reusing the last data example, importing the files exported with the settings described above results in errors on a system that does not have ancestors like P1, P7, C1 and C4 existing in the system in advance. However, when using the Advanced STEPXML format, the exporter can include ancestor objects up to the hierarchy roots (‘PHR’ and ‘CHR’ in the diagrams).
For products, classifications, and entities, include ancestors using the ‘IncludeParent’ attribute as shown in the output template example below:
<?xml version='1.0'?>
<STEP-ProductInformation>
  <Assets ExportSize="Minimum">
    <Asset/>
  </Assets>
  <Classifications ExportSize="Minimum">
    <Classification IncludeParent="true"/>
  </Classifications>
  <Products ExportSize="Referenced">
    <Product IncludeParent="true"/>
  </Products>
</STEP-ProductInformation>
With this output template, P1, P7, C1, and C4 and all ancestor nodes up to ‘Product hierarchy root’ (‘PHR’ in the diagram) and ‘Classification 1 root’ (‘CHR’ in the diagram), that both always exist on a STEP system, are included in the exported file. This allows importing the file on a system where the ancestor nodes do not exist in advance. This is illustrated below with non-exported nodes dimmed:
A similar attribute called ‘IncludeParentClassifications’ exists for assets. Setting this attribute to ‘true’ in an output template for the ‘Asset’ element will, when using the domain exporter (automatically enabled for In-Memory systems), cause classifications that a selected or referenced asset is linked into to be included in the exported file. For example, using the hierarchy above, C4 and all ancestor classifications up to CHR will be included.
Asset Content
Asset content, i.e., the actual image and document files referenced from asset objects, is not represented in STEPXML per default. However, the data can be included using both the STEPXML and the Advanced STEPXML formats. Data can be imported again to create or update asset content.
With the STEPXML format, asset content can be included in the exported file as shown below:
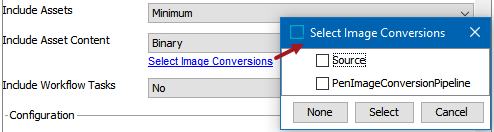
With Advanced STEPXML, binary data can be included via the ‘AssetContent’ element as shown below:
<?xml version='1.0'?>
<STEP-ProductInformation>
  <Assets ExportSize="Minimum">
    <Asset>
      <AssetContent ExportType="Binary">
        <ImageConversionConfiguration ID="Source"/>
      </AssetContent>
      <!-- other asset specific instructions omitted ->
    </Asset>
  </Assets>
  <!-- other instructions omitted ->
</STEP-ProductInformation>
With Advanced STEPXML, once you start specifying sub elements for the super type specific elements like ‘Asset’ and ‘Product,’ you only export the data you have specified. For example, with the template above, you would not export asset names or values.
To export name, values, references, and classification links, use a template for assets as follows:
<Assets ExportSize="Minimum">
  <Asset>
    <Name/>
    <ClassificationReference/>
    <EntityCrossReference/>
    <Values/>
    <AssetContent ExportType="Binary">
      <ImageConversionConfiguration ID="Source"/>
    </AssetContent>
  </Asset>
</Assets>
When exporting asset content, converted versions of the content cannot be imported – only the unconverted source (in the exported file, data for the unconverted source will be in an ‘AssetBinaryContent’ element for which the value of the ‘ImageConversionConfiguration’ ‘ID’ attribute is blank / empty string).
Important: Since including asset content can lead to very large files, seriously consider if asset content is required in the target systems.
Cross Context Exports
A STEPXML file can contain data from multiple contexts, and you can manually export data for multiple contexts with the STEPXML format and the Advanced STEPXML format.
The context selection using the STEPXML format is shown below:
The context selection using the Advanced STEPXML format is shown below:
Transferring Configuration and Data Between Systems
With the STEPXML export functionality described above, you can select specific category nodes and have all descendant nodes plus referenced and linked nodes across multiple contexts included in a single STEPXML file. If Advanced STEPXML is used, you can include ancestors to the exported nodes, thereby allowing for the data to be imported on an empty system.
Important: For the import to succeed, it is crucial that required configuration objects like object types, attributes, units, etc., are either included in the file or present in the target system prior to importing the data.
If the target system is empty, it will often make sense to include configuration objects in the data export file. The most straightforward approach is to use the export size ‘All’ for all configuration objects so that all attributes, units, object types, integration endpoints, Web UI configurations, etc. are included in the exported file.
For configuration objects like attributes, you can use the ‘Minimum’ setting to avoid getting large amounts of attributes included that are not needed. If doing so, however, there is a high probability that attributes that are not directly used by the exported data but required for some other functionality, e.g., a business rule or a Web UI configuration, will be missing.
If the target system is not empty, it will make sense to use the Version Control System (VCS) integration functionality introduced with STEP version 9.1 to manage the configuration. For details about this functionality, refer to the Version Control System Integration section of the Configuration Management documentation. In brief, the functionality allows for system configurations to be pushed to a branch in a Git repository, thereby allowing comparison of the configuration across systems. The files present in Git will be valid STEPXML files that can be imported using the standard import manager or via inbound integration endpoint functionality also described in the Version Control System Integration section mentioned above.
With the desired configuration in place, data can be moved ad hoc using the functionality described above.
Example
This section illustrates how the export logic described can be used to export a sub section of a product hierarchy and have classification and asset dependencies included while ensuring that the exported file can be imported on a, data-wise, empty system.
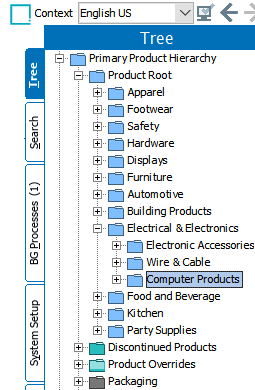
Consider the data hierarchy shown above. For this example, the goal is to export the ‘Computer Products’ category of products. And, in the exported file, include data for:
- All products below and including ‘Computer Products’
- All product ancestors for ‘Computer Products’ up to and including ‘Primary Product Hierarchy’
- All classifications that products below ‘Computer Products’ are linked into
- The ancestors for these classifications up to and including ‘Classification 1 root’ (hidden classification hierarchy root node)
- All assets referenced from products below ‘Computer Products’ including the binary asset content
- All classifications that these assets are placed in
- The ancestors for these classifications up to and including ‘Classification 1 root’
This goal can be achieved by selecting the ‘Computer Products’ product for export and using the following output template:
<?xml version='1.0'?>
<STEP-ProductInformation>
<Assets ExportSize="Minimum">
  <Asset IncludeParentClassifications="true">
    <Name/>
    <ClassificationReference/>
    <EntityCrossReference/>
    <Values/>
    <AssetContent ExportType="Binary">
      <ImageConversionConfiguration ID="Source"/>
    </AssetContent>
  </Asset>
</Assets>
<Classifications ExportSize="Minimum">
  <Classification IncludeParent="true"/>
</Classifications>
<Products ExportSize="Selected">
  <Product IncludeParent="true"/>
</Products>
</STEP-ProductInformation>
As described above, the exported file can be made to include data from multiple contexts by selecting the desired context in the export manager.
The export can further be modified to also include product objects from other categories referenced from products below ‘Computer Products,’ and their ancestors. This can be achieved by replacing ‘<Products ExportSize="Selected">‘ with ‘<Products ExportSize="Referenced">‘.
Note: The objects referenced from the reference targets will not be included in the export.
To import the generated file, definitions of attributes, object types, units, LOVs, etc., must either exist in the target system in advance or be included in the file. As mentioned above, the configuration can either be managed separately using the VCS integration functionality or the configuration objects can be included in the file by using the export size ‘All’ for all desired types. ‘Minimum’ can potentially also be used, e.g., for attributes, but as previously mentioned, the safest choice is to include all.
If you want to export a subset of data as described above and include all of the System Setup configurations, your output template would look similar to this one:
<?xml version='1.0'?>
<STEP-ProductInformation>
  <Assets ExportSize="Minimum">
    <Asset IncludeParentClassifications="true">
      <Name/>
      <ClassificationReference/>
      <EntityCrossReference/>
      <Values/>
      <AssetContent ExportType="Binary">
        <ImageConversionConfiguration ID="Source"/>
      </AssetContent>
    </Asset>
  </Assets>
  <Classifications ExportSize="Minimum">
    <Classification IncludeParent="true"/>
  </Classifications>
  <Products ExportSize="Selected">
    <Product IncludeParent="true"/>
  </Products>
  <TagGroupList/>
  <TagList/>
  <Qualifiers/>
  <GlobalSettings/>
  <UserTypes ExportSize="All"/>
  <Keys/>
  <DerivedEventTypes/>
  <EdgeTypes/>
  <CrossReferenceTypes ExportSize="All"/>
  <DimensionList/>
  <ContextList/>
  <UnitList ExportSize="All"/>
  <CollectionList ExportSize="All"/>
  <ListOfValuesGroupList/>
  <ListsOfValues ExportSize="All"/>
  <IntegrationEndpoints/>
  <EventProcessors/>
  <SetupGroups/>
  <SetupEntities/>
  <AttributeGroupList ExportSize="All"/>
  <AttributeList ExportSize="All"/>
  <DataContainerTypes ExportSize="All"/>
  <ActionSetList/>
  <UserGroupList/>
  <UserList/>
  <SystemSetup ExportSize="All"/>
  <TableColors ExportSize="All"/>
  <TableRules ExportSize="All"/>
  <TableTypeGroupList ExportSize="All"/>
  <TableTypeDefinitions ExportSize="All"/>
  <ECatalogs/>
  <EventQueues/>
  <STEPWorkflows ExportSize="All"/>
  <StatusFlags ExportSize="All"/>
  <BusinessLibraries ExportSize="All"/>
  <BusinessRules ExportSize="All"/>
  <MatchCodes/>
  <MatchingAlgorithms/>
  <PortalConfigurations ExportSize="All"/>
  <AttributeTransformationGroups/>
  <ImportConfigurations ExportSize="All"/>
  <ExportConfigurations ExportSize="All"/>
  <BulkUpdateConfigurations ExportSize="All"/>
  <TransformationLookupTableConfigurations ExportSize="All"/>
  <ComponentModels/>
</STEP-ProductInformation>
For reference, also refer to the Transferring STEP Configuration and Sample Data topic in this documentation.