To view commercial data, you must first create a commercial list object type and object. Before you can create a commercial list, the related object type must first exist created in System Setup, then a commercial list object must be created in your publication.
In most systems, a default commercial list object type will already exist, named Price (Price). However, if you need an additional commercial list object type, the following subsection guides you through the process of creating the object type.
To Create an Object Type for Commercial Lists
To create a new commercial list object type, follow these steps.
- In System Setup, navigate to Object Types & Structures > Commercial Types (Term-list user-type root), then right-click and select New Object Type.
- In the Create Object Type dialog, populate the following fields:
- ID: Enter an ID for the object type. Example: 'ClearancePrices'
- Name: Enter a name for the object type. Example: 'Clearance Prices'
- Dimension Dependency: Select the relevant dimension dependency (optional)
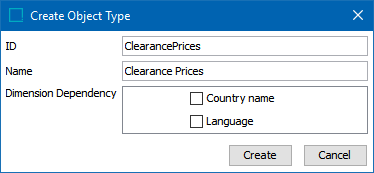
- Click Create to finish creating the commercial list object type.
Configure the Commercial List Object Type
Next, you have to specify the fields that are displayed when commercial data is being viewed either on the commercial list itself or on the commercial tab of a product.
- With your commercial list object type selected, go to the Object Type tab.
- Though a Name Pattern and ID Pattern are not required, it is strongly suggested to enter at least an ID Pattern. This makes it easier to create new commercial lists in publications, since commercial lists, even in different publications, cannot use the same ID.
- Double-click the column next to the Visible term-fields field to display the Value Editor.
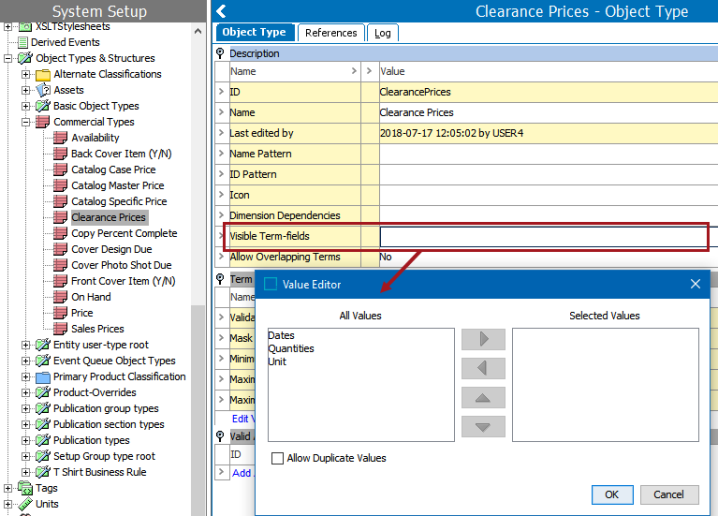
- Select the relevant option under 'All Values' (Dates, Quantities, Unit), then click the right arrow button to add it to the 'Selected Values' list. Repeat the step to add more values. Or, hold down the Shift or Ctrl key to select multiple values, then add them to the list.
- Check 'Allow Duplicate Values' if you would like to allow duplicate values in your list, then click OK to close the dialog.
- While still on Object Type tab, select Yes or No from the dropdown list in the Allow Overlapping Terms field. The default setting is No.
'No' means that a product can have only one unique price for any given data interval and quantity in the commercial list. However, in some cases it can be useful to allow overlapping terms, so you would select 'Yes.'
In the travel market, for example, the same holiday package can be offered from Monday to Monday and from Friday to Friday. The weekend then overlaps.
- Under the Term Validation flipper, the validation rule for commercial values can be edited if you want the imported values to adhere to a specific format (e.g., number or regular expression). By default, there is no validation. The validation base rules for commercial values work the same as those for attributes. For more information, refer to the Validation Rules topic in the System Setup documentation here.
- Under Valid Attributes, add an attribute if you have a need for metadata attribute values to be present on the commercial list. For more information, refer to the Attributes Valid for Object Types topic in the System Setup documentation here.
To Create a Commercial List
Once a commercial list object type has been created in System Setup, you can create the commercial list object in your publication.
- In the Tree, navigate to the relevant publication in the publication hierarchy. This will be the publication that the commercial terms list should be linked to.
- Expand the publication, then right-click the Commercial Data folder and select New List. A list of eight commercial terms object types displays. Price is the most commonly used commercial list object type.
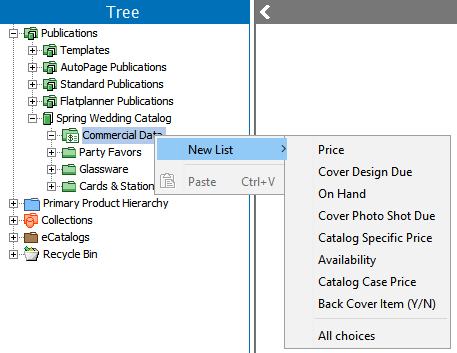
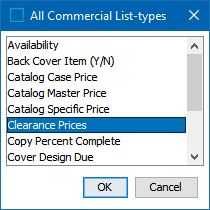
- If the commercial list object type that you need is not visible in the list, click All choices at the bottom of list to display the All Commercial List-types dialog. Choose the relevant list type, then click OK.
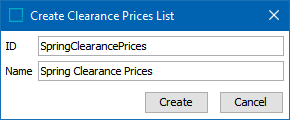
- In the Create List dialog, enter an ID and Name for the commercial list, then click Create. In the below example, the name of the commercial list type ('Clearance Prices') displays in the dialog label ('Create Clearance Prices List').
- The commercial list is created.
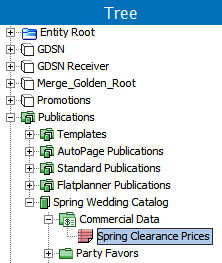
Note: When using the standard Price commercial list object type, the commercial list displays with a 'dollar' icon.

After the list is created, the next step is to define the import settings for the list. This involves creating a sample spreadsheet and the creation of an import configuration based on this sheet. Refer to the next section of this guide, Defining Import Settings for Commercial Data (here), for more information.
Additional Configurations for Commercial Lists
A number of additional configurations and metadata options are also available for commercial list objects.
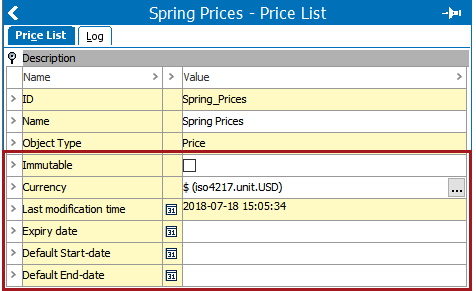
- Immutable: When checked, this setting prevents commercial data from being updated.
- Currency:Click the ellipsis button (
 ) to choose a currency unit for the list. This selection can be any unit and does not have to be currency.
Note: This does not place the unit on terms lists values. To have the unit display within terms lists, the unit must be added when defining the import configuration by mapping the values of an Excel column to the 'Unit' aspect of the terms list. Refer to Defining Import Settings for Commercial Data here for more information on creating import configurations.
- Last modification time: Displays the date and time that the list was last modified. This field is non-editable.
- Expiry date: Enter an expiration date for the list, or double-click the field to open the Date Picker.
Note: The commercial list will not expire automatically. The date is for administrative purposes only and is not the same as the 'End Date' value that can be defined for individual terms. Refer to Defining Import Settings for Commercial Data here for more information on the 'End Date' value.
- Default Start-date and Default End-date: Like Expiry date, these values are for administrative purposes only and are not the same as the 'Start Date' and 'End Date' values defined for individual terms.