The creation of automatic classification rules is a two-step process where you first create a Rule Set and then the Rules.
Before you start to create a Rule Set, verify that you have created a Rule Set asset type and configured the automatic classification component model. For more information, refer to the Initial Setup for Automatic Classification topic in this documentation here.
Creating Rule Sets
- In the Tree, right-click the classification where you want to store your new Rule Set, and then choose New Asset. The Create Asset dialog appears.
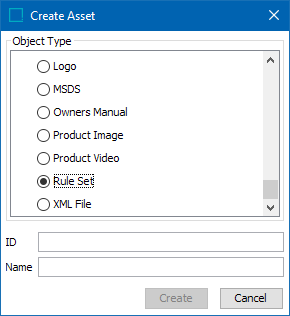
- Select the relevant asset Rule Set type.
- Enter an ID and a Name for the asset, and then click OK.
You now have an empty Rule Set. Upon configuring the Auto Classification component model to the current Rule Set type, it has a Rule Set Editor tab. This is where you specify the automatic classification Rules. If this tab is not displayed, verify that you have configured the asset Rule type properly.
Steps for configuring the Auto classification component model to the current Rule Set type are outlined in the Initial Setup for Automatic Classification topic in this documentation here.
Editing Rule Sets
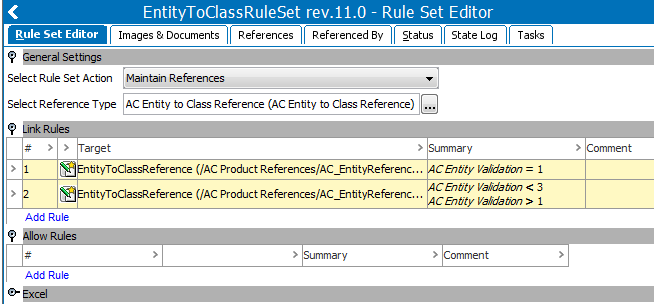
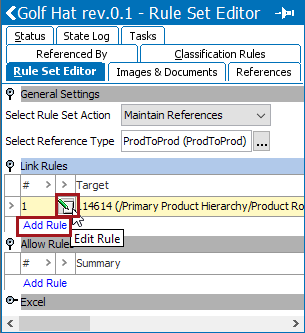
The Rule Set Editor is the primary tool for editing of Rule Sets. A Rule Set contains general settings, Link Rules and Allow Rules.
The Select Rule Set Action, together with the selected Reference (/Link) Type, will determine how the Rule Set is used.
Note: Loading a large number of autoclassification rules can take a long time. The flipper starts closed and the rules are not loaded before the flipper is opened.
Showing a table with too many autoclassification rules can cause the workbench to run out of memory. The number of rules shown in a table is limited by the property AutoClassification.RuleTable.MaximumNumberOfRows, which defaults to 3500.
- In the Rule Set Action list, you select the type of classification action the Rule Set supports. There are two options:
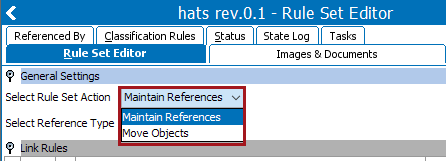
- Move Objects: Use this action to move objects within their primary hierarchy so that, for example, an object gets a new parent. This action can only be applied to products and entities.
- Maintain References: Use this action to maintain references, including references for linking products into the classification hierarchy.
The Maintain Reference action may create new references as well as delete existing ones if they are no longer required by the Rule Set.
- If you have selected Maintain References, you must select a reference type by clicking on the Select Reference Type ellipse button.
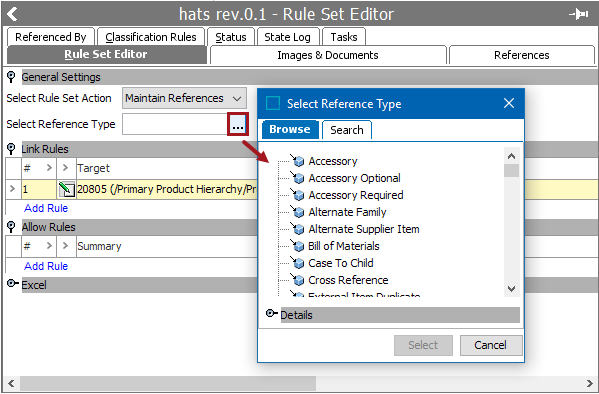
The selected reference type controls what kind of references the Rule Set maintains. When an object is classified automatically, new references required by the Rule Set are created using the specified reference type. Similarly, existing references of the specified reference type are deleted if they are not required by the Rule Set.
If you do not specify a Reference Type, the Rule Set will only work with certain legacy bulk update operations and business action operations.
Important: We recommend that a reference type is used exclusively for either manual classification or automatic classification.
Automatic classification supports several reference types including product-to-classification link types for linking products into the classification hierarchy and common reference types that allow products or entities as source objects such as product-to-product reference types, product-to-asset reference types, entity-to-asset reference types, and so on.
Allow Rules and Link Rules
A Rule Set can contain Link Rules and Allow Rules, and each Rule contains a set of Rule conditions. An object and a Rule are matched when the object meets all conditions of the Rule.
Allow Rules
- Use Allow Rules to establish high-level criteria for the objects that you want to be classified automatically. An object is automatically classified under the following conditions:
A) There are no Allow Rules in the Rule Set.
- or-
B) The object matches at least one Allow Rule. Allow Rules are never strictly necessary, but they are useful to define assortments. For example, one Allow Rule allows "red jeans", another allows "funny hats", and so on. If a product is not a pair of red jeans or a funny hat, it will not be classified, even if it matches a Link Rule.
Link Rules
Use Link Rules to specify the conditions under which an object should be linked to a specific target object. Link Rules are the most common kind of Rules. A Rule Set must contain at least one Link Rule, otherwise no objects will be classified. A Link Rule refers to a target object. The target object is either a new parent object, which is the case when objects are moved, or a destination object, which is the case when references are maintained.
In short, a Link Rule is a Rule that specifies the conditions for:
- Linking a product to a specific classification
- Creating a reference to a specific object
- Establishing an object to become the new parent for an object to which the Rule Set is applied
An object is automatically classified under the following conditions:
A) The object matches one or more of the Allow Rules in the Rule Set if there are any.
-and-
B) The object matches the Link Rule.
Note: If you are new to automatic classification, we recommend that you start by creating Rule Sets that only contain Link Rules. Rule sets that only contain Link Rules are more flexible to work with, and they are also often easier to understand.
Creating and Editing Rules
- In the Tree, select the relevant Rule Set (asset).
- On the Rule Set Editor tab, click Add Rule, or click the Edit button to edit an existing Rule.
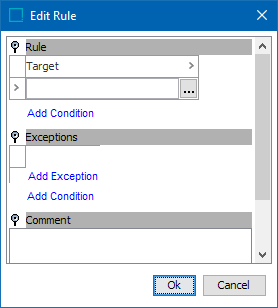
- In the Edit Rule dialog, you can perform the following tasks:
- Specify a link target. This only applies to Link Rules.
- Add conditions to a Rule.
- Add exceptions to a Rule.
- Add a Rule comment.
Adding Rule Conditions
You can apply any number of Rule conditions to a Rule.
- In the Edit Rule dialog, click Add Condition.
- Select a Condition Type and browse or search for an Attribute if relevant.
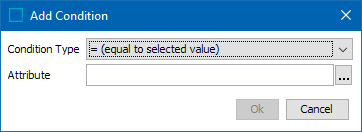
The condition type indicates the type of expression that must resolve to true for the condition to be met. Most condition types must be configured with an attribute. However, the Type and Below conditions do not require an attribute.
| Condition | Description |
|---|---|
|
= |
equal to selected value |
|
< |
less than selected value |
|
> |
greater than selected value |
|
<= |
less than or equal to selected value |
|
>= |
greater than or equal to selected value |
|
!= |
not equal to selected value |
|
Type |
product is of selected type |
|
Below |
product is below selected product in the primary product hierarchy |
Note: Attribute Conditions Types ('=,' '<,' '>,' '<=,' '>=,' '!=') can be OR'ed. Node-Based Condition Types ('Type' 'Below') cannot be OR'ed. Also note that Rule Sets are under revision control. When the Rule Set is applied, it is possible to select whether the approved version of the Rule set should be used.
Multiple Conditions and Multiple Values
A Rule can have one or more conditions. An object must match all conditions of a Rule to match the Rule. For example, it is possible to define a Rule where "product class must equal jeans and product color must equal black."
Each individual condition can have one or more Rules, and an attribute can have one or more values. If multiple values are applied, they work as alternatives. This means that a condition is met if the expression is true for at least one of the alternatives. For example, it is possible to define a condition where "the product class must equal jeans or shoes or ...."
Editing Rules on Target Objects
In some situations, it is useful to view and edit classification Rules from the target object. To be able to view Rules from the target object, you specify in the automatic classification component model on which object type you want to be able to edit the Rules. For more information, refer to the Initial Setup for Automatic Classification topic in this documentation here.
When you select a relevant object, you can edit the Rule targets on the Classification Rules tab. It shows all Link Rules that refer to the selected target.
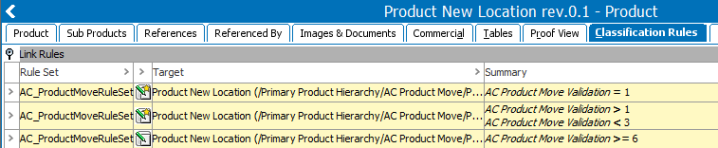
On the Rule target are Link Rules that belong to different Rule Sets. This is not possible on the standard Rule Set Editor, which only shows link Rule of one Rule Set. Allow Rules are not displayed because they have no target.
Properties for Skipping Rules that Remove References and Links
In the sharedconfig.properties file, the property AutoClassification.SkipIfRulesDoNotAllow enables the Automatic Classification functionality to skip objects that do not meet the Rules. This is done to prevent the links from being updated to no references since these objects are not meeting the current automatic classification requirements.
Whether the property is set to 'True' or 'False,' if the object does meet the Allow Rules, its references are updated to what is set in the Automatic Classification.
If this property is set to 'True,' then the Automatic Classification functionality will skip any objects that do not meet the Allow Rules and not remove any of the current links or references. If this property is set to 'False,' then the Automatic Classification functionality will delete any References / Links on objects that do not meet the Allow Rules.
By default, this property is set to 'False.'