References
References allow you to define a connection between two objects, essentially creating a set of rules for the relationship between those objects. For example, a reference can associate an image with a product, or join multiple addresses with a single company, or connect an object to a classification, among other uses. References can be inherited from one object to another (i.e., a specific-sized shoe inherits a reference from a brand of shoes) or references can be local (i.e., a specific-sized shoe has its own reference not inherited from a brand of shoes or any other object).
For more information regarding inherited and local references and how to differentiate between these types of references, go to the Inherited and local references topic.
List view
Like attribute data, reference data can be edited from within a perspective. Both inbound (source) and outbound (target) reference columns can be added manually using the Customize toolbar action. More information can be found in Adding and removing columns.
When looking at a product in the list view, outbound references can be added or removed from within the table. First, double-click the outbound field on the reference you want to edit. There are two ways to add a reference from the cell:
-
In the dialog that displays, all current outbound references for the selected object are listed below a "Search" field. Use the typeahead search functionality in the "Search" field (based on the object ID or name) to specify a product to reference. This method of adding a reference is depicted in the video below.
-
Click the Node Picker icon in the right-hand side of the field to access the Node Picker. The Node Picker dialog allows you to navigate product and classification hierarchies, depending on the target type configured for the reference type, and add references.
To view the details of a reference or a group of references, right-click the reference cell and select "Inspect" from the dropdown, or click the table cell that contains the references and then click the "Inspect" button on the toolbar.
If the Inspect icon is selected within a cell that allows for multiple product references, the reference table will be displayed.
The Details page for a specific referenced product that is displayed in the reference table can then be displayed by selecting the blue multi-directional arrow located in the product row.
Details view
When looking at an item in, for example, the Task perspective using the details view, reference metadata can be changed from within the details pane.
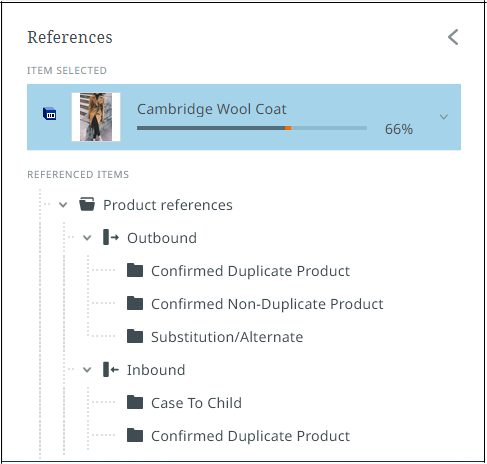
To access references, click the arrow next to the product information in the hierarchy. For example:

There are two methods to add or remove references:
-
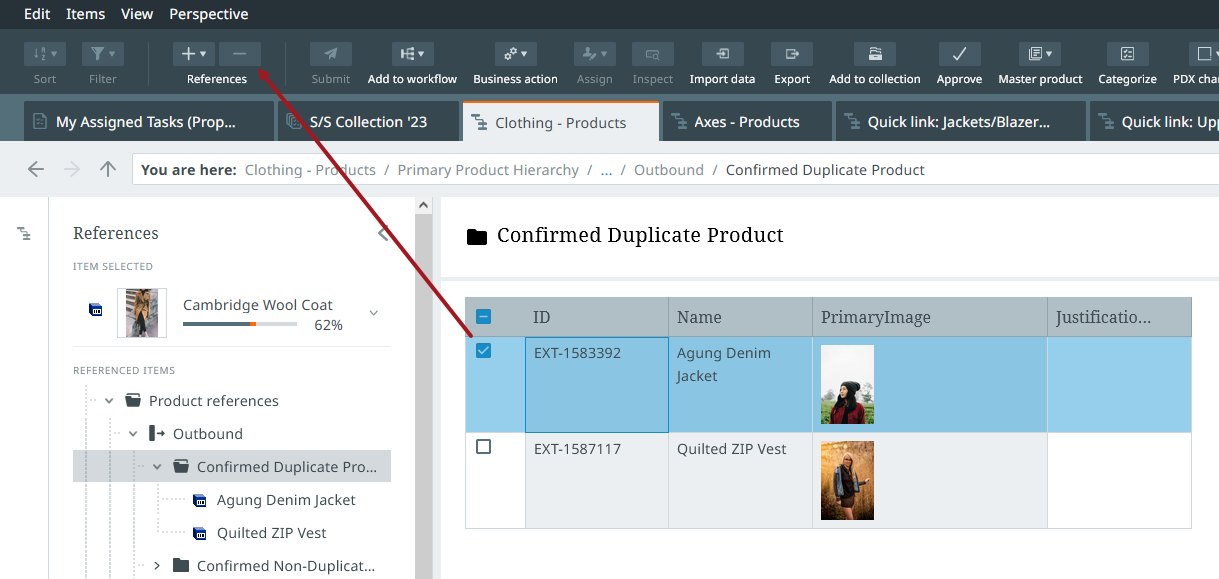
click the "+" (Add) or "-" (Remove) buttons in the "References" section of the toolbar

-
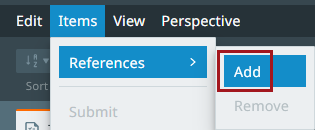
click the "Items" option from the menu, and then click "References"; if adding a reference select "Add..." from the dropdown; if removing a reference, first select the reference to be removed, then click "Items", and select "Remove"
The "+" (Add) button (and corresponding menu option) is always active when viewing items in a "Details" view on either the "Browse" or "Tasks" perspectives. The "-" (Remove) button (and corresponding menu option) is only enabled when a specific reference has been selected. If neither button is active, current view does not allow for the addition or removal of references.
Adding a reference using either method will display an "Add Reference" dialog.
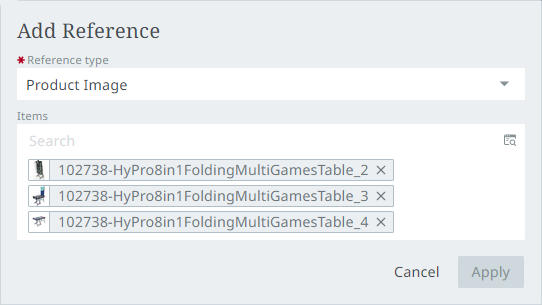
If the user is viewing the references for a reference type in a "Details" view on a "Tasks" perspective and then clicks the "+" (Add) button, the "Reference type" field in the "Add Reference" dialog is pre-populated with the viewed reference type.
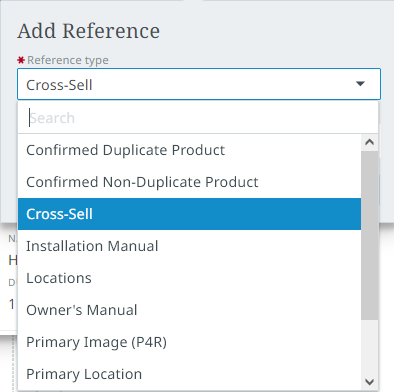
If a reference of a different reference type is desired, click the arrow in the right-hand corner of the field to display a dropdown listing all available reference types.
In the "Items" field, all existing references will display. To add a reference in this field, start typing the desired item to reference in the "Items" field and the typeahead function will display a list of relevant options for selection. Alternatively, users may navigate to the desired reference by clicking the "Node Picker" button in the right-hand corner of the field.
For more information on using the Node Picker, refer to the Node picker topic.
References hierarchy and table

If you are working in the reference hierarchy or in a reference table, the "+" (Add) and "-" (Remove) buttons in the toolbar can also be used to add and remove references. When adding references, you can use the typeahead function as described above, or the Node picker feature to find the items to reference.
In the reference table, it is possible to select many references by using the table checkboxes.
-
The "-" (Remove) button will show as enabled, even if you select references that cannot be removed. You will receive an error message after clicking "-" (Remove) if there are some references that cannot be removed.
-
The "-" (Remove) button will be disabled if the direction is inbound and if you do not have the privilege to remove references for the specific object type.
Reference details
Navigate to the desired outbound reference from the list, and select a field to edit within this "Relationship information" section.
Alternatively, this metadata can be edited directly from the references table that displays when selecting an outbound reference.
You can add and remove references using the toolbar and menu.
Note: This metadata can only be changed for outbound references and non-inherited references. Inherited references are indicated by a hierarchy icon beside the name of the reference.
Find more information in Details view.
Classification links
Classification links can be maintained in a similar fashion to references, but only from the details view. Additionally, only outbound classification links can be added or removed.
Find more information in Product references and classification links.
References details dialog box
By selecting "Format column" from the View menu, users can configure specific settings that determine what is displayed within the selected referenced product's details dialog box.
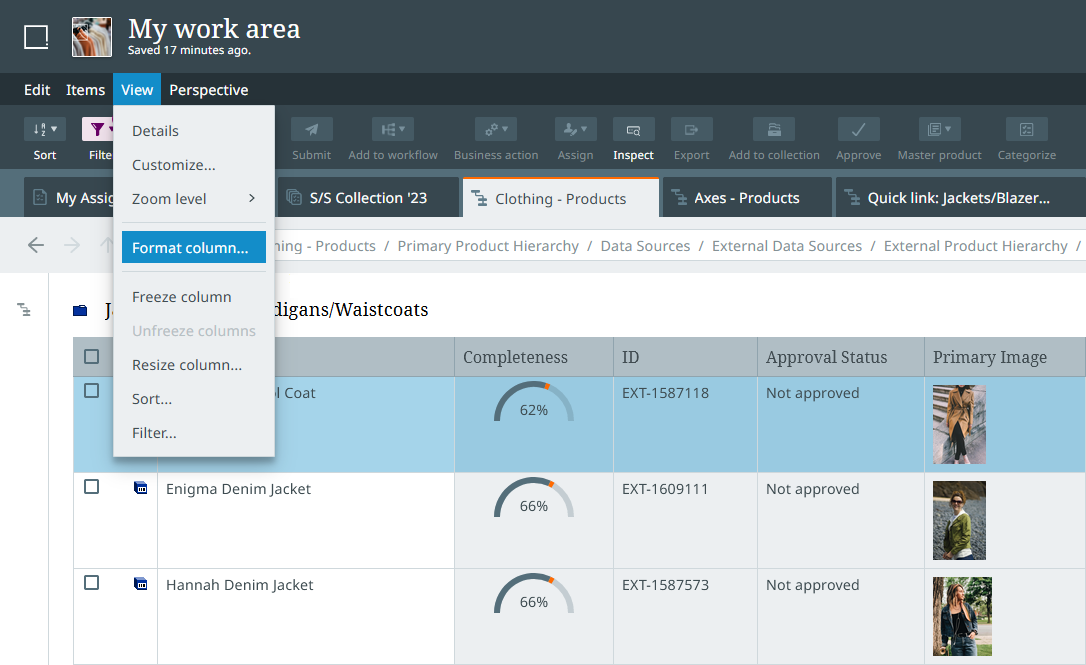
These configurable settings include:
-
the ability to select which attributes will be displayed in the dialog box (with a maximum of five attributes displayed at one time)
-
the option to display the value of selected attributes but not the title of the attributes themselves
-
the option to display or not display the primary image on the referenced product on the overlay
-
the ability to choose the display value of the referenced product based on an attribute (e.g., a user may decide to identify the referenced product by its ID instead of its name)