STEP can only be accessed by authenticated users. This section contains information needed to work with Users in Users and Groups from the STEP Workbench. Information detailed in this topic includes:
- Creating a user
- Adding a user to a group
- Duplicating a user
- Removing a user from a group
- Deleting a user
For how to change a user password, refer to the Changing a User Password topic here.
Creating a User
Once user groups and their associated privilege rules have been defined, users can be created.
-
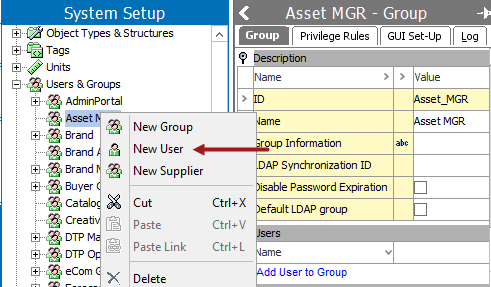
Right-click on the user group and select New User.
-
In the dialog box, add the following information:
-
User ID -The ID that the user will use to sign into the STEP Workbench or Web UI. The user ID is not case sensitive, and it is recommended not to use special characters.
All user IDs must be unique as this is the ID that is used to track everything that is done in the STEP Workbench or the Web UI.
-
Name - Enter the name to be used for the user.
-
Password - Enter the password for the user to sign on. Passwords may have up to 24 characters and are case sensitive.
-
Retype Password - Retype the password just entered.

Complete additional setup for the user and refer to the Adding a User to a Group section that follows.
Note: To make additional parameters for users, such as Group Information and User Information shown in the example below, create or identify description attributes. From Object Types & Structures, open the Basic Object Types node and select the User object type. Use the Add Attribute link in the Valid Attributes flipper to apply the attributes to user objects.
-
E-Mail - add the email address used for error reporting from processes started by the user and to publish objects to PDX from the Web UI Search Screen.
-
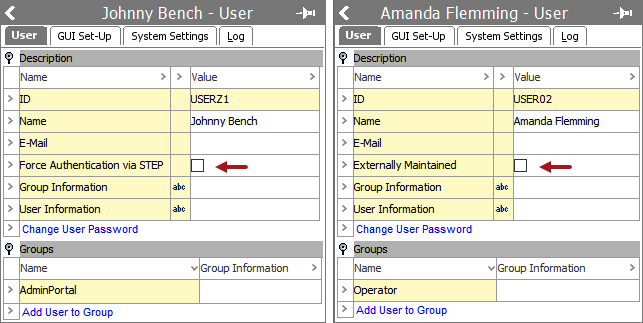
Force Authentication via STEP - check to use STEP to authenticate users instead of a configured external authentication, for example, SAML in an on-premises system. Also, when checked, the user is allowed to change their password on the Web UI. Refer to the Changing a User Password topic here.
'Force Authentication via STEP' is not available on STEP systems with OAuth2-based authentication enabled (single sign-on). Instead, use the 'Externally Maintained' option below.
-
Externally Maintained - check to ensure that authentication does not use STEP managed credentials, that a STEP password cannot be set or changed for the user account, and that the STEP password expiration policy does not apply. When checked, users managed via an IDP cannot introduce a conflict to their IDP credentials within STEP.
'Externally Maintained' is available only on SaaS STEP systems with single sign-on (SSO) enabled. This option is automatically checked when logging in via an IDP, where user authentication is managed outside of STEP.
-
Bulk Adding New Users
With a STEPXML import, you can create multiple new users at once, including the privilege groups required to enable those users. The STEPXML example below creates a user named 'JohnHarris' who is privileged with all setup and user actions for the Product hierarchy, Classification 1, and Entity hierarchy roots in the user group with ID of ‘UserSupport’.
<?xml version="1.0" encoding="utf-8"?>
<STEP-ProductInformation ContextID="Context1" WorkspaceID="Main">
<UserGroupList>
<UserGroup ID="UserSupport" ReadOnly="false">
<Name>UserSupport</Name>
<PrivilegeRule ActionSetID="All setup actions"/>
<PrivilegeRule ActionSetID="All user actions" ProductID="Product hierarchy root"/>
<PrivilegeRule ActionSetID="All user actions" ClassificationID="Classification 1 root"/>
<PrivilegeRule ActionSetID="All user actions" EntityID="Entity hierarchy root"/>
</UserGroup>
</UserGroupList>
<UserList>
<User ID="Admin" ForceAuthentication="false" EMail="JohnHarris@acme.com">
<Name>JohnHarris</Name>
<UserGroupLink UserGroupID="UserSupport"/>
</User>
</UserList>
</STEP-ProductInformation> Use the example STEPXML as a template for creating new users by repeating the relevant information for each new user being created. Replace the existing values with the relevant values in your system. Omit the UserGroup if not required but confirm the UserGroupID on the UserGroupLink has a value that exists on the target system.
Passwords for bulk created users
Passwords can be included in an import file by replacing line 13 in the previous STEPXML example with the following:
<User ID="Admin" ForceAuthentication="false" Password="Password" EMail="JohnHarris@acme.com">
By default, the Import.Users.PasswordIgnored property is 'true' and passwords included in the STEPXML import file are ignored. This prevents unauthorized users with access to a STEPXML file of users / passwords to access STEP unintentionally.
Importing while the property is 'true' with or without a password defined in STEPXML, creates users with system-defined passwords. Attempting to log in as one of these users with the password defined in the file displays the 'Your login credentials are invalid' error message. To resolve this error, the newly created user can set a new password in:
-
Web UI via the 'Forgot password' option on the login screen, where the reset option is managed through the email address provided in the import file.
-
Workbench on System Setup tab, with the assistance of an administrator.
For testing and non-production systems, to bulk create users with defined passwords via import, update the sharedconfig.properties file on the application server, and set the case-sensitive Import.Users.PasswordIgnored property to 'false'. When this property is false, the password specified in the import file is assigned to the new user(s). When the import is complete, revert the property back to the default value of ‘true’.
Importing users
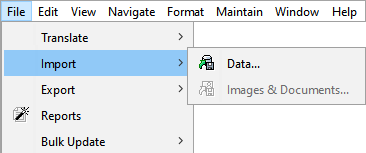
When the STEPXML file includes all required users, import it via the File > Import > Data... menu option.
For more information, refer to the Creating a Data Import topic in the Data Exchange documentation here.
Adding a User to a Group
Users are added to groups in System Setup > Users & Groups.
Note: Adding a user to multiple groups is not recommended as it makes it difficult to track which privileges a user has.
Adding a user to a group provides the user with the privileges assigned to the group.
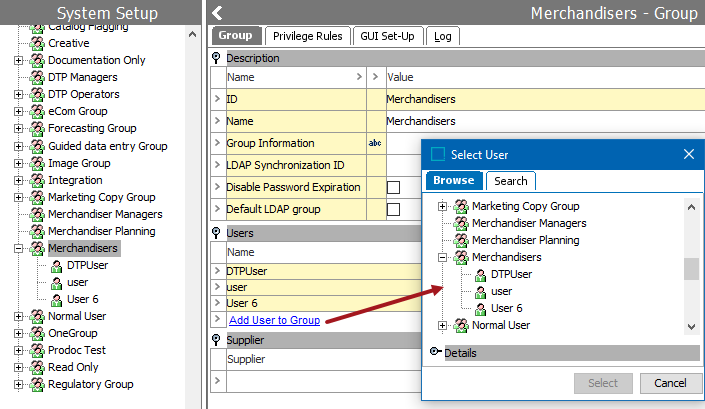
- In System Setup, open Users & Groups, and then click the relevant group. The group appears in the group editor.
-
Under the Users flipper, click the Add User to Group link. A Select User dialog box displays.
-
Select the relevant user, and then click Select. A user has now been added to the selected group, and the user appears under Users.
Note: Although a user can be a member of many groups, it is not recommended as it makes it difficult to define what privileges a user actually has.
Duplicating a User
Duplicating a user can be useful if several users need to adhere to the same privileges. For instance, if one hundred users need to be added to the same group, create the first user and then duplicate it for the others.
Important: Duplicating a user is very efficient, but metadata attribute values on the duplicated user are also duplicated. So, for example, if a user email address value is in the user being duplicated, that value is carried over to the new user object and should be changed.
-
To create the first user, follow the process in Creating a User section above.
-
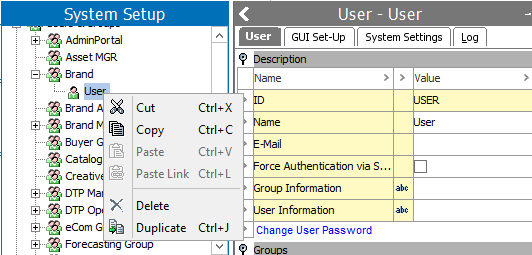
Right-click the user you just created and select Duplicate.
-
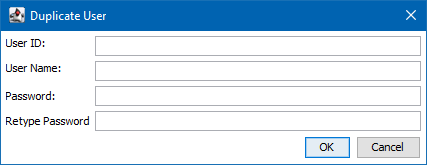
In the Duplicate User dialog, follow the steps outlined in Creating a User.
The duplicated user has the same privileges, GUI Set-Up, and System Settings as the user that was duplicated.
Removing a User from a Group
There are two scenarios for removing a user from a group.
-
A user is no longer permitted to have any access to the STEP Workbench or the Web UI. Find the user ID in any group, right-click the user, and select Delete to delete the user from all groups in the system.

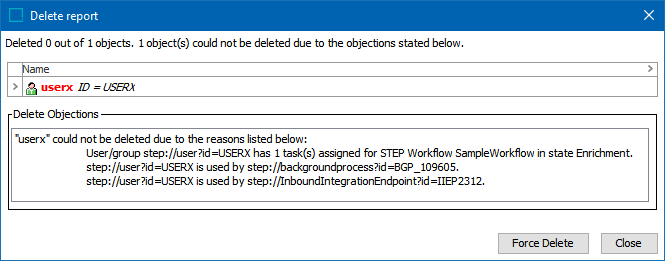
There may be reasons a user cannot be deleted, such as if the user is an assignee within a workflow task, or you are trying to delete your own user ID / name. In this case, you are presented with additional information within the dialog that displays.
-
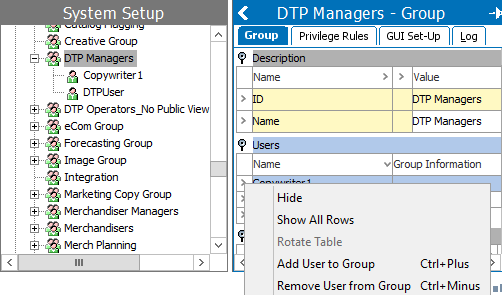
A user needs to be removed from one or more groups while remaining in other group(s). Find the group from which the user should be removed, expand the Users flipper, right-click the arrow next to the User ID, and select Remove User from Group. Repeat these steps to remove the user from other groups as needed.
Deleting a User
To remove a user from accessing STEP altogether, right-click the desired user and select Delete.
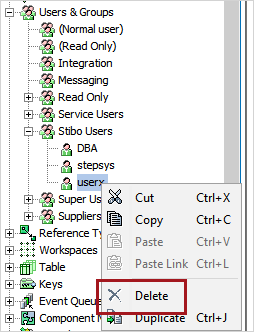
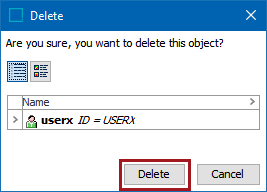
A confirmation prompt displays. Select OK to confirm deletion.
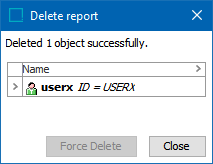
After a background process completes, the user is deleted.
Considerations
A user cannot delete the user they are logged in as.
A user cannot be deleted while they have any outstanding actions. Outstanding actions that stop the deletion process include:
- scheduled background processes that were started by the user, either queued or running
- inbound and outbound integration endpoints that have the user in the Identify Endpoint step User parameter
- workflow states assigned to the user
Attempting to delete the user with responsibilities displays the following error showing where in STEP the user is assigned. Until the user is removed from these actions, they cannot be deleted, even with the 'Force Delete' button.