This guidance outlines how to create translation export files for Setup Objects, which refer to LOVs (or List of Values), attributes, and units. Users who read this guidance should be able to create an export file for these setup objects, and understand how the content is displayed in the XML export file. For information on translating Data Objects, refer to the Starting a Structured Translation documentation here.
Before setup objects can be exported for translation, the following criteria must be met:
- Both LOVs and attributes must have a language dimension dependency.
- LOVs must be configured so that the values that comprise them have IDs.
If these criteria are not met, these objects cannot be exported for translation. If these criteria are met, then they can be exported for translation either by using a Manual Excel Translation export or through creation of an XML file using the structures translation method.
For more information regarding dimension dependent attributes, refer to the Dimension Dependent Attributes topic in the System Setup documentation here.
For more information regarding IDs for LOVs, refer to the Creating an LOV topic in the System Setup documentation here.
Generating Translation Export Files for Setup Objects
The process required to initiate translation exports for setup objects is not significantly different from the process for data objects. With that in mind, listed below are the differences to consider when initiating translations for setup objects that make the process different from that of data objects.
Exporting to XML
- Ensure that the context is set on the correct source language context.
- From the File menu, click Translate, and then select Setup Objects.
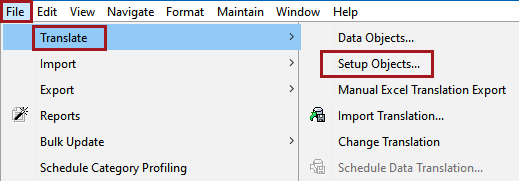
The Request Translation - Setup Objects wizard guides the user through the six steps that enable the user to adapt the translation export to their specific requirements.
Step 1 - Select Configuration
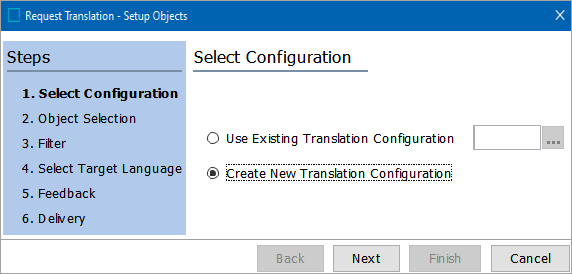
The first step in the Request Translation - Setup Objects wizard is Select Configuration. With the appropriate radio button selected, the user can select an existing translation configuration by clicking the ellipsis button ( ) and selecting the desired configuration, or create a new translation configuration.
Step 2 - Object Selection

The second step in the Request Translation - Setup Objects wizard is Object Selection. In this step, the user selects which objects should be included in the translation export, and from where in STEP the objects should be pulled.
There are two ways to select objects.

- From Root Node: For importing objects directly from the Tree. If the user has started the Request Translation - Setup Objects wizard while standing on an object in the Tree, that object will pre-populate the Root Node field. If the user wishes to change the selection, clicking the
 button will bring up a screen allowing the user to either Browse the Tree for the object, or Search for the object by typing the sought-for object directly into the search field.
- From Collection: For importing a manually selected grouping of various object types (which can, potentially, be from multiple super types) grouped in a collection. In the Collection field, click the
 button and either browse or search for the collection to be translated. If the collection is based on a search and you want to ensure that new or amended values in the collection are captured prior to exporting for translation, click the box beside Refresh Automatically.
Step 3 - Filter
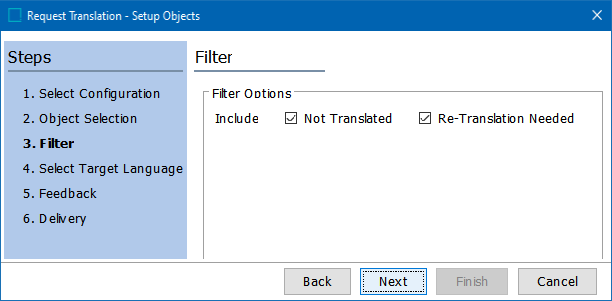
The third step in the Request Translation - Setup Objects wizard is Filter. In this step, the user may elect to include or exclude values that are Not Translated or values that have been amended and are thus designated as Re-Translation Needed. Click the boxes next to each to include them in the filter. One or both must be checked to proceed. Otherwise, the Next button will be inactive.
Step 4 - Select Target Language
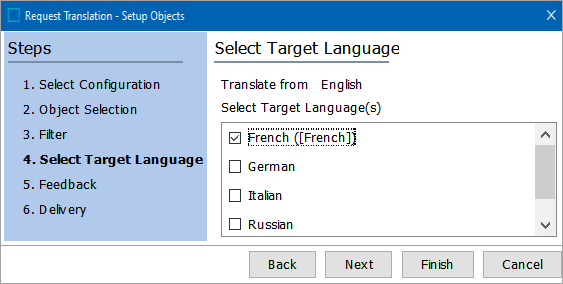
In the Select Target Language step, the user is prompted to select the language they would like to translate their content into. Click the language or languages that are applicable and click the Next button. At least one language must be selected to proceed. It is also possible to click the Finish button, which will begin the export process immediately, provided there are no errors.
Step 5 - Feedback
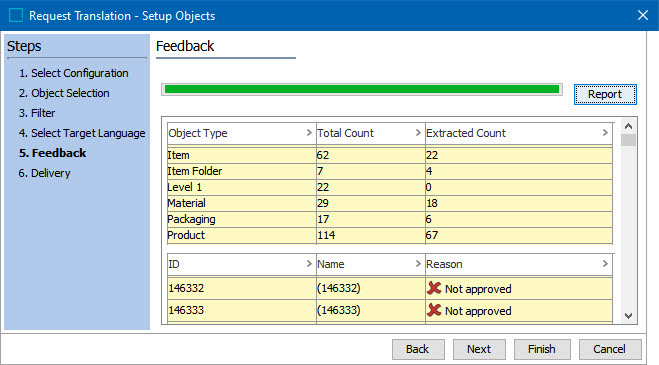
The Feedback step's primary function is to provide the user with reporting about the objects slated to export so the user can know what precisely will translate before starting the export. On this screen the user will view all of the objects that will be included in the translation export. The breakdown of this data is captured in two tables.
The first table is the summary of what will be included in the export. This is the data it presents:
- Object Type - The different kinds of object types that will be included in this extraction. In this example, there is one object type: ItemFamily.
- Total Count - The total count of each object type that will be included in the extraction. In this case, there is one instance of the ItemFamily object type included in the extraction.
- Extracted Count - The number of each object type that will be included in the translation export.
The second table is a list of all of the objects that will be part of the extraction.
- ID - The STEP ID of the object being translated.
- Name - the STEP name given to the object being translated.
- Reason - The listed reason why it is being included or excluded from the extraction. A green checkmark (
 ) indicates that it will be exported. A red X (
  ) indicates that it will not be exported. Below are some of the reasons a green checkmark will appear or a red X might appear:
 Up to Date: objects will not be exported.
 Not Translated: objects will be exported for translation.
 Not Approved: objects will not be exported (not applicable if the 'Completely Approved Source' requirement is unchecked in the Object Selection screen).
 Not in Approved workspace: objects will not be exported because they are only in the Main workspace and not the Approved workspace (Regardless of whether the 'Completely Approved Source' requirement is checked, translation only pulls content from the Approved workspace. If the object has no data, then the object will not be included in the export).
 Re-translation Needed: objects will be exported for translation.
 In Progress: objects will not be exported because they are already being translated
 Invisible in Target: objects are not visible in target language and will not be extracted for translation.
 No translation to source: objects will not be exported because the source>target translation being requested is invalid. For instance, let us say a translation relation exists for an object from English to French with English set as the Master language. The user then requests a translation be started from French to English. Because English is set as the master language for the object being translated, this object cannot be included in a French to English translation, and the 'No translation to source' status will display for that object.
 No translatable content: objects will not be exported as there are no values that are language dependent.
The second table in the Feedback screen will display up to 1,000 items. If there are more than 1,000 items, a row of text will appear in the second table that reads, 'More than 1,000 objects, only first 1,000 is shown...'. To view all the objects, click the Report button in the upper right corner of the Feedback screen. The objects will then be exported into a single-column CSV file for review.
For each object listed in the CSV file, there is a + sign (will be included in the export) or a - sign (will not be included), followed by the reason for why it is or is not included in the export.
This is an example from the CSV file of an object that will not be extracted for translation. Note the minus sign:

This is an example from the CSV file of an object that will be extracted for translation. Note the plus sign:

If the user already knows they want the translation data exported as an XML file, they may click Finish. However, if the user wants an Excel file, or the XML file delivered in a format other than the default (file), they must click the Next button to manually configure the delivery aspects of their export.
Step 6 - Delivery
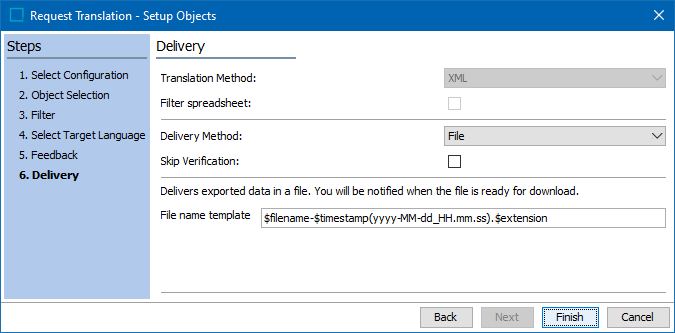
In the Delivery step, the user specifies the method by which the XML file should be delivered to the user.
Note: Setup objects cannot be exported to an Excel using the structured translation process. The Manual Excel Translation Export is the only method available to bring these objects into an Excel file.
Translation Method - Not applicable. Because setup objects can only be exported into an XML file when using the structured translation feature, this dropdown is grayed out and cannot be edited.
Filter spreadsheet - Not applicable. Because Excel is not a selectable option, this field cannot be edited.
Delivery Method - Choose one of options that determine by what method the user will receive the exported translation file. Dependent on how a user's specific STEP system has been configured, some of these options may not be available.
The available export options depend on your system setup. The commonly used delivery methods are shown below (and further defined in the Export Manager - Select Delivery Method topic in the Data Exchange here:
- Deploy: Delivers a file to a specified directory.
- Email: Delivers a file as an email attachment. The user must specify the email address of the recipient, a subject, and the body text.
- File: Delivers a file in the background process. The user is notified when the file is ready for download.
- FTP: Delivers a file using file transfer protocol (FTP). The user must specify the host name, user name, password, and the file name used to deliver the file.
- Server Side Delivery: Exports the file into a folder located on the Application Server of the STEP system. The file is only delivered if the specified path has read / write access on the server.
- SFTP: Delivers a file using the Secure File Transfer Protocol (SFTP). The user must specify the host name, user name, password, and file name.
- WebSphere Commerce Import: Depends on a user's system setup
Check the box for Skip Verification if you are certain that all of the objects listed in the Feedback screen are correct to export. Checking this box prevents suspension of the export process until a user visits the export's background process and confirms the export may proceed.
File name template - The name the translation file will be saved as; by default, the filename as formatted as '$filename-$timestamp(yyyy-MM-dd_HH.mm.ss).$extension'.
- $timestamp: This variable is replaced with the time in year-day-month-hour-minutes-seconds-milliseconds, excluding the dashes. For example, 20161511094709625 is used for an export on 15 NOV 2016 at 9:47:09:625 AM.
Adding a definition for the arrangement of the date / time elements provides a way to generate a more readable date. Static characters can be included to separate the timestamp elements and individual elements can be ordered as required, as shown below.
- $timestamp(ddMMyyyy): The timestamp is modified to display day-month-year (excluding dashes) and is output as '15112016' for 15 NOV 2016.
- $timestamp(yyyy-MM-dd_HH.mm.ss): The timestamp is modified to display year-month-day_hour.minutes.seconds (including the dashes, underscore, and periods) and is output as '2016-11-15_09.32.43' for 2016 NOV 15 at 9:32.43 AM.
Saving the setup object translation configuration
Once the Request Translation Wizard is complete, clicking Finish opens the Save Data Object Translation Configuration dialog.
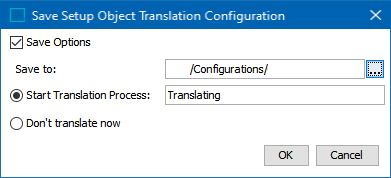
- Save Option: Checking the Save Options checkbox allows the translation configuration to be saved.
Note: The Save Options checkbox must be checked to use the Save to: option.
- Save to: Clicking the ellipsis button (
 ) opens the Save to: dialog.
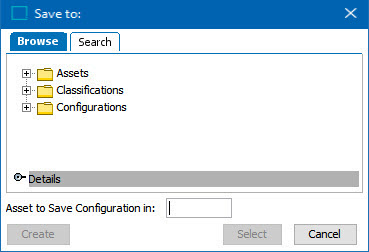
The translation configuration can be saved to an existing asset (saving to an existing asset will overwrite the data on the selected asset) or can be saved to a new asset by providing a name for the new asset within the Asset to Save Configuration in: text field and clicking the Create button.
- Start Translation Process: By default, the Start Translation Process text field will be automatically populated with the word 'Translating'; however, this can be edited by the user.
- Don't Translate Now: Select Don't Translate Now to save the translation for a later time, assuming you selected the Save Options checkbox. Click OK to close without importing.
For information regarding scheduling a saved translation, refer to the Scheduling a Data Translation topic here.
XML Export of Setup Data
LOV
Displayed below is an example of a LOV and its three component values exported for translation. In this case, the LOV name is Colors, the target language is German, and the values (highlighted in yellow) are Yellow, Green, and Red. In this instance, these values are to be translated into German.
<STEP-ProductInformationTranslation ExportTime="2013-03-27 10:06:21"  ExportContext="EN All All" ContextID="EN All All"
WorkspaceID="Main" wfmProcessTemplateName="Translation"
wfmProcessID="BGP_768298" translationTarget="German" PendingFileName="translation.xml">
<ListsOfValues>
	<ListOfValue ID="Colors" UseValueID="true" AllowUserValueAddition="false" ParentID="List Of Values group root">
	   <Name>Colors</Name>
	   <Validation InputMask="" MaxLength="100" MaxValue="" MinValue="" BaseType="text"/>
	   <DimensionLink DimensionID="Language"/>
	   <Value ID="634592" QualifierID="en"><TranslatableText>Yellow</TranslatableText></Value>
	   <Value ID="634593" QualifierID="en"><TranslatableText>Green</TranslatableText></Value>
	   <Value ID="634594" QualifierID="en"><TranslatableText>Red</TranslatableText></Value>
	</ListOfValue>
</ListsOfValues>
</STEP-ProductInformation>
Next, a translation vendor would receive this data, translate the data, and then send the updated XML file with the translated values back to the user. Subject to how the workflow has been configured between the user and the translation vendor, the updated XML file is then imported back into STEP, and the translation of the setup data is complete.
Attribute Name
Displayed below is an example of an attribute name and an attribute metadata value exported for translation (the text to be translated is highlighted in yellow). In this case, the attribute name is Color Attribute, and the metadata attribute is Description, for which the value is 'This color attribute is supposed to be used for cars.'
<STEP-ProductInformationTranslation ExportTime="2013-03-27 10:06:21"  ExportContext="EN All All" ContextID="EN All All"
WorkspaceID="Main" wfmProcessTemplateName="Translation"
wfmProcessID="BGP_768299" translationTarget="German" PendingFileName="translation.xml">
<AttributeList>
	<Attribute ID="Color" MultiValued="false" ProductMode="Property" FullTextIndexed="false" ExternallyMaintained="true"
Derived="false" HierarchicalFiltering="false" Selected="true" Referenced="true">
	<Name><TranslatableText>Color Attribute</TranslatableText></Name>
	<ListOfValueLink ListOfValueID="Colors1"/>
	<DimensionLink DimensionID="Language"/>
	<MetaData>
		<Value AttributeID="Description"><TranslatableText>This color attribute is
                supposed to be used for cars</TranslatableText></Value>
	</MetaData>
	<AttributeGroupLink AttributeGroupID="AAAA1"/>
	<UserTypeLink UserTypeID="Product"/>
	<UserTypeLink UserTypeID="LAAA_OT"/>
	</Attribute>
</AttributeList>
</STEP-ProductInformation>
As with the LOV example, a translation vendor would receive this attribute name data, translate it, and then send the updated XML file with the translated values back to user. Subject to how the workflow has been configured between the user and the translation vendor, the updated XML file would then be imported back into STEP. The translation of the setup data is then complete.