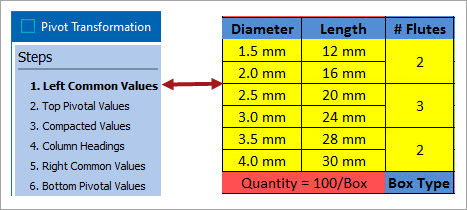
In the Table Guide, the Left Common Values will be the attributes for Diameter, Length, and # Flutes.
Note: The contents of table cells may be free text, product attribute values, product Names or IDs, meta-data, product references, or asset references. But for purposes of simplicity in this document the terms "attribute" and "attributes values" are used when referring to a cell's content.
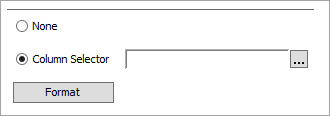
In this step you choose the attributes whose values are common to all the products in the same row and that will be positioned on the left hand side of the table. You have the following options:
- Select None if you do not want any attributes in this area. If you choose this option, you will need to define at least one attribute in the Right Common Values area. Otherwise the transformation cannot be accomplished.
- To choose one or more attributes to be placed on the left side of the table, click the ellipsis button (
 ) to open the window where you will choose those attributes. The Column Selector radio button is automatically set and the following screen displays:
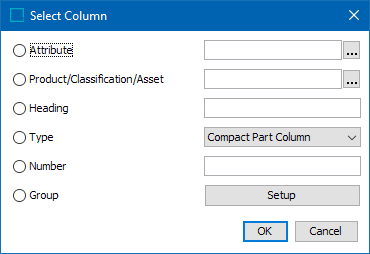
The options in this dialog box should be familiar; they are used for identifying columns or rows of attributes in several other table transformations. If you know that you will be defining more than one attribute in the Left Common Values area, then you should immediately select Group > Setup, which launches the 'Select Row/Columns to be Grouped' window.
If you know that you will only be defining one single attribute in the Left Common Values area, then you may make your selection in the usual manner from the options provided.
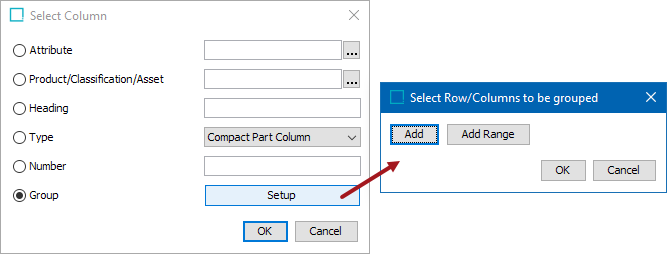
If you have selected Group > Setup, then click Add on the 'Select Row/Columns to be Grouped' window. Click the ellipsis button ( ) by the Column field to launch the 'Select Column' window, then choose the columns that should be in your group. Define as many attributes as needed.
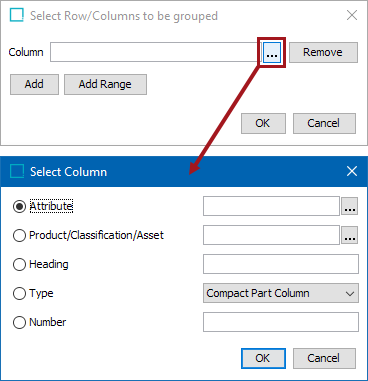
Each time you select the 'Add' button (top picture) you are presented with the options for identifying the attribute to appear on the left side of the table (bottom picture). The attributes display in the pivoted table in the same order they appear in this setup. So, the order in which the columns appear in the Table Definition is irrelevant. It is at this wizard step that you select the order of the columns to be displayed.
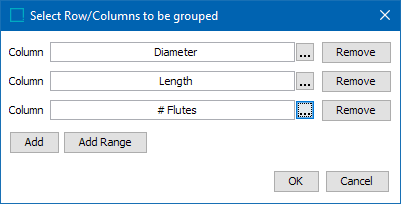
The selection of attributes that matches the Table Guide.
When you are finished with your selections, click OK to return to the main Wizard screen. Your selections will appear in the Column Selector line, similar to the following:
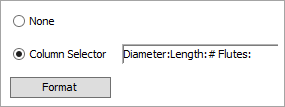
Format Button – Left Common Values
The Format Button is available in seven of the Wizard screens. The options within the Format window are very similar.
After making your selections as to which attributes will be placed on the left side of the table you need to define how the attribute values in the newly formed columns should be displayed. If you click the Format button, you can control the assignation of all the required Column Types in this area.
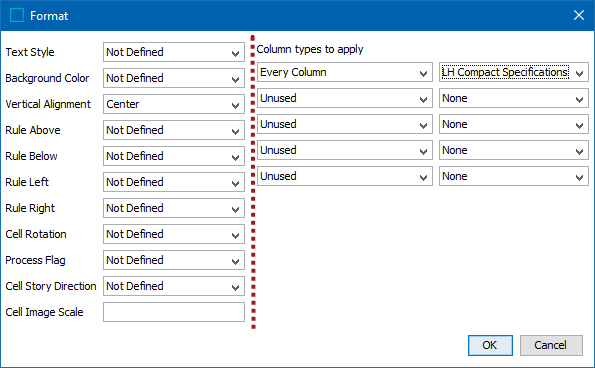
The options and selections in this window are the same as those for the Right Common Values.
Note that although the selections in the Format window for the Left Common Values and Right Common Values windows are exactly the same they are completely separate. So when you are in the Left Common Values area you will only be establishing setups for that area and not for the Right Common Values area.
The window is divided into two distinct areas, indicated by the vertical dashed line in the above picture. Over on the right hand side of the Format window you may apply column types to the attributes that you just selected. However, no matter what setups are defined within those Column Types that you have specified, the settings in the area over on the left hand side of the Format window will override those settings. You can therefore consider the settings on the left side to be 'global overrides'. For more information refer to the section on Priority of Formatting Setups here.
For example, in the above screenshot, if there is a Background Color of 'Mango' defined in the Column Type = LH Compact Specification, it will only take effect if there is no Background Color specified on the left.
Summary: Any setting that is not defined in the 'global overrides' area will allow the setting from the Column Type (specified on the right side) to take effect. However, there are some additional conditions that will influence this, refer to the section on Priority of Formatting Setups here.
Applying Column Types
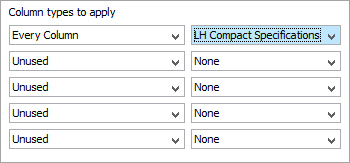
Up to five 'rules' may be applied when assigning column types. Each rule has the same selection of options.
There are different ways of assigning Column Types since the number of attributes selected in the Left Common Values area may vary from table to table. You have up to five sets of options or "rules" that you can apply to the assignation of the Column Types:
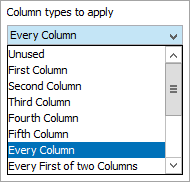
The available selections within each rule.
- Unused: No Column Type is defined.
- First Column: The specified Column Type will be assigned to the first column in the Left Common Values area.
- Second Column: The specified Column Type will be assigned to the second column in the Left Common Values area.
- Third Column: The specified Column Type will be assigned to the third column in the Left Common Values area.
- Fourth Column: The specified Column Type will be assigned to the fourth column in the Left Common Values area.
- Fifth Column: The specified Column Type will be assigned to the fifth column in the Left Common Values area.
- Every Column: Every column in the Left Common Values area will be assigned the specified Column Type.
- Every First of Two Columns: Starting at the first column in the Left Common Values area, every alternate column will be assigned the specified Column Type.
- Every Second of Two Columns: Starting at the second column in the Left Common Values area, every alternate column will be assigned the specified Column Type.
- Every First of Three Columns: Starting at the first column in the Left Common Values area, every third column will be assigned the specified Column Type.
- Every Second of Three Columns: Starting at the second column in the Left Common Values area, every third column will be assigned the specified Column Type.
- Every Third of Three Columns: Starting at the third column in the Left Common Values area, every third column will be assigned the specified Column Type.
- Remaining Columns: All columns in the Left Common Values area following the ones affected by the previous rules will be assigned the specified Column Type. For example, if rules have been applied to the first three columns, then from column 4 onwards the specified Column Type will be assigned.
- Last Column: The last column in the Left Common Values area will be assigned the specified Column Type.
When column types are applied, the rules are applied in the order they are listed, thus a later rule overrides an earlier rule. For example, if the first rule is 'Every Column' and the second rule is 'Third Column', then all columns will be assigned the Column Type defined in the first rule, except the third column, which will be assigned the Column Type defined in the second rule.
Note that as a result of these different options it is possible to achieve the same result in different ways. For example, review the setups in the following picture – they accomplish the same thing:
