When importing assets into STEP, System Properties attributes can be automatically created in STEP on the asset, and then populated with the image metadata detected on the incoming assets. The image metadata must be formatted as either XMP (Extensible Metadata Platform) or EXIF (Exchange Image File). Determination of which metadata attributes should be housed in STEP is configured manually.
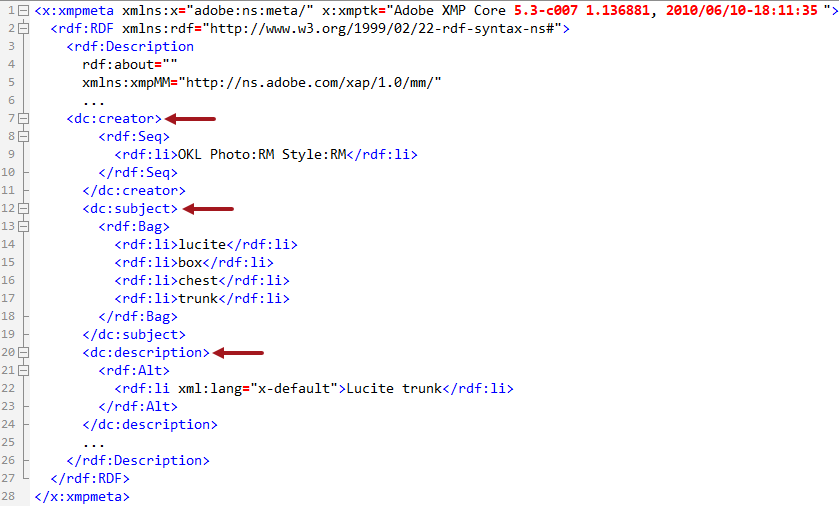
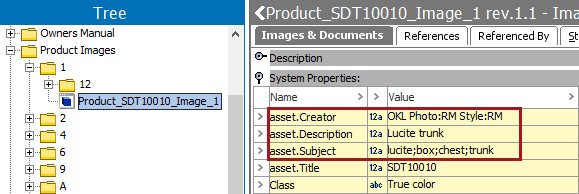
In an image file, image metadata is stored as plain text in XML format. Based on the configuration file and import shown below, the Creator, Subject, and Description metadata will be written to STEP. In the following sample, some rows have been removed for brevity, as indicated by '...'.

Prerequisites
The user should have a basic understanding of XML, the XML structure of image metadata, and XPath before proceeding with configuration. The configuration file uses XML to define attribute names and the XPath query to retrieve metadata. For more information, search the web.
XMP Configuration File
The custom asset metadata configuration file uses the instruction 'XmpConfiguration' to define the name of the system attributes being created in STEP and the XPath that defines how to retrieve the image metadata.
XPath is an XML query language STEP uses to search the XML within an image file and identify the desired metadata. The XMP configuration file defines the XPath queries to be run against an image file being imported.
The following sample configuration file defines three metadata attributes (Creator, Description, and Subject), and the XPath query required to find the corresponding metadata.

In the above example, the 'creator' attribute is defined by the text:
name="Creator" unit=""
The XPath to find the creator metadata is defined by the text:
xpath="/*[name(.)='x:xmpmeta']/*[name(.)='rdf:RDF']/*[name(.)='rdf:Description']/*[name(.)='dc:creator']/*[name(.)='rdf:Seq']/*[name(.)='rdf:li']"/>
Another example (an XML block in an image file and the XPath):
<x:xmpmeta xmlns:x="adobe:ns:meta/" x:xmptk="XMP Core 4.4.0-Exiv2">
<rdf:RDF xmlns:rdf="http://www.w3.org/1999/02/22-rdf-syntax-ns#">
<rdf:Description rdf:about=""
xmlns:iptcExt="http://iptc.org/std/Iptc4xmpExt/2008-02-29/"
xmlns:xmpMM="http://ns.adobe.com/xap/1.0/mm/"
xmlns:stEvt="http://ns.adobe.com/xap/1.0/sType/ResourceEvent#"
xmlns:plus="http://ns.useplus.org/ldf/xmp/1.0/"
xmlns:GIMP="http://www.gimp.org/xmp/"
xmlns:dc="http://purl.org/dc/elements/1.1/"
xmlns:tiff="http://ns.adobe.com/tiff/1.0/"
xmlns:xmp="http://ns.adobe.com/xap/1.0/" iptcExt:DigitalSourceType="http://cv.iptc.org/newscodes/digitalsourcetype/digitalCapture"
xmpMM:DocumentID="gimp:docid:gimp:7620dabd-f6a6-435f-a865-ff3b8315b650"
xmpMM:InstanceID="xmp.iid:9c338c25-620b-4d53-adc7-c2a921b771cd"
xmpMM:OriginalDocumentID="xmp.did:e19d764e-1731-46ca-9fe1-8c86d0b29d05"
plus:ModelReleaseStatus="http://ns.useplus.org/ldf/vocab/MR-LPR"
GIMP:API="2.0"
GIMP:Platform="Windows"
GIMP:TimeStamp="1613727775463349"
GIMP:Version="2.10.22"
dc:Format="image/png"
tiff:Orientation="1"
xmp:CreatorTool="GIMP 2.10">
<XmpProperty name="GIMP_Version" unit="" xpath="/*[name(.)='x:xmpmeta']/*[name(.)='rdf:RDF']/*[name(.)='rdf:Description']/*[name(.)='GIMP:API'] | /*[name(.)='x:xmpmeta']/*[name(.)='rdf:RDF']/*[name(.)='rdf:Description']/@*[name(.)='GIMP:API']" /> Using an XMP Configuration File
- Create and save a custom asset metadata configuration file using XmpConfiguration instruction as shown above, that defines:
- the image metadata attribute name(s)
- the appropriate XPath to the required metadata on the image
- Save the configuration file to the STEP server in the same directory as the sharedconfig.properties file.
- Edit the sharedconfig.properties file and include the case-sensitive XMP.ConfigFile property as follows, where 'customxmpconfiguration.xml' is the name of the configuration file created above.
XMP.ConfigFile = /workarea/customxmpconfiguration.xml
- Save the sharedconfig.properties file.
- Restart the STEP server to apply changes to both configuration files.
- Import an image that includes the metadata attributes defined in the XMP configuration file.
- Navigate to the imported asset to view the metadata assets on the System Properties flipper.
Custom attributes are identified in the STEP asset editor by the text 'asset.' which is prepended to the attribute name (for example, 'asset.Creator').

Important: Custom coding by Stibo Systems can be used to allow attributes to be displayed in workbench with names other than 'asset.[attribute name]'. For more information, contact your Stibo Systems representative.