This topic provides a general overview of how to mount objects onto InDesign pages using the Print Publisher 'drag-and-drop' method. The provided examples use product and entity objects.
Though objects other than products and entities can be dragged and dropped onto InDesign pages from STEP (including standalone assets, classification folders, and green publication hierarchy objects), they are not covered in this topic since the drag-and-drop method is the same, and their use is less common.
This topic assumes that you have already set your template preferences in the STEP Preferences menu and have selected a publication version to use for mounting. For more information on these preliminary steps, refer to the preceding topic in this guide, Setting Template Preferences and Selecting a Version here.
Mounting a Product
To mount a product onto an InDesign page, follow these steps.
- Open the STEP Structure View panel by navigating to Window > STEP Structure View.
- If using locally stored product templates, select the product template that you would like to use from the Template list at the bottom of the panel.
Note: The product templates in the dropdown list are the templates stored in the Template Path folder designated in the STEP Preferences menu.
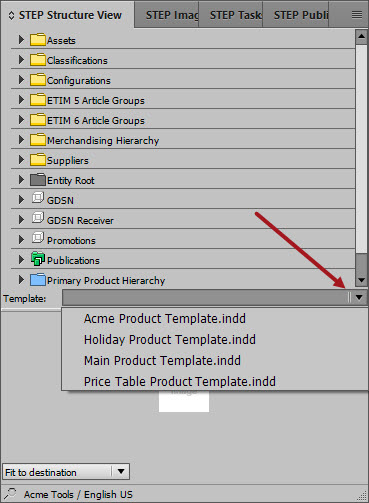
- In the STEP Structure View tree, locate the object that you would like to mount.
To locate an object in the STEP Structure View, either browse through the tree or click on the magnifying glass icon in the lower left corner of the panel to display the Search dialog. The Search dialog can also be accessed by clicking the Options dropdown arrow in the upper right corner of the panel.
- Select the object, then hold down the left button of your mouse while you drag it to the desired location on the page.
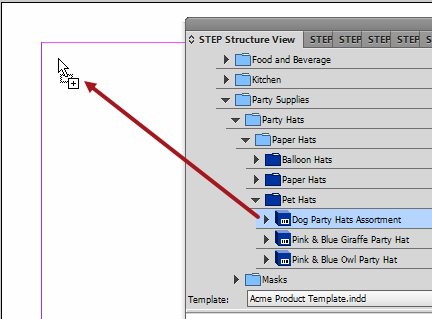
- To mount several products in one operation, hold down Ctrl or Shift while making your selections in the STEP Structure View tree. Products will be mounted sequentially.
Note: Your multi-selection must be within the same classification or product family. Additionally, if not using pagination rules, all products will use the same product template. For information on how to mount objects using pagination rules, refer to the Mounting Objects Using Pagination Rules topic here.
A gap will be placed between the products based on what was entered in the Multi-place Gap field in the STEP Preferences menu.

If the product data exceeds the available space on the column or page or column, Print Publisher can be configured to flow the data into next column or page by splitting a frame, or group of frames, across the column or page. These split settings are applied to product template frames on the STEP Template Frame panel. Refer to the STEP Template Frame panel topic here for more information.
- Release the mouse button where you would like to drop the product onto the page.
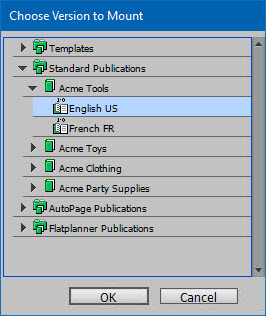
- If you selected 'Prompt for Version' in the STEP Preferences menu, the Choose Version to Mount dialog will display when you release the left button of your mouse. Select the desired version, then click OK to close the dialog and mount the product.
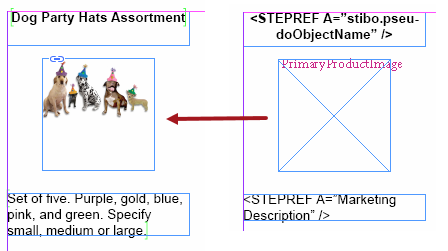
- Once dropped, the product is mounted to the page, using the layout and formatting from the product template.
Mounting an Entity
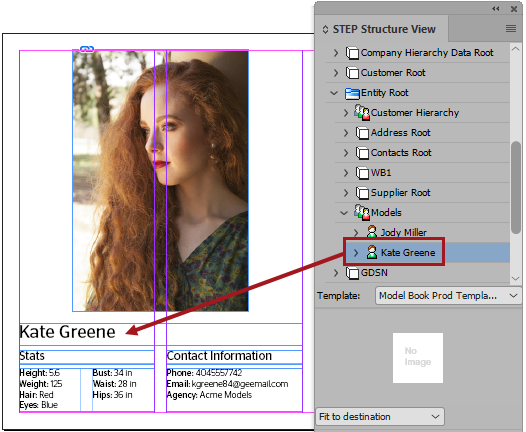
Entities are used in Print Publisher to publish non-product data such as people information (e.g., customer data), businesses (e.g., retail store locations, floor plans, opening hours), and 'technology / feature' objects linked to products in catalogs (e.g., quality standards, care instructions, materials). The 'drag-and-drop' steps for mounting an entity to an InDesign page are the same as those for mounting a product.
The below example shows an entity directly mounted to an InDesign page and contains information related to a fashion model (including height, weight, and hair color). It is also referenced to an image asset (a modeling headshot).
Remounting Objects
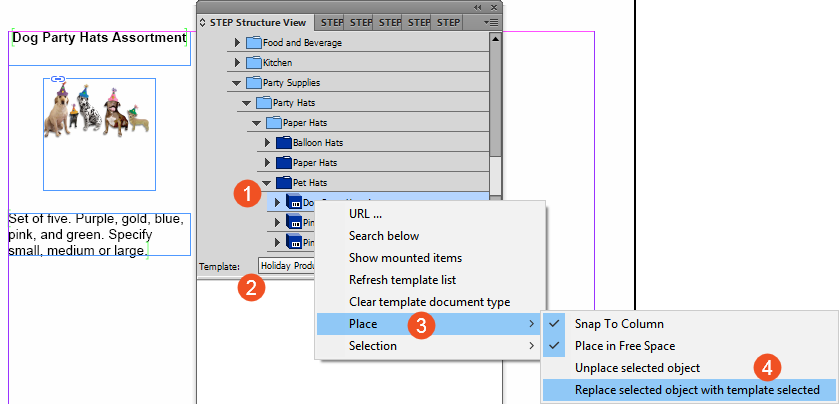
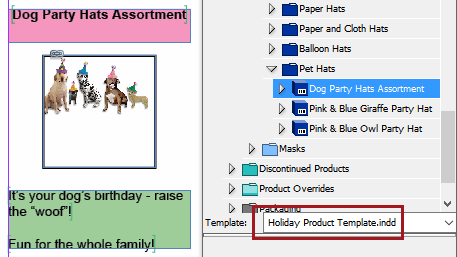
After mounting an object onto a page, you can remount it using a different product template by using the Replace selected object with template selected command. This command enables you to keep the mounted object on the page and change its layout without having to delete it from the page and remount it anew.
To use this command, follow these steps:
- In the STEP Structure View panel, navigate to the object that you would like to remount.
- Select the new template from the Template dropdown list.
- Select Place, then Replace selected object with template selected.
- The object is remounted using the selected template.
Unmounting Objects
Sometimes, after mounting an object onto the page, it must be unmounted. Objects are frequently removed from pages when testing product templates, but they can be removed at any point in the production process.
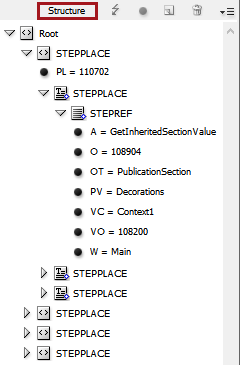
Once an object is mounted onto a page from STEP, information about the mounted object is embedded into the XML Structure in InDesign. However, unmounting an object involves more steps than deleting it from the page. When a mounted object is deleted, STEPXML tags still remain in the InDesign XML Structure, even though the visible data is gone from the page. Leftover STEPXML tags mean that historical data is still embedded on pages, and these leftover tags can cause issues such as:
- Attribute transformations not working correctly when a new object is mounted
- Problems with updating product data on the page, since the system accesses data on the page that is not actually there
- Miscalculations of space usage for objects on pages
- A mixture of publication versions on the same page, since version information is embedded in the XML tags
- Unwanted products appearing in indexes
- Inflated file size from the amount of broken and unused mount tags building up in the background
Note: To view the XML Structure in Print Publisher, press Ctrl+Alt+1 in Windows or go to View > Structure > Show Structure.
There are three ways to properly unmount an object and clear the InDesign XML structure.
Undo
After mounting an object, if you decide that you are unhappy with the results and would like to mount it again, or, you are testing on a publication template and want to return to a clean slate after mounting, perform one of the following actions:
- Press Ctrl+Z on Windows machines or Cmd+Z on Macs.
- Go to Edit > Undo STEP Drag/Drop.

Delete Mounted Object and Cleanup Mount Tags
- Delete the mounted object(s) from your page using standard delete functionality. If your object has mounted on multiple pages, you must delete the entire product presentation from all pages that it appears on, not just the portion that appears on the first page.
- Go to STEP > Cleanup Mount Tags

- The XML Structure is now cleared.
Unplace selected object
Use the Unplace selected object option to delete an object from the page and remove the STEPXML tags from the structure in one action. This option only works on one object at a time.
- Navigate to the mounted object in the STEP Structure View.
- Right-click and select Place > Unplace selected object.
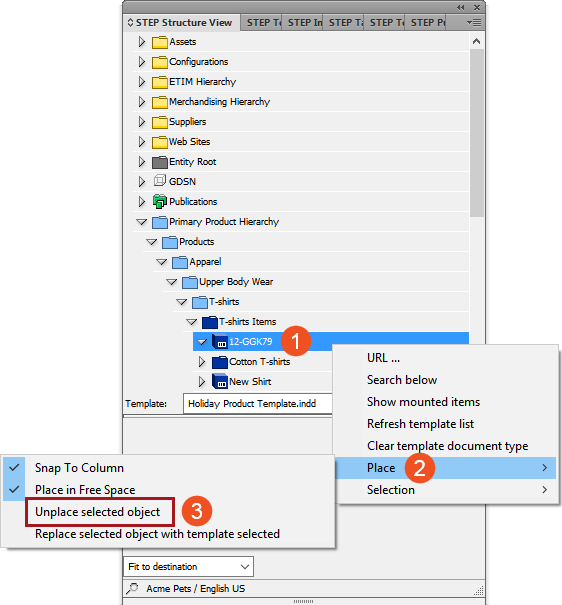
- The mounted object is removed from the page and all associated STEPXML is removed from the InDesign XML Structure.