The server-side setting of the sharedconfig.properties PDX.Url determines the PDX environments eligible in the OIEP configuration of the delivery method. Two PDX environments are relevant to this setting:
-
PDX Production (https://api.pdx.stibosystems.com)
-
PDX Pre-production (https://api.pdx-preprod.stibosystems.com)
General setup will include one account on the Production environment, which processes and syndicates live data, while multiple non-production accounts / clients may exist on the Pre-production environment. In the image below, STEP environments are in the column on the left, and those on the right represent PDX environments with PDX accounts.

Note: Changes to the properties file, outlined below, are implemented when the server is restarted.
The sharedconfig.properties on the STEP Production environment would specify the PDX Production environment (containing the customer’s production account / client) as the valid target of the PDX OIEP configured, as seen in the example below:
PDX.Url=1=https://api.pdx.stibosystems.com
To ensure product information maintained in all the contexts selected for syndication in the PDX OIEP setup can be transferred, the following property should be set to ‘false’:
PDXDelivery2.LocaleChecking=false
Once these are set, continue setup by following the steps below:
-
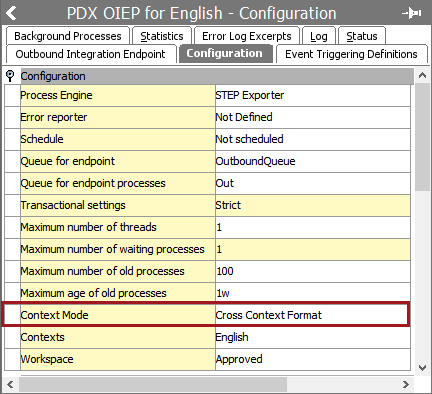
The STEPXML Type: Ensure that the OIEP always sends cross context formatted STEPXML to PDX by setting the 'Context Mode' to 'Cross Context Format' as highlighted below:

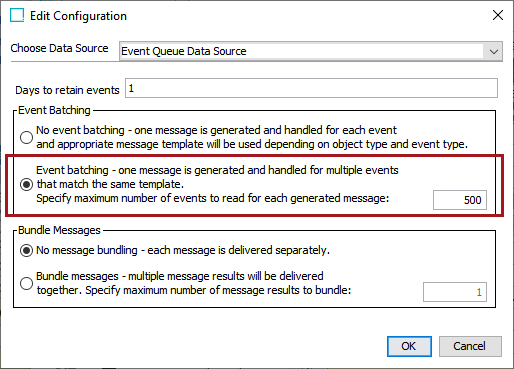
Important: Ensure the event batching is set to a maximum of 500 to ensure optimal performance of the integration.

-
The STEPXML Template: The Format used in the PDX integration is Advanced STEPXML, and the template should always contain the following tags:
-
ContextList
-
CrossReferenceTypes
-
UnitList
-
AttributeList
The following is an example template:
Copy<STEP-ProductInformation ResolveInlineRefs="true" FollowOverrideSubProducts="true">
<ContextList ExportSize="Minimum"/>
<CrossReferenceTypes ExportSize="Minimum"/>
<UnitList ExportSize="Minimum"/>
<AttributeList ExportSize="Minimum"/>
<Products ExportSize="Minimum" FlattenHierarchy="false">
<Product/>
</Products>
<Assets ExportSize="Referenced"/>
</STEP-ProductInformation>
-
-
The Pre-processor: The Pre-processor used should be the 'PDX Pre-Processor 2.'

It has a single setting called 'Only Changes.' If this is set to 'No,' then all products in the event queue will be sent. If it is set to 'Yes,' then only products with a changed revision will be sent.
-
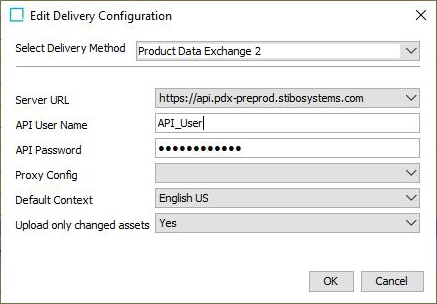
The Delivery Method: When setting up the Delivery Method of the PDX OIEP, ensure that the 'Product Data Exchange 2' is chosen.

-
Select the appropriate target PDX environment
-
Enter the username and the API password of a PDX user associated with a relevant account on the targeted environment.
Note: If a HTTP Proxy has been configured, you’re able to choose it in the “Proxy Config” dropdown list. For more information on how to configure a proxy, refer to the topic HTTP Proxy Configurations in the Data Exchange documentation here.
-
Specify which of the contexts included in the OIEP configuration is the 'default context.' The data in this context will be used to populate the default language layer in PDX.
Important: Channel assignment rules in PDX will be evaluated based on the values available in the default language layer.
-
Set the 'Upload only changed assets' setting to 'Yes,' if you only want to include referenced asset objects where either attribute values or the asset content has changed.