The Amazon SQS Delivery Method delivers messages to the Amazon Simple Queue Service (Amazon SQS). This delivery option is only available in OIEPs. When multiple XML files are available to be delivered at the same time, they are sent individually (not concatenated into a single file).
To access the Amazon SQS Delivery method, a Delivery.AmazonSQS component must be activated on your system in addition to the normal update procedures. Contact your Stibo Systems representative for more information.
The Amazon SQS queues require a file size of less than 256KB. Common setup is to use file compression (zip export file) to reduce the message size to meet this limitation. Amazon S3 storage account is required to handle files 256KB or larger. For more information, search Amazon S3 online.
Prerequisites
Changes to the properties file, outlined below, are implemented when the server is restarted.
- For the 'Credentials profile' parameter, create a credentials file following the instructions at http://docs.aws.amazon.com/cli/latest/userguide/cli-config-files.html. Place the credentials file (named 'credentials', without any file extension) in the required path on the application server. This file is used by both the OIEP Amazon SQS Delivery Method and the IIEP Amazon SQS Receiver.
- Prior to configuration, clicking the Server URL dropdown parameter displays the required property name. Provide a selection for the dropdown parameter via the sharedconfig.properties file on the STEP application server using the case-sensitive SQSServerUrl property. The following is an example of a property entry for a single server:
SQSServerUrl=1=https://sqs.us-east-2.amazonaws.com
- Prior to configuration, clicking the Credentials Path dropdown parameter displays the required property name. Provide a selection, including the name of the credentials file, for the dropdown parameter via the sharedconfig.properties file on the STEP application server using the case-sensitive SQSCredentialsPath property. If necessary, use a comma and increment the number to separate multiple paths as shown in the example below.
SQSCredentialsPath=1=C:\\Users\\stibosw\\.aws\\credentials,2=C:\\Users\\stibosw\\.aws\\credentials123
- Prior to configuration, clicking the S3 Bucket Name dropdown parameter displays the required property name. If Amazon S3 is being used, provide a selection for the dropdown parameter via the sharedconfig.properties file on the STEP application server using the case-sensitive SQSDeliveryS3BucketName property. The following is an example of a property entry for a two buckets where a comma separates multiple buckets:
SQSDeliveryS3BucketName=1=AmazonBucketName1,2=AmazonBucketName2
- For the 'Queue name' parameter, if necessary, create a new queue on the SQS server. Use the steps defined in the Amazon SQS Queue Configuration section below.
- If necessary, establish the Amazon S3 storage account and create the required buckets. For details, refer to Amazon S3 on the web.
- If message attributes are required, create up to seven (7) string Message Attributes on the Amazon website. The message attribute names in Amazon correspond to the Key parameters created in the delivery method configuration below.
Contact your Stibo Systems representative if you need assistance with setup.
Configuration
After completing the prerequisite steps, edit the delivery method of the OIEP. Use the following steps to configure the OIEP to use the Amazon SQS delivery option.
For information on a parameter, hover over the parameter field to display help text.
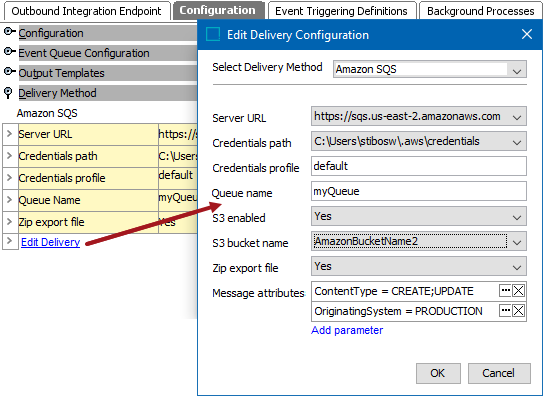
- For Select Delivery Method, choose Amazon SQS.
- In Server URL, select the URL that points to the SQS server where the data will be delivered.
- In Credentials path, select the path to the desired SQS credentials file.
- In Credentials profile, enter the profile name included in the SQS credentials profile.
- In Queue Name, enter the Amazon queue created for this delivery. This queue is also required when Amazon S3 is being used.
- For S3 Enabled, select 'Yes' if you have an Amazon S3 storage account. Setting this option to 'No' results in an error for messages that exceed the 256KB size limit.
Note: When 'S3 Enabled' = Yes, the Amazon framework sends messages that are smaller than 256KB continue to be processed without S3 using Amazon SQS.
- In S3 Bucket Name, select the Amazon bucket name that should be used for this delivery. This name must already be established on the Amazon account.
- In Zip export file, specify whether to zip the contents before delivery.
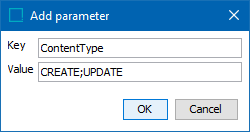
- Message Attributes provides user-defined data that is visible within Amazon SQS (refer to the Amazon SQS View Message Attribute section below) and is specific to the OIEP. Click the Add parameter link to create a message attribute, then enter a text value for the Key and the Value parameter. In the image above, the Key = ContentType, and the Value = CREATE;UPDATE, which could be used to indicate that the OIEP is processing both create and update events.
- On the Edit Delivery Configuration dialog, click the OK button to save the delivery method.
Amazon SQS Queue Configuration
When required, use the following steps to create a new Amazon SQS queue.
- Log in to the Amazon server based on your region.
- Search for Simple Queue Service and select it to display the queue list page.
- Click the Create New Queue button to display the Create New Queue page.

- For Queue Name, type a queue name including the '.fifo' extension.
- For the type of queue section, select FIFO Queue.
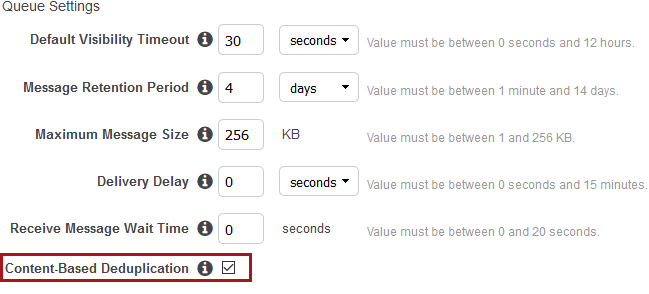
- Click the Configure Queue button at the bottom of the page to display the default Queue Attributes parameters.
- Check the Content-Based Deduplication parameter box to enable the queue.
- Click the Create Queue button. The new queue is displayed in the list.
Amazon SQS View Message Attributes
- Log in to Amazon SQS and display your queue(s).
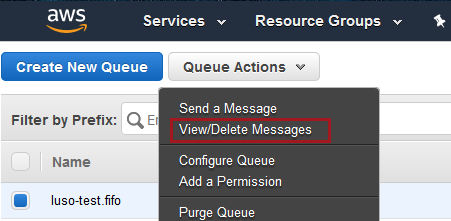
- Right-click the desired queue to display the menu (or click the Queue Actions dropdown button) and click the View/Delete Messages option.
- Click the More Details link to display the Message Details dialog.
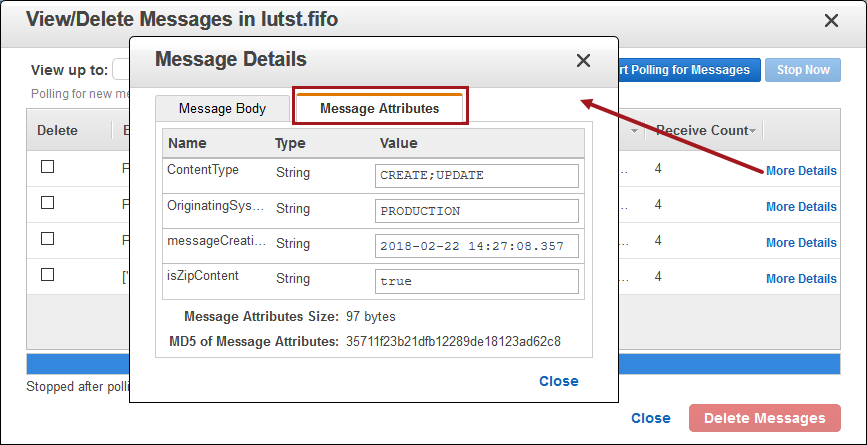
- On the Message Details dialog, click the Message Attributes tab to display the standard and user-defined message attributes.
Note: In addition to the user-defined message attributes, two standard message attributes are included: messageCreationTime displays the delivery datetime, and isZipContent indicates the status of the 'Zip export file' parameter.