The plugin suite for Version Control System (VCS) integrations consists of these plugins:
-
'STEPXML Splitter' Post-processor Plugin in Outbound Integration Endpoint (OIEP)
-
'Git Delivery' Plugin in Outbound Integration Endpoint (OIEP)
-
'STEPXML Joiner' Pre-processor Plugin in Inbound Integration Endpoint (IIEP)
-
'Invoke OIEP' Post-processor Plugin Inbound Integration Endpoint (IIEP)
Each is described in their own section below.
Additionally, within this topic, is information regarding an editable business rule format. JavaScript-based business rules can be created, maintained, and unit tested outside of STEP. This allows customers and partners to govern the lifecycle of business rules in a standard source code control system such as GIT, and from there, deploy appropriate versions of the business rules to the various STEP systems that are part of a Development, Testing, Acceptance and Production (DTAP) environment.
'STEPXML Splitter' Post-processor Plugin in OIEP
The 'STEPXML Splitter' post-processor can take any STEPXML file produced by the 'STEP Exporter' processing engine as input and will split the file into multiple valid STEPXML files and/or editable business rule format files that are then passed to the configured delivery plugin. Generally, the splitter produces one file per STEP object and further normalizes the content so that elements for which the sequence has no significance in STEP are output in the same order every time. Non-object configurations (e.g., derived events) and system settings are output in a single file.
Splitting and normalizing makes it easier to compare configurations outside of STEP in a VCS like Git. Further, it makes it easy to selectively choose specific configuration items to be imported on another system.
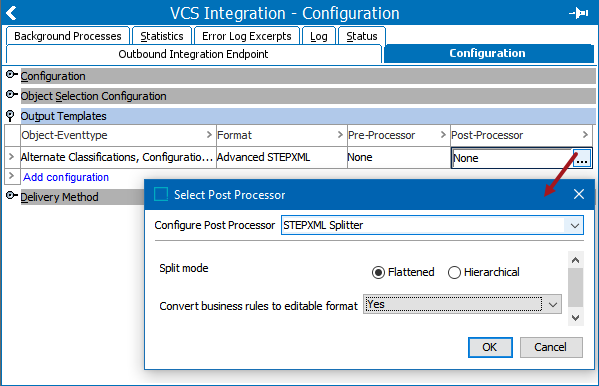
The ‘STEPXML Splitter’ plugin has the configuration options explained below.
Split mode
Split mode defaults to ‘Flattened’ but also allows 'Hierarchical'. The parameter affects how to represent STEP objects in the produced split files when they are typically exported in a nested structure.
To illustrate the difference, in the example shown below, the following classification hierarchy is being exported:
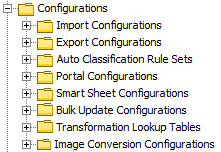
In both modes, one file will be created per classification object.
In Flattened mode, upper levels are omitted and each file contains exactly one 'Classification' element with parent identifier information, as shown below.
(…)
<Classifications>
  <Classification ID=‘stibo.IMConfigFolder’ UserTypeID=‘ImportConfigurationsRoot’ ParentID=‘ConfigurationsRoot’>
    <Name>Import Configurations</Name>
    <MetaData>
      <Value AttributeID=‘Purpose’ QualifierID=‘en-US’>Storage for import configurations</Value>
    </MetaData>
  </Classification>
</Classifications>
(…)
In Hierarchical mode, each of the leaf classifications (e.g., 'Import Configurations') is nested inside the element representing the 'Configurations' classification, which is stripped of all but ID, object type ID, and parent ID information, as shown below.
(…)
<Classifications>
  <Classification ID=‘ConfigurationsRoot’ UserTypeID=‘ConfigurationsRoot’ ParentID=‘Classification 1 root’>
    <Classification ID=‘stibo.IMConfigFolder’ UserTypeID=‘ImportConfigurationsRoot’>
      <Name>Import Configurations</Name>
      <MetaData>
        <Value AttributeID=‘Purpose’ QualifierID=‘en-US’>Storage for import configurations</Value>
      </MetaData>
    </Classification>
  </Classification>
</Classifications>
(…)
Generally, it is recommended to use the default 'Flattened' mode while the 'Hierarchical' mode should only be used if the full hierarchy path must be present in each file.
Note: The 'Hierarchical' example from above can be imported on a system where the classification with ID 'ConfigurationsRoot' is not present as it will be created during import. Importing the 'Flattened' example on such a system, however, results in an error.
Convert business rules to editable format
This option determines how business rules (conditions, actions, functions, and libraries) are exported.
-
If set to No, the business rules are exported as STEPXML files.
-
If set to Yes, the rules are exported in the editable *.js format described in this topic.
When exporting editable business rules, set this option to 'Yes.' The business rules in the STEPXML that are fed to the post-processor are converted to the editable format and represented in a single *.js file instead of being represented in a STEPXML file. For details, refer to the Editable Business Rules Format topic here.
‘Git Delivery’ Plugin in OIEP
The 'Git Delivery' plugin delivers files produced by the outbound integration endpoint (OIEP) processing engine or a configured post-processor to a branch in a remote Git repository. Refer to https://git-scm.com for more information about Git.
When using the plugin on an on-premise STEP system, the delivery to Git can be performed via a configured local directory accessible from all application servers in the cluster (refer to the 'Local git repository URI' section below). With this setup, the plugin first checks if the local delivery directory is Git enabled.
If the local delivery directory is Git enabled, the following operations are performed:
-
Git fetch
-
Git checkout (of configured branch)
-
Git hard reset
-
Git pull (if branch exists in remote)
If the local delivery directory is not Git enabled, the following operations are performed:
-
Git clone
-
Git checkout (of configured branch)
On cloud-based STEP systems, a temporary local directory is always used and the second approach (clone and checkout) is used.
Note: The remote repository cannot be empty. At least one branch with one file must exist (e.g., the 'main' branch and the README.md file).
The locally checked-out branch is now in sync with the remote branch, and the following operations are performed:
-
Files produced by the OIEP are written to the local directory
-
Files present in the local directory but not in the delivery are deleted
-
Git stage
-
Git commit
-
Git push
Important:
-
With each invocation, the OIEP must produce files for all the configuration objects and/or settings to be represented in the configured Git branch. Exporting only a file for a single object will cause all other files in the Git branch to be deleted. Refer to the OIEP for VCS Integration topic (here) for more information on how to configure an OIEP using this delivery plugin.
-
Only STEP should make changes in the configured Git branch. All other changes are overwritten with the next STEP delivery.
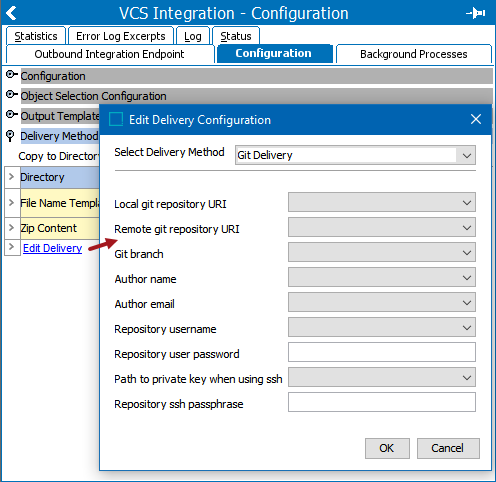
Configure the 'Git Delivery' plugin using the following parameters:
Note: In the sharedconfig.properties file entries mentioned below, use a sequential set of variable integers in the property names, for example, 1, 2, 3. Property values are not read correctly if the sequence is not sequential, for example 1, 3, 4.
-
Local git repository URI - URI for the local directory via which configuration files are synchronized.
For on-premise systems, possible values for this parameter are read from the case-sensitive 'GitDelivery.LocalRepoUri.[integer]' sharedconfig.properties file entries.
Example:
GitDelivery.LocalRepoUri.1=/workarea/conf-attributes
GitDelivery.LocalRepoUri.2=/workarea/conf-all
allows selection between the values '/workarea/conf-attributes' and '/workarea/conf-all' for the parameter in the workbench.
For cloud STEP systems, do not set the sharedconfig.properties file entry and leave this parameter blank.
-
Remote git repository URI - URI for the remote repository.
For both on-premise and cloud STEP systems, possible values for this parameter are read from the case-sensitive 'GitDelivery.RemoteRepoUri.[integer]' sharedconfig.properties file entries.
Examples:
GitDelivery.RemoteRepoUri.1=https://gitlab.com/john-smith/step-conf.git
GitDelivery.RemoteRepoUri.2=git@bitbucket.org:john-smith/smithrepo.git
Note: For internally-hosted Git setups, you must ensure that any firewall access rules, IP white-listing, or ports (tcp/22 or similar) have been configured to allow the STEP server(s) to access the needed Git repository.
-
Git branch - Name of the branch to which the delivery is published.
Values for this parameter are read from the case-sensitive 'GitDelivery.Branch.[integer]' sharedconfig.properties file entries.
Examples:
GitDelivery.Branch.1=step-dev-1
GitDelivery.Branch.2=step-qa
-
Author name - Author name for the Git commit.
Values for this parameter are read from the case-sensitive 'GitDelivery.AuthorName.[integer]' sharedconfig.properties file entries.
Examples:
GitDelivery.AuthorName.1=John Smith
-
Author email - Author email for the Git commit.
Values for this parameter are read from the case-sensitive 'GitDelivery.AuthorEmail.[integer]' sharedconfig.properties file entries.
Examples:
GitDelivery.AuthorEmail.1=john.smith@acme.com
-
Repository username - The remote repository username supports delivery via HTTPS and PAT (discussed later).
Values for this parameter are read from the case-sensitive 'GitDelivery. RemoteRepoUsername.[integer]' sharedconfig.properties entries.
Example:
GitDelivery.RemoteRepoUsername.1=john.smith
Note: The Repository username and Repository user password parameters and properties are only used for HTTPS-based and PAT-based (discussed later) connections. For SSH-based connections, leave these properties blank since they are ignored. SSH uses only the Path to private key when using ssh and Repository ssh passphrase (if applicable) parameters and properties.
-
Repository user password - The remote repository password supports delivery via HTTPS and PAT (discussed later.) Password must be entered directly when configuring the plugin for these authentication methods.
-
Path to private key when using ssh - The remote repository RSA SSH private key generated using the old OpenSSH format.
Important: PuTTYgen (.ppk) and EdDSA-type (ed25519) SSH keys are not supported by STEP. Using an unsupported key type results in an 'invalid private key' error.
-
Use ssh -V to check the version on your system and then generate a key.
-
With OpenSSH versions prior to 7.8, use the following command to generate the new OpenSSH format key:
ssh-keygen -t rsa -b 4096 -C <comment> -f <keyfile_name>
Example:
ssh-keygen -t rsa -b 4096 -C john.smith@acme.com -f git_rsa4096_key
-
With OpenSSH versions 7.8+, generated keys default to the new OpenSSH format. To generate keys in the old format, use the following command:
ssh-keygen -t rsa -b 4096 -C john.smith@acme.com -m PEM -f git_rsa4096_key
Important: While the general approach and commands are the same with later versions of OpenSHH, the -m PEM argument shown above is needed with versions 7.8+.
-
-
Add the public version of the SSH key (e.g., git_rsa4096_key.pub) to your GitLab or Bitbucket account. Failure to add the public key to your account results in a 'Not authorized' error.
-
For GitHub accounts, refer to the GitHub Limitations and Configuration section below.
-
For Bitbucket accounts, refer to the Bitbucket Limitations and Configuration section below.
-
For a general overview of supported authentication methods, refer to the Supported Authentication Methods (per Git Service) section below.
-
Values for this parameter are read from the case-sensitive 'GetDelivery.SshPrivateKeyUri.[integer]' sharedconfig.properties entries. These entries must contain the full path to the private SSH key file.
Example:
GitDelivery.SshPrivateKeyUri.1=/home/stibosw/.ssh/git_rsa4096_key
GitDelivery.SshPrivateKeyUri.2=/workarea/.ssh/gitlab_rsa4096_enc_key
GitDelivery.SshPrivateKeyUri.3=/upload/.ssh/bitbucket_rsa4096_key
-
-
Repository ssh passphrase - The remote repository SSH passphrase. The passphrase must be entered directly when configuring the plugin.
Supported Authentication Methods (per Git Service)
|
|
Protocols |
||
|---|---|---|---|
|
Git Services |
HTTPS |
SSH |
PAT* |
|
GitHub |
|
|
|
|
GitLab |
|
|
|
|
Bitbucket |
|
|
|


*PAT = Personal Access Token / App Password
GitHub Limitations and Configuration
The following limitations apply when using GitHub with STEP:
Unlike other Git services, GitHub is more restrictive in the level of security placed on accessing its repositories, specifically:
-
Basic authentication for HTTPS connections is not supported.
-
RSA SSH keys that use the sha-1 signature algorithm are not supported.
For the STEP application:
-
EdDSA-type keys are not supported.
Therefore, the only available authentication method for using the Git Delivery Plugin with a GitHub account is a Personal Access Token (PAT). To use PAT:
-
Configure the OIEP with the HTTPS URL of the repository via the 'GitDelivery.RemoteRepoUri.[integer]' property.
-
Specify the user name via the 'GitDelivery.RemoteRepoUsername.[integer]' property.
-
Add the personal access token into the Repository user password parameter.
-
Leave the 'GetDelivery.SshPrivateKeyUri.[integer]' parameter and sharedconfig.properties entry blank.
Bitbucket Limitations and Configuration
Bitbucket does not support using Basic authentication for HTTPS connections. This means that apart from SSH keys, the only other usable authentication method is app passwords.
When using app passwords:
-
Configure the OIEP with the HTTPS URL of the repo with the 'GitDelivery.RemoteRepoUri.[integer]' property.
-
Specify the user name with the 'GitDelivery.RemoteRepoUsername.[integer]' property.
-
Add the app password in the Repository user password field.
-
Leave the 'GetDelivery.SshPrivateKeyUri.[integer]'parameter and sharedconfig.properties entry blank.
Remote Setup Example
Below is an example of how a remote Git repository using Bitbucket (https://bitbucket.org) can be configured to work with the Git delivery plugin.
-
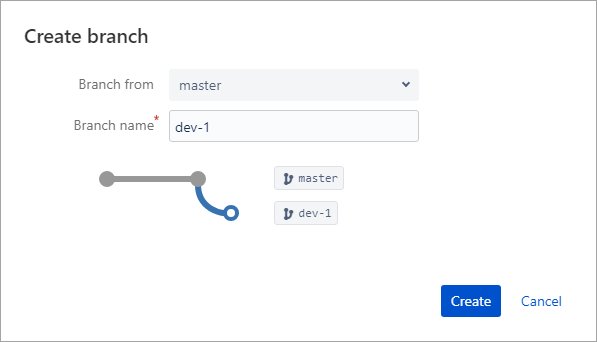
Create a new repository with a 'README' file via the Bitbucket web interface.
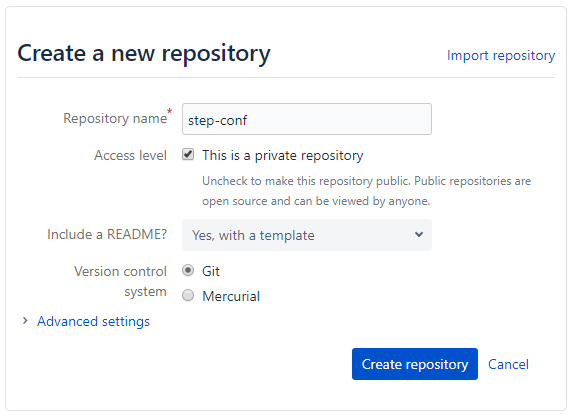
-
Create a system specific branch in the repository.
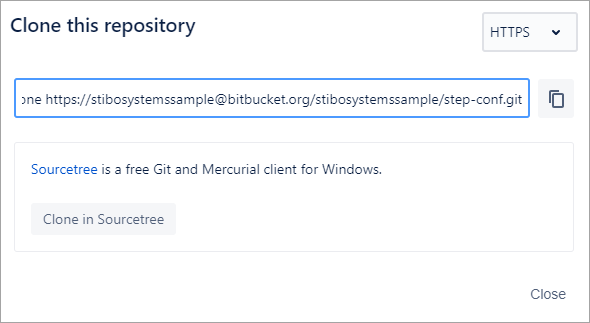
-
Get the 'Remote git repository URI' from, for example, the Bitbucket 'Clone' option.
'STEPXML Joiner' Pre Processor Plugin in IIEP
The 'STEPXML Joiner' inbound pre-processor plugin is designed to be used to import configurations and settings previously exported via the outbound functionality (described above). The outbound functionality produces STEPXML files and potentially *.js files representing business rules. The 'STEPXML Joiner' plugin can take a .ZIP file containing any number of such files as input and then combines objects and settings in a single STEPXML and passes the combined file to the IIEP processing engine.
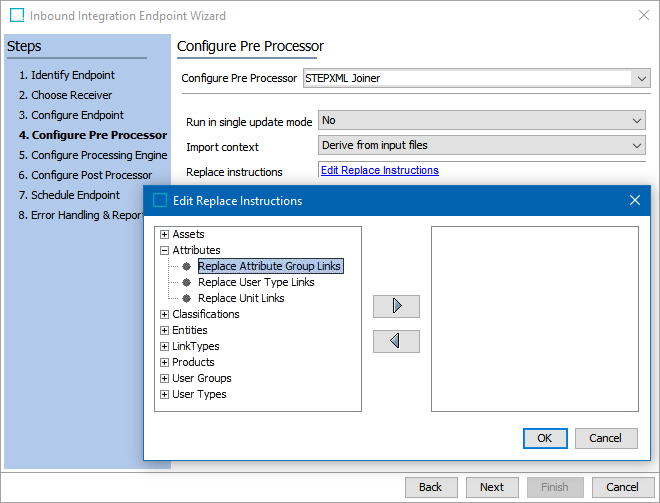
Various processing instructions for the combined STEPXML file can be included on the pre-processor plugin. Processing instructions can be added via the UI (shown below) or can be included in a template STEPXML file within the .ZIP file to be processed by the endpoint.
Note: If a template file is provided in the .ZIP, the settings from this file override any UI configurations made in the UI. The template file must be named 'ProcessingInstructions.xml' and only the ReplacementRules element should exist inside the STEP-ProductInformation element.
To configure the UI:
-
For Configure PreProcessor, select STEPXML Joiner.
-
For Run in single update mode, set to Yes or No as appropriate.
-
For Import context, select the context that will receive the imported data.
-
For Replace instructions, add replacement rules as needed.
For 'list properties' (multiple instances of the same XML element at the same level) such as 'Value' elements inside the 'Values' element for a product or 'TargetUserTypeLink' elements for a reference type definition, special processing instructions (replacement rules) are used to express that the properties that are not present in the import file are to be removed from the system as part of the import. Click the 'Edit Replace Instructions' link.
If you are using replacement rules across contexts with suppressions, include all contexts in an export for best results. This ensures complete results are communicated between systems.
For more information regarding ReplacementRules, refer to the ReplacementRules Tag in STEPXML topic in the Data Exchange documentation here.
-
For the Edit Replace Instructions dialog, build the rules by selecting options on the left and using the arrow button to move the rule over to the right. Click OK to save changes before moving to the next step of the Inbound Integration Endpoint Wizard.
'Invoke OIEP' Post Processor Plugin in IIEP
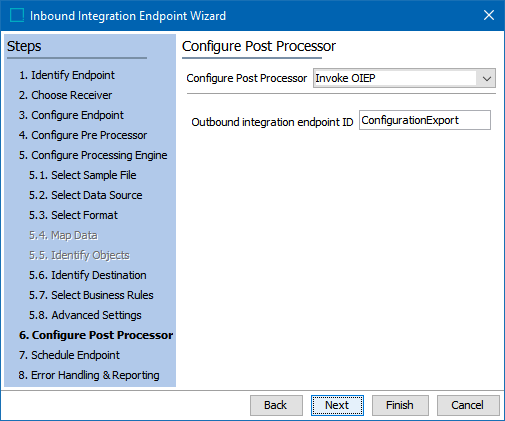
The 'Invoke OIEP' post processor plugin allows for an OIEP to be invoked once the IIEP process has completed. This allows updating the representation of the system configuration in a remote Git branch immediately after the configuration has been imported.
As shown below, the plugin requires the ID of the OIEP to be invoked.
For more information, refer to these topics in the Version Control System Integration section: