For customers who have integrated with Stibo DX's Content Hub DAM, this topic describes how to enable and configure the connection on the STEP side, and how to use the functionality the integration provides. For information on proper configuration of the connection on the Stibo DX side of the integration, review the relevant documentation provided by Stibo DX.
Setting up the Content Hub DAM integration
To set up the integration between STEP and the Content Hub DAM, users must complete the following setup tasks:
-
Apply the component that will enable the integration on your system
-
Add and set six properties on the sharedconfig.properties file (described below)
-
Configure the component model in STEP
Adding the component
To use the Content Hub DAM functionality in the Web UI, the functionality must be enabled for your STEP system. Contact your Stibo Systems account manager for more information.
Applying the properties
What follows is a list of the properties needed to enable the integration with the Content Hub DAM, along with a description of what information needs to be added to each property to configure it.
-
ContentHub.ServerURL=[CUE DAM URL] -- This property enables the connection between STEP and the Content Hub DAM. Set this property as equal to the URL for the Content Hub DAM. This URL will be supplied by Stibo DX.
The following two properties listed and described below (properties 2 and 3), are only needed if STEP and the Content Hub DAM are not using a common user authentication solution like Keycloak.
-
ContentHub.UserName=[username] -- In conjunction with the property listed immediately below, this property enables users of the Web UI to automatically access the Content Hub DAM via the Referenced Asset Representation or References components in the Web UI. Admins set up the username to access the Content Hub DAM, and then set this property as equal to the user name value set there.
-
ContentHub.Password=[password] -- In conjunction with the property listed immediately above, this property enables users of the Web UI to automatically access the Content Hub DAM via the Referenced Asset Representation or References components in the Web UI. Admins set up the password to access the Content Hub DAM in Content Hub, and then set this property as equal to the password value set there.
-
ContentHub.ClassificationID=[classification name] -- This property directs the system to the classification folder in STEP wherein the Content Hub DAM images (or placeholders for those images as the images themselves continue to reside in the Content Hub DAM) will be stored. Set this property as equal to the ID of the classification folder where Content Hub DAM assets will be stored in STEP.
-
ContentHub.WebUI.Enabled=true -- This property enables the Content Hub DAM to be accessed via the Web UI. Set this property to 'true'.
-
ContentHub.UploadConfiguration=uploadconfig_step_generic -- This property points to the upload configuration stored and configured in the Content Hub DAM. Assets that go into this folder are auto-approved prior to being uploaded to the Content Hub DAM. This configuration name ("uploadconfig_step_generic") is standard for all Content Hub DAMs as it is designed specifically to work with STEP.
Configure the component model
Two steps must be taken in the STEP workbench to complete enablement of the Content Hub DAM integration.
-
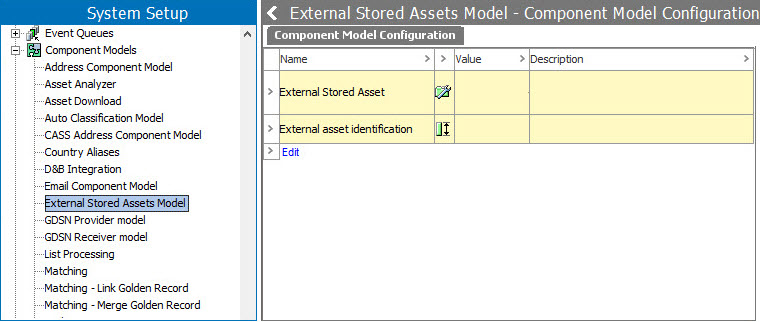
In the workbench, in the System Setup tab, find the 'Component Models' node and expand it. Locate the component model called 'External Stored Assets Model'. This component model is the only one that enables this integration.
-
This component model features two component model elements (shown below): 'External Stored Asset,' the object type for Content Hub DAM assets, and 'External asset identification,' the attribute that will hold the unique ID on all assets from the Content Hub DAM.

-
For 'External Stored Asset,' assign the object type for all assets incoming from Content Hub DAM that will be linked to objects in STEP. For instance, a user might create an object type called 'CUE DAM Assets' and assign it to 'External Stored Asset.' In that instance, all assets chosen from the Content Hub DAM via the Web UI and referenced by products and other objects in STEP would flow into STEP as a 'CUE DAM Asset' object type.
-
The attribute assigned for 'External asset identification' is linked to all assets incoming from the Content Hub DAM, and is populated with a unique identification value provided by the Content Hub DAM. For this component model element, create an attribute, make it valid for the object type assigned to the 'External Stored Asset' element, and populate this field with that attribute.
These are the necessary steps required on the STEP side of the STEP/Content Hub DAM integration to make the functionality work as intended. Additional set up is required on the Content Hub DAM side to complete the configuration. For more information on this aspect of the setup, contact your Stibo Systems or Stibo DX representative.
Using the Content Hub DAM from the Web UI
When all the required configuration in the workbench and in the sharedconfig.properties file is complete, the functionality provided by this integration can now be accessed. To do so, admin users must add one of two components to a Node Editor screen in the Web UI: Referenced Asset Representation or References (when an asset-type reference type is selected).
When configuring the References (with an asset reference type) or Referenced Asset Representation components for use with the Content Hub DAM integration, it is important to keep in mind the following considerations:
-
make sure the 'Read Only' parameter is unchecked; otherwise the plus sign will not display and users will be unable to access the Content Hub DAM to add / link assets.
-
be aware that not all configuration parameters for these components are applicable (even when set) when integrated with the Content Hub DAM.
-
be aware of whether the configured reference type is a single- or multi-reference type as this will determine whether one or many assets can be added to an object via the Content Hub DAM interface.
For more information on setting up a Referenced Asset Representation component, refer to the Referenced Asset Representation topic, also found in this section of the Web User Interfaces documentation here.
When adding an asset via a Referenced Asset Representation or References component in the Node Editor, users will click the plus button to bring up an asset selection dialog. In a standard Referenced Asset Representation component, the configuration of the component in the designer determines the user's range of options for that component. For example, clicking the 'Add' button will bring up a Node Picker window where the user can determine which asset in STEP to reference.
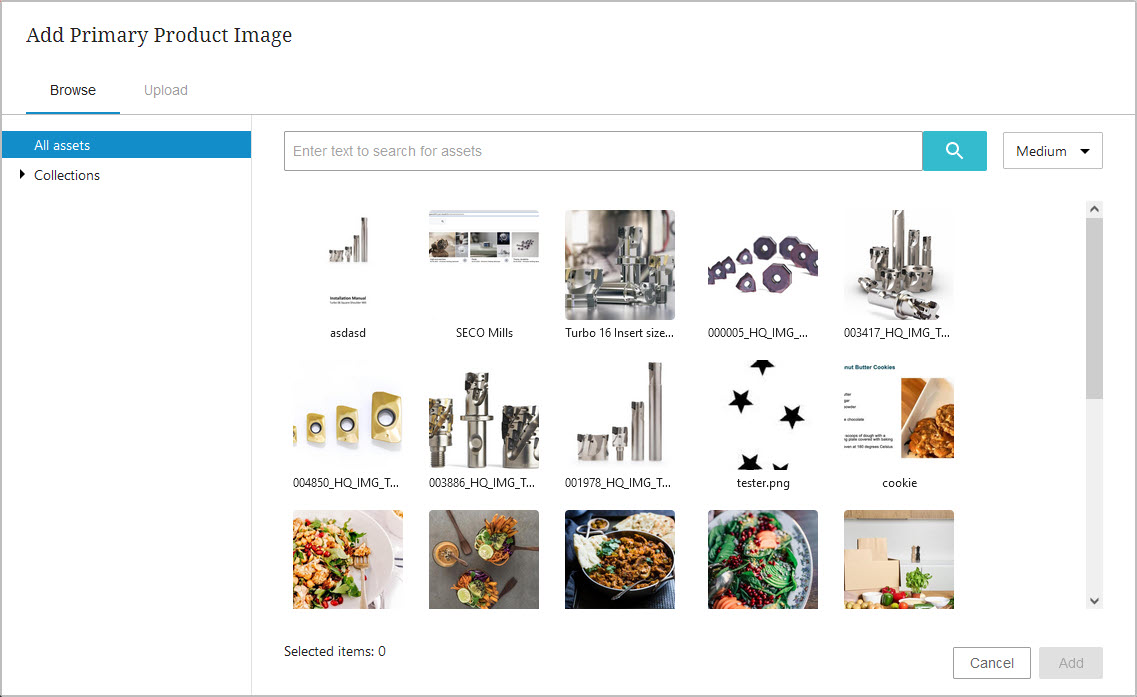
When a Content Hub DAM integration is enabled, however, clicking the add button instead brings up a window displaying a real-time view of assets in the Content Hub DAM, as pictured in the screenshot below.

The window is titled 'Add' followed by the name of the reference type added to the 'External Stored Asset' in the component model (described above).
There are two tabs that provide the user with different methods to select and link assets to objects in STEP: 'Browse' and 'Upload.'
The 'Browse' tab
The 'Browse' tab (shown in the screenshot above) is the default view when the window displays. This tab displays all assets in the Content Hub DAM and allows users to scroll through collections set up in the Content Hub DAM. The assets that display in this window are all approved, and reflect a real-time view of the assets currently in the Content Hub DAM. Collections created in the Content Hub DAM for use in the STEP Web UI can be found in the assets column at the far left of the window.
In addition to collections, 'Channels' can also be set up in the Content Hub DAM and will be accessible in the assets column in the Content Hub DAM window. While collections enable more granular curation, channels can be set up based on the type of asset (e.g., video, audio, images, documents, etc.). If no collections have been set up, an 'All assets' collection is available at the top of the assets column and allows the user to browse through all available assets in the Content Hub DAM.
In the primary asset window, thumbnails for the assets display with the asset's assigned name directly below the thumbnail. To select an image to 'add' to the object in STEP, click the desired thumbnail, and then click the 'Add' button. Clicking the 'Add' button auto-executes a series of actions in support of creating the link between the asset and the STEP object:
-
the reference between the asset and the product is saved.
-
a placeholder object of the asset is created and linked to the object. The asset itself will not be stored in STEP; a thumbnail of the asset will display and asset information will be pulled from the Content Hub DAM.
Note: For single-reference reference types, only one asset can be added to an object. For multi-reference reference types, multiple assets can be selected.
Click the thumbnail sizing button in the upper right-hand corner to change the size of the displayed asset thumbnails to 'Small', 'Medium' (default), or 'Large.'
At the top of the primary asset window is the 'Search' field. Enter your desired search terms in the search field and click the magnifying glass button at the far right of the field. If there are assets that match your search terms, their thumbnails will display below the search field.
The 'Upload' tab
The 'Upload' tab enables users to select assets from their own machine and upload those assets to the Content Hub DAM based on the upload configuration indicated in the ContentHub.UploadConfiguration property (described above). It must be this configuration in order for the uploaded images to be approved as they flow into the Content Hub DAM.
All assets uploaded via this tab are auto-approved as they flow into the Content Hub DAM because the Content Hub DAM only displays approved assets. This approved status pertains solely to the asset in the Content Hub DAM; the auto-approval does not extend to the object to which the asset is being linked.