The MLAC service offers a REST endpoint for uploading entire hierarchies using a CSV file. Uploading data requires an OIEP for a single hierarchy with the required output format to publish the data.
To upload hierarchies, perform all steps in the following sections:
- Prerequisites
- Configure a Hierarchy OIEP
- Publish Hierarchy Data to MLAC
Important: Repeat all of the steps in this topic for each hierarchy being uploaded.
Prerequisites
Complete the following setup to successfully configure the OIEP and publish data.
- In the 'workarea' directory shared between the application servers, edit the sharedconfig.properties file. Add or modify the case-sensitive RestDirectDeliveryURL property to identify the hierarchy-specific URL for the MLAC service hierarchy upload resource. The URL is used to supply values for the REST Direct Delivery Method in the OIEP. The URL uses the format: https://app.stibosystems.com/ds/mlac/v1/hierarchies/[hierarchyId]
Note: The hierarchy identifier ([hierarchyId]) is also used when uploading classified products.
RestDirectDeliveryURL=1=https://app.stibosystems.com/ds/mlac/v1/hierarchies/primary
In this example, the hierarchy ID of 'primary' has replaced the placeholder text '[hierarchyId]'.
Note: If adding multiple URLs for deliveries, the property should be added like this: RestDirectDeliveryURL=1=https://app.stibosystems.com/ds/mlac/v1/hierarchies/primary, 2=https://app.stibosystems.com/ds/mlac/v1/products
- Restart the server to implement the properties file changes.
Configure a Hierarchy OIEP
Use the following steps to configure the necessary OIEP. For more general information on OIEPs, refer to the Outbound Integration Endpoints topic in the Data Exchange documentation here.
- Create an event-based OIEP (as defined in the Creating an Event-Based Outbound Integration Endpoint topic of the Data Exchange documentation here) with the following settings in the wizard:
- On the 'Identify Endpoint' step, set the User parameter to a user who is privileged to view all hierarchy nodes.
- On the 'Configure Endpoint' step, the Contexts parameter identifies the location of the classified products to be published.
- On the 'Configure Endpoint' step, the Workspace parameter identifies the location of the classified products to be published. This is typically the 'Approved' workspace.
- Click the Finish button to complete the wizard.
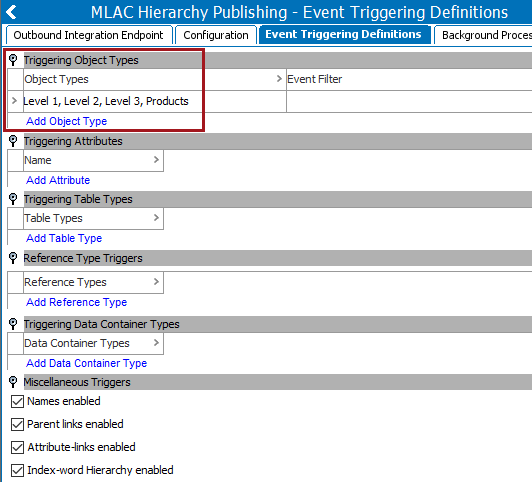
- Open the OIEP's Event Triggering Definitions tab, open the Triggering Object Types flipper, and click the Add Object Type link to add the hierarchy object types. Leave the other settings as their default values.
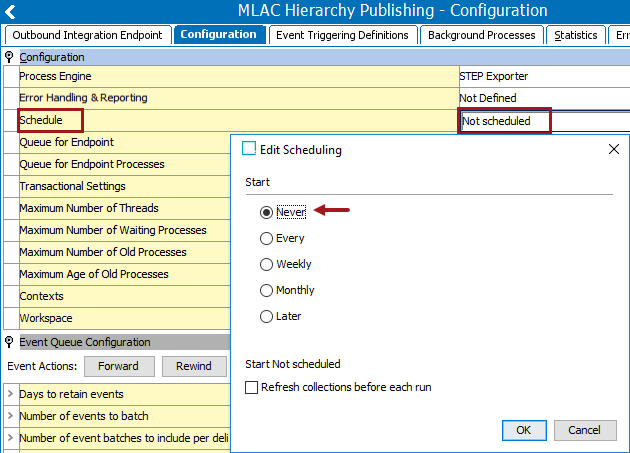
- On the Configuration tab, open the Configuration flipper and set the 'Schedule' parameter to Never and click the OK button.
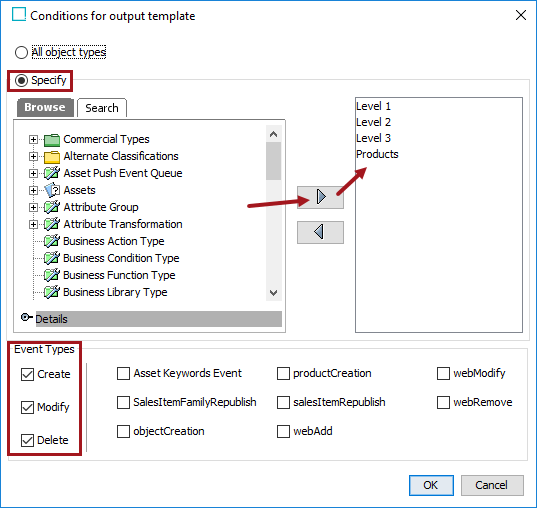
- On the Configuration tab, open the Output Templates flipper, and set the following for the Object-Eventtype column:

- Click the Add configuration link to display the 'Conditions for output template' dialog.
- Select the Specify radio button and add the hierarchy object types to be output.
- Select the Create, Modify, and Delete event types, and click the OK button.
- On the Output Templates flipper set the following for the Format column:
- Click the Format column cell to display an ellipsis button.
- Click the ellipsis button (
 ) to display the 'Select format' dialog.

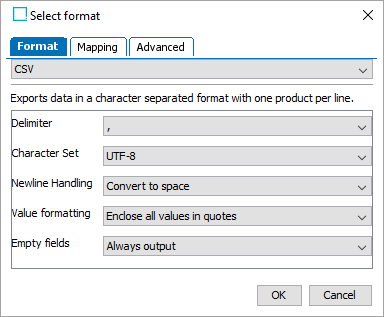
- On the 'Select format' dialog 'Format' tab (shown below), select CSV from the dropdown and set the following parameters:
- For the 'Delimiter' parameter, select the comma (,).
- For the 'Character Set' parameter, select UTF-8.
- For the 'Newline Handling' parameter, select Convert to space.
- For the 'Value formatting' parameter, select Enclose all values in quotes.
- For the 'Empty fields' parameter, select Always output.
- On the 'Mapping' tab:
- Map the <ID> data source.
- Open the '<ID> ID' flipper and map 'Constant Value' as a Header row. On the 'Enter Value' dialog enter id (without quotes) and click the Save button.
- Click the delete button (
 ) for the original header so the Header mapping matches the image below.
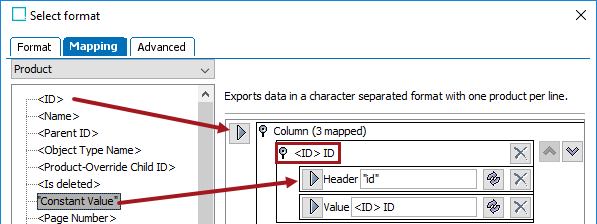
- Map the <Name> data source.
- Open the '<Name>' flipper and map 'Constant Value' as a Header row. On the 'Enter Value' dialog enter name (without quotes) and click the Save button.
- Click the delete button (
 ) for the original header so the Header mapping matches the image below.
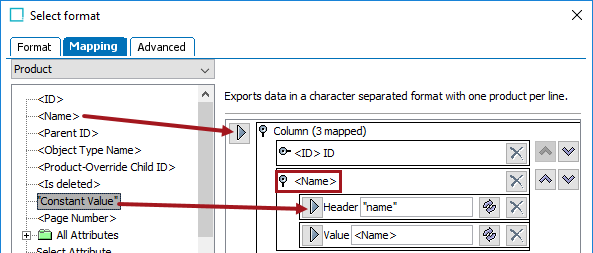
- Map the <Parent ID> data source.
- Open the '<Parent ID> ID' flipper and map 'Constant Value' as a Header row. On the 'Enter Value' dialog enter parentId (without quotes) and click the Save button.
- Click the delete button (
 ) for the original header so the Header mapping matches the image below.
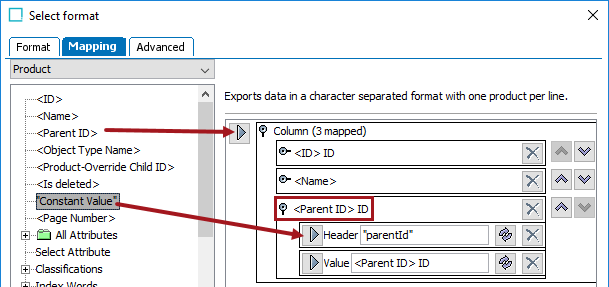
- On the value part of the mapped Parent ID, click the transform button (
 ).
). - On the Transformations dialog, click the Add Transformation link.
- On the Select Transformation dialog, select the Replace whole value option and click the OK button to update the Transformations dialog.
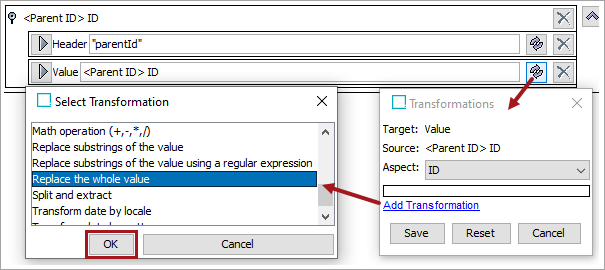
- On the updated Transformations dialog, in the 'Replace' parameter type ID of the hierarchy root and in the 'with' parameter, remove the value. This causes the 'parentId' for the hierarchy root node to be blank and the MLAC service considers this node as the root.
- Click the Save button.
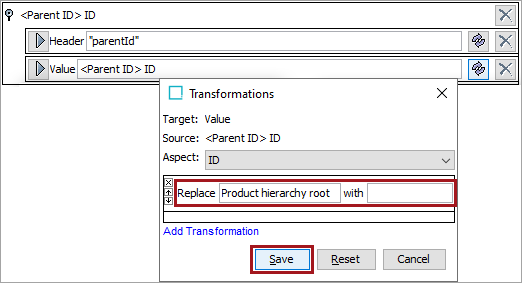
- Now the final '<Parent ID> ID' mapping is in parentheses, like (<Parent ID> ID), to indicate a transformation is applied for the Value element.

- In the upper left of the dialog, beneath the mapping tab, set the object type of the hierarchy to be exported (typically 'Classification').

- On the 'Advanced' tab:
- Check the Only Export Selected Objects checkbox.
- Click the OK button.
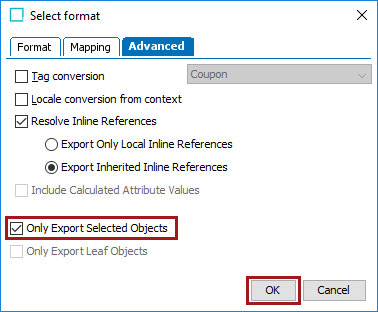
- The final state of the Output Templates flipper fields are displayed.

- On the Delivery Method flipper, click the Edit Delivery link to open the 'Edit Delivery Configuration' dialog.
Note: To validate the configuration, instead of setting the REST Direct method, first use the 'Copy to directory' or 'Email' delivery method and check the generated CSV file. Refer to the OIEP Delivery Methods topic (here) in the Data Exchange documentation for details.
- For the Select Delivery Method parameter, select REST Direct from the dropdown.
- For the URL parameter, select the hierarchy-specific URL in the dropdown.
- For the HTTP Method parameter, select PUT.
- For Query Parameters, click the Add parameter link to display the 'Add Parameter' dialog. Set the Key parameter to keepExisting, the Value parameter to true, and click OK in order to avoid batches of nodes overwriting the former batch(es).
- For the Headers parameter, click the Add parameter link to display the 'Add Parameter' dialog. Set the Key parameter to Content-Type, the Value parameter to application/octet-stream, and click OK.
- For the ZIP Content parameter, select No.
- For the Auth Header Value Function parameter, a MLAC token must be obtained as described in the Configuring a Gateway Integration Endpoint - REST topic found in the Gateway Integration Endpoints section of the Data Exchange documentation here.
- Leave other parameters blank or as their defaulted value.
- Click OK on the Edit Delivery Configuration dialog.
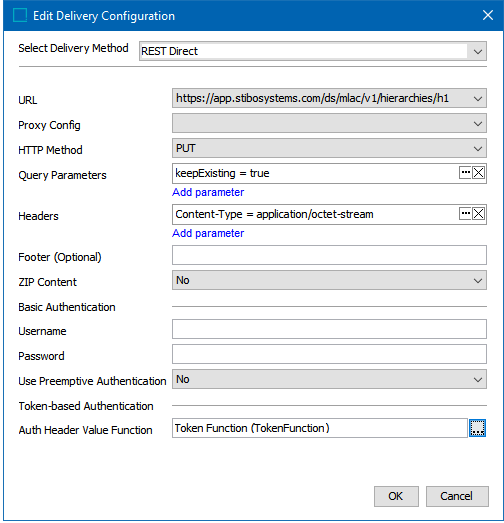
- Repeat this setup for each hierarchy that will hold the newly classified products.
Publish Hierarchy Data to MLAC
Publishing hierarchy data to the MLAC service requires invoking an OIEP with unread events. For details about these steps, refer to the Running an Outbound Integration Endpoint topic (here) and the Event-Based OIEP Forward, Rewind, Purge, and Republish topic (here), both in the Data Exchange documentation.
Important: Before publishing data to the MLAC service, it can be useful to first validate the configuration by using either the 'Copy to directory' or 'Email' delivery method and checking the generated CSV file. Refer to the OIEP Delivery Methods topic (here) in the Data Exchange documentation for details.
Use the following steps to publish hierarchy data to the MLAC service.
- On System Setup, right-click the configured OIEP and click the Enable Integration Endpoint option.
- On the OIEP's Configuration tab, open the Event Queue Configuration flipper and set the Queue Status parameter to Read Events.
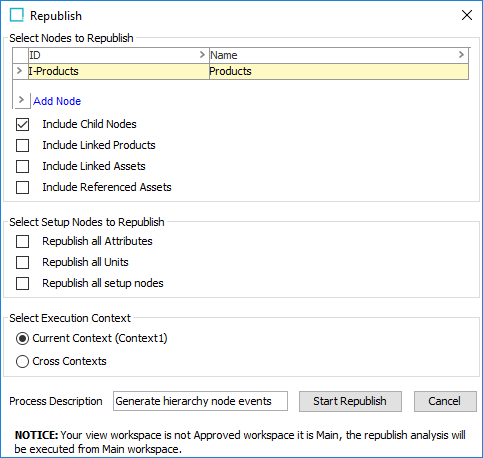
- Click the Republish button to display the Republish dialog.
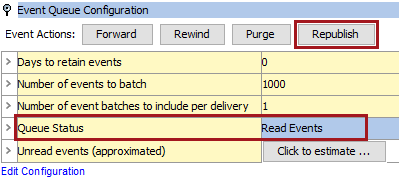
- On the Republish dialog:
- Click the Add Node link and add the hierarchy root node.
- Check the Include Child Nodes checkbox.
- For the Process Description parameter, type a description. 'Generate hierarchy node events' is the description in the following image.
- Click the Start Republish button.
- Verify that the republish background process finishes successfully.
- Right-click the OIEP and click the Invoke option to manually publish the hierarchy data.
- Right-click the OIEP and click the Disable Integration Endpoint option.
- On the OIEP's Configuration tab, open the Event Queue Configuration flipper and set the Queue Status parameter to Discard Events.