LOV Cross-Validation is a condition which specifies legal relationships between the values in two Lists of Values (LOV) attributes. Setting up the 'LOV Cross-Validation' condition requires setting a defining attribute to which the dependent attribute will be compared.
For example, an LOV attribute is named ‘List Colors’ with values ‘Blue,’ ‘Black,’ and ‘Red.’ This is the 'Defining' attribute. Another LOV attribute is named ‘List_Size’ with values 'M,' ‘L’, ‘XL,’ or ‘XXL.' This is the 'Dependent' attribute. Based on the availability of different sizes of shirt for a particular color, you can make use of the ‘LOV Cross-Validation’ business condition to specify the relationships between the two LOV attributes like ‘Blue’ > L, XL, ‘Black’ > XXL, ‘M,’ and so on.
Important: It is not recommended to use LOVs with duplicate values in cross-validation in both dependent and defining attributes.
Prerequisites
Before using this business condition:
-
Verify the 'Use IDs on values' option for both the 'Defining attribute' and the 'Dependent attribute' LOVs is set to Yes.
- Verify the Defining and the Dependent attribute LOVs are configured so that users cannot add new values. This enables the user to specify that the value of one LOV attribute limits which values are valid for another LOV attribute.
- Create a business rule as defined in the Creating a Business Rule, Function, or Library topic here.
- Edit the business rule to configure the operation as defined in Editing a Business Rule or Function topic here.
Configuration
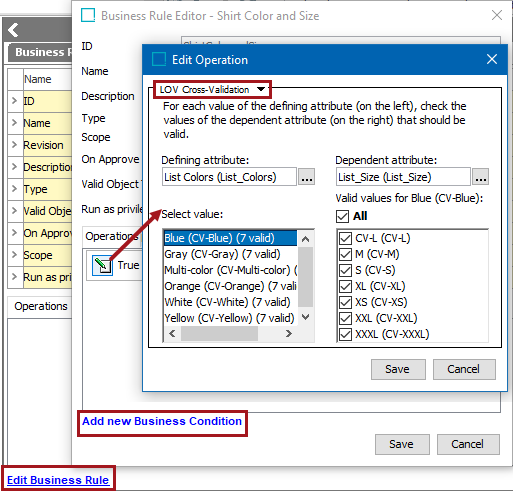
- On the 'Edit Operation' dialog, select LOV Cross-Validation from the dropdown.
- For the 'Defining attribute' field, click the ellipsis button (
 ) to display the Defining Attributes dialog. Use the 'Browse' or 'Search' tab to identify the defining list of values, then select the desired single-valued LOV attribute. Click Select to display this attribute as the defining attribute.
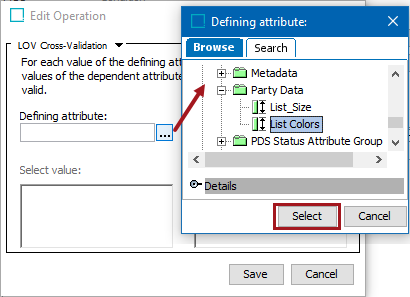
- For the 'Dependent attribute' field, click the ellipsis button (
 ) to display the Dependent Attributes dialog. Use the Browse or Search tab to identify the dependent list of values, select the desired single or multi-valued LOV attribute. Click Select to display this attribute as the Dependent attribute.

- Select an attribute in the 'Defining Attribute' column list on the left, and set the valid dependent attribute values in the 'Dependent attribute' column list on the right.
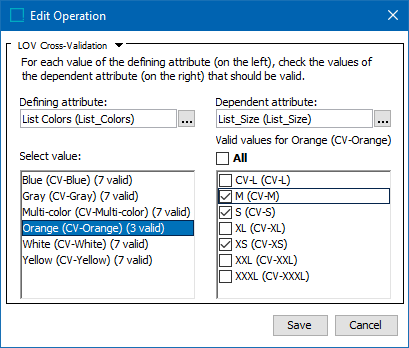
Note: The number in the parentheses next to each attribute name specifies how many values of the dependent attribute are configured to be valid. This provides an overview of the configuration without clicking through every defining value.
- Select the Save button to save this business condition.
Note: The cross validation functionality will also work in the Web UI when the LOV Cross-Validation business condition has been configured for two editable LOV attributes inside a data container.
Important: If one or more attributes are configured in multiple business conditions, the business conditions that share attributes will not work when applied. For instance, if two LOV Cross-Validation business conditions are set and one attribute is configured in both, the cross validation functionality will not work as expected.
Setup of LOV Cross-Validation in the Web UI
To enable this cross-validation business condition in the Web UI, additional steps must be taken in the Web UI designer.
Navigate to the screen or component the cross-validation will be applied to. In this example, the cross-validation business condition is applied to two 'Attribute Value Components' added to a Node Editor screen.
In the Node Editor, add two Attribute Value Components, one for the 'Defining' attribute, and one for the 'Dependent' attribute.
In this example, an Attribute Value Component has been added for 'List Colors', the 'Defining' attribute, and one for 'List_Size', the 'Dependent' attribute.
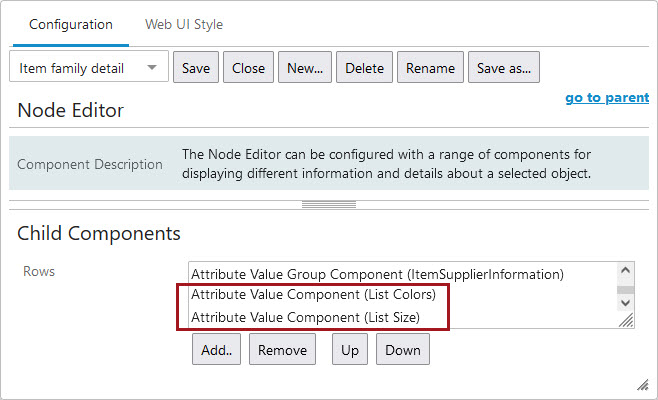
For more information on setting up an Attribute Value Component, refer to the Attribute Value Component topic in the Web User Interfaces documentation here.
On the Node Details properties screen in the designer (click the 'go to parent' textual button to navigate to this page until it no longer displays), expand the 'Validation' section, and add the business condition that details the cross-validation.
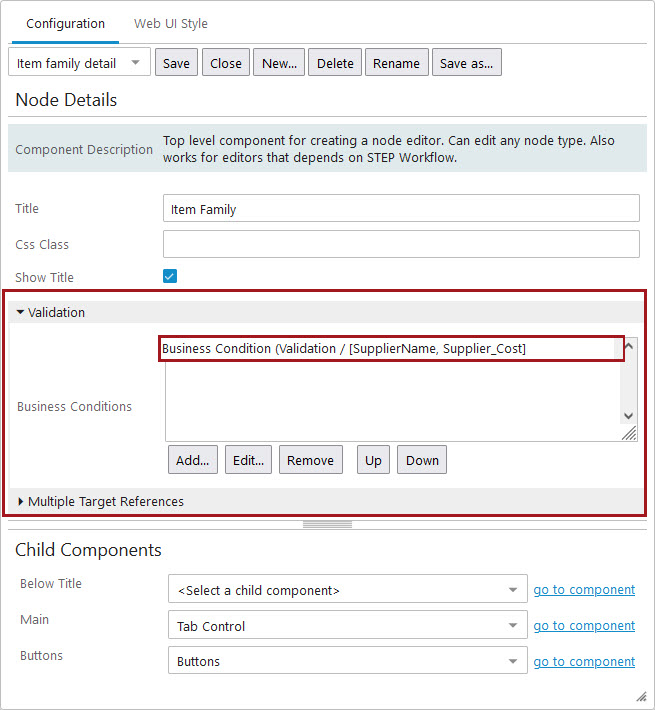
Double-click the added business condition. In the 'Add component - configure required properties' dialog that displays, under the 'Target Attributes' parameter, click the 'Add...' button. In the Node Picker that displays, find and select the two attributes—the 'Defining' and 'Dependent' attributes—referenced in the business condition.
For 'Usage', select 'LOVFilter'.
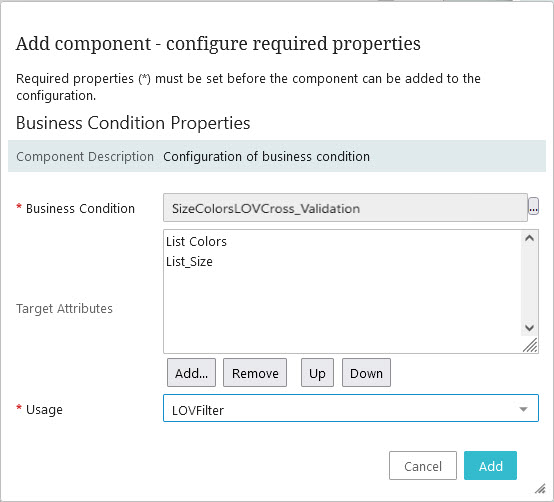
To setup business conditions in the Web UI, refer to the Business Conditions in Web UI topic in the Business Rules documentation here.
The LOV cross-validation functionality also works for the following components:
-
'Grouping' (Node Editor)
-
'Initiate Item Screen'
-
Globally Configured Data Container Component – Title with Dialog View
-
Globally Configured Multi Edit Data Container Component