This topic covers a series of manual steps users can take to quickly rectify issues that may come up during the translation process. Whether that means accommodating a late change to a shipped translation, or fixing an incorrectly set source language, this documentation provides guidance on how to use make these adjustments. Users who have read and understood the content in this topic will know how best to use the Change Translation and Change Translation Status features.
Changing the Translation Status
Translation relations, or the link between a source language and a target language, are established automatically when translation exports are done. In most cases these relations will not need to change, but on rare occasions the translation relation must be changed manually. Translation relations need to be changed manually when:
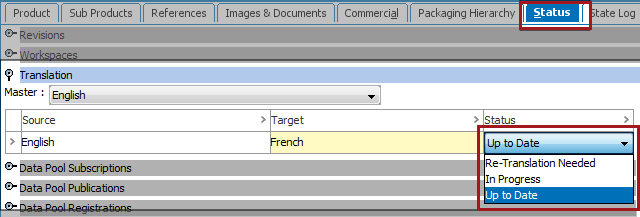
- the shipped translation file is corrupt due to a network or hard disk issue. This necessitates resending the translation export file, which would require manually changing the status from In Progress to Re-Translation Needed.
- the shipped translation file is missing some content that should have been included. This necessitates resending the translation export file, which would require manually changing the status from In Progress to Re-Translation Needed.
To change the translation status, take the following steps:
- In the Tree tab, select the object whose status needs to change. Click the Status tab, and then expand the Translation section by clicking the flipper. Find the translation relation (source language to target language) where the status needs to be changed, and then click into the cell in the Status column. A dropdown displays with the available statuses. Select the appropriate status and the change is complete.

Changing the Source Language
As with the translation status, the source language is established when a translation export is first created and rarely needs to be changed. But there are some instances where manually changing the source language is the correct option. For instance, if the user selected French as the source language instead of US English and identified their error shortly after exporting the translation file, manually changing the source language is the right option.
To change the source language, take the following steps:
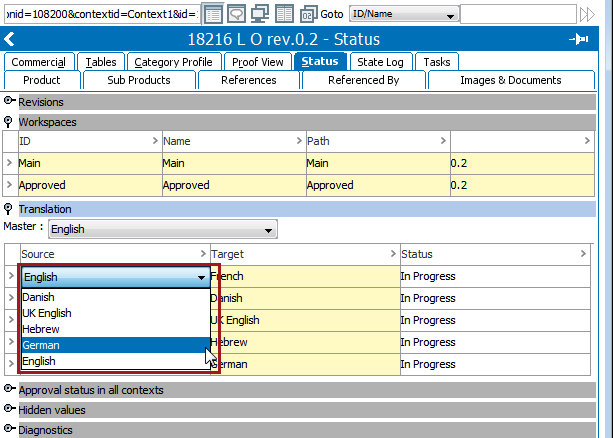
- In the Tree tab, select the object whose source language needs to change. Click the Status tab, and then expand the Translation section by clicking the flipper. Find the translation relation (source language to target language) whose source language needs to be changed, and then click into the cell in the Source column. Selecting a new language completes the task. If the source language has been incorrectly set for one translation, it likely needs to be changed for all. If this is the case, repeat this step for all applicable translation relations.

Important: Changing the source language for an object is not possible if no translations have previously been done for the new source language. For example, let us say an object has only one translation relation: English (source) to German (target). You want to change the source language from English to French. If the object has not previously been translated into French, French cannot be selected as the new source. In this example, only German could be a selectable source language.
- Next, change the translation status from In Progress to Re-Translation Needed.
- Finally, re-export the newly amended translation because any previous export files will be nullified by the change of source language.
As with any significant error that occurs in the translation process, it is always recommended practice to communicate with your translation vendor. Given the specific translation configuration you have established with the vendor, they may provide useful guidance about how best to rectify the error, including steps they can take on their side.
Changing the Translation Setup
If multiple objects require a change to either their source language or translation relations, the Translation Setup tool enables you to change translation relations on many objects in a single step.
Important: Use the Change Translation Setup tool with care. Changes to the master language or translation relations can have a major impact on the translations in your system. We recommend using this dialog when you have, for example, a limited set of objects where you need to change the master language or translation relations.
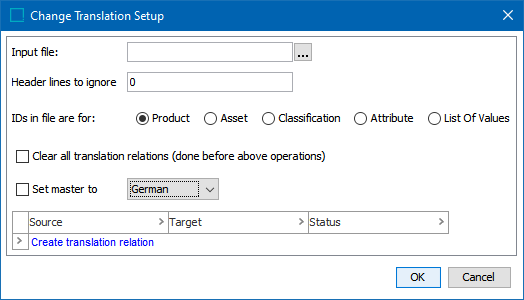
- In the File menu, click Translate, and then choose Change Translation. The Change Translation Setup dialog appears.

- In the Input file field, click the ellipsis button (
 ), and then select the relevant text file. The text file must contain the IDs of all objects whose translation relations and status you want to change.
Important: Only .txt files can be used. A common way to create this file is to export the relevant objects from STEP into Excel, and then copy and paste the data from that Excel into a .txt file.
- If there are header lines in the text file that you want the system to ignore, enter the number of header lines in the Header lines to ignore field. The default setting is 0.
- For the IDs in file are for element, select which of the listed object types the IDs in the .txt file refer to. The Change Translation Setup tool can only take action on one of the listed object types (Product, Asset, Classification, Attribute, Lists Of Values) at a time.
- Check Clear all translation relations if you want to remove all existing translation relations on the matched objects. In practice, this will remove all translations that have been created for a given object.
- If you want to change the source language for the same target language across multiple objects (e.g., all translations into French), check the box for the Set master to field, select the desired target language that, and when you click OK, any translation relationships with the selected language as the target language will swap their current source-target translation relation.
Note: Though STEP allows users to check both the Clear all translation relations and Set master to boxes, if you do check both, be advised that only the Clear all translation relations command will be executed. Set master to is a command to take action on existing translation relations. If you have also directed STEP to clear all translation relations, Set master to will have no translation relations to take action on. Because of these restrictions, be sure to only check one or the other.
- Click the Create translation relation text to specify any new translation relation you want to apply to the objects listed in the .txt file. However, be aware that:
- If Clear all translation relations is checked, all existing translation relations are removed from the matched products, and the relations specified in this dialog are applied to the matched products.
- If Clear all translation relations is not checked, the existing translation relations on matched products remain as they are, and the relations specified in this dialog are added to the matched objects.