In workflows, there may be cases where the system (via business rules) should make the decision for the path a task takes through the workflow, rather than a user. While there are many use cases for this, a simple scenario is the 'if X, then Y' reasoning. For example, a user may have a workflow set up that evaluates each product that passes through a particular state to identify if is includes lead. If so, special handling instructions need to be applied, whereas this is not required for items that are lead-free. Therefore, tasks are automatically routed to differing states based on the presence / absence of lead, which is determined by an attribute value.
This topic describes the preferred method for basic auto-routing of tasks, and allows for users to submit a task without requiring any knowledge of where it needs to go next, as this is evaluated and determined via a series of conditions on the available transitions. There are additional methods available for auto-routing of tasks, including via use of the Scripting API Task interface and the triggerByID() and triggerLaterByID() methods.
Auto-routing using conditions requires that all transitions from the state have the same event name applied. It is also important to remember that all conditions return either true or false, and that a condition evaluating to true on a transition means that the transition can be taken, while a condition evaluating to false means that the transition cannot be taken.
This setup can be used to skip states, as well as to select between one of two states. Therefore, either of the below workflows could utilize it, and in both cases the outcome will be that the task is sent to the Has Lead state from the Review Data state, if needed. In all cases, all transitions out of the Review Data state have the Proceed event. With this setup, the end user will view only a single selection option (Proceed) when submitting the task, allowing the system to make the decision, while keeping things simple for the end user.
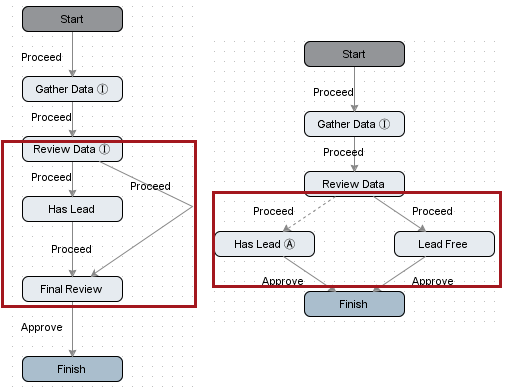
In order to determine where the task should go, an attribute with ID=HasLead is evaluated. If the value is Yes, the task must go to the Has Lead state. If the value is No, the task must take the other transition. We could set up a "Yes" condition and a "No" condition, applying one to each transition out of the state as appropriate, and that would accomplish the end result. However, if an object did not have the HasLead attribute populated, it would not have a viable transition, unless we wrote a condition to account for a null value. Assuming mandatory attribute functionality was applied and we could ensure a value was present, there is however still an easier way to do it using only a single condition, which evaluates to true if HasLead=Yes. By leaving another transition with no conditions applied, and instructing the system to always evaluate the conditioned transition first, all tasks with the Yes value are caught first and appropriately routed, and all tasks with a 'No' or null value take the other (unimpeded) option.
Detailed instructions and additional considerations for this setup are below.
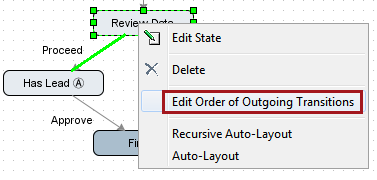
- Set the order in which outgoing transitions are attempted by right-clicking on the state that has the multiple transitions with the same name coming out of it, and selecting Edit Order of Outgoing Transitions.
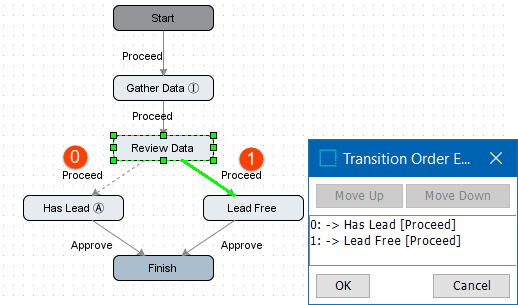
- In the dialog that appears, select any entry and use the Move Up or Move Down buttons to set the appropriate order. This example uses only two transitions, but this method works for any number of transitions. The '0' transition is evaluated first, and subsequent transitions are evaluated in sequential order. The system will send the object via the first transition it finds that evaluates as true.
If multiple transitions will exist with conditions applied, care should be taken to ensure that they are sequenced properly, that they do not overlap unless intended (and managed via sequencing), and that all tasks have a way to exit the state. With that in mind, it is generally advised to ensure that conditions are exclusive (e.g., a task is not likely to evaluate true for more than one transition), and that one transition exists unimpeded (e.g., without a condition). However, there are exceptions, so carefully test the design and outcome.
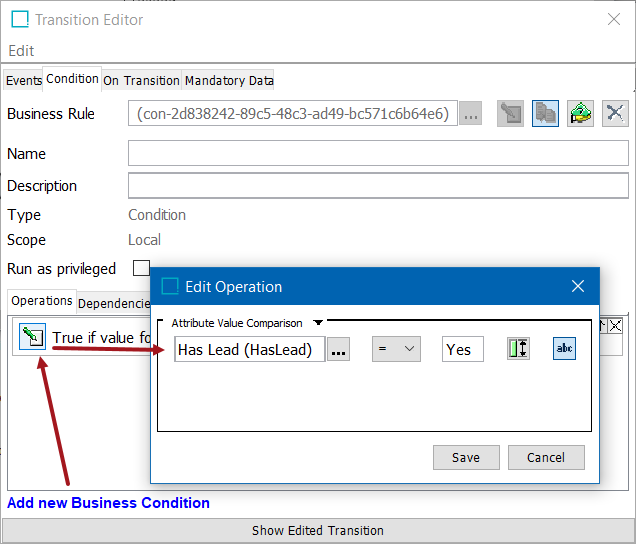
- Set a condition on the transition to be evaluated first. For the purposes of the example, a basic attribute value comparison will be done, but any condition could be used. Double-click on the order zero transition to open the Transition Editor. Select the Condition tab and click the Add new Business Condition link. Click the Edit icon to open the Edit Operation dialog and select Attribute Value Comparison from the dropdown. Select the appropriate attribute, operator, and value. Click Save to close the Edit Operation dialog, and click the X in the upper right corner to close the Transition Editor.