The option to configure and associate a business action with a number of referenced parameters allows users to provide their own values when running a business action in the Web UI. This not only gives the users a better sense of control, as the changes entailed by running a business action become much more apparent, but also provides a more dynamic and useable setup. A single business action can be reused for a variety of similar tasks without the need for reconfiguration.
Parameterized Business Action functionality is only supported for JavaScript business actions in Web UI. The workbench 'Time & Test Business Rule' functionality does not support parameterized business actions.
Using a parameterized business action in Web UI requires the following setup:
- Create a JavaScript business action in STEP Workbench
- Create a Bulk Update Configuration (with the business action) in STEP Workbench
- Configure the Bulk Update action in Web UI
Each of these steps is defined in the sections below.
Creating a JavaScript Business Action in STEP Workbench
A JavaScript business action supplies the necessary parameters to the Web UI user. For more information, refer to the Business Rules topic.
- In the workbench, on System Setup, select the desired business action node, right-click, and select New Business Action.
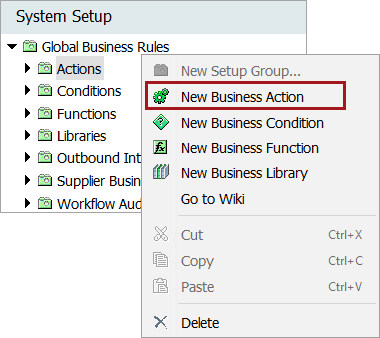
- Add an ID and a Name, and click the Create button. The new action is displayed in the selected node.

- Select the new action, right-click, and select Edit Business Rule.
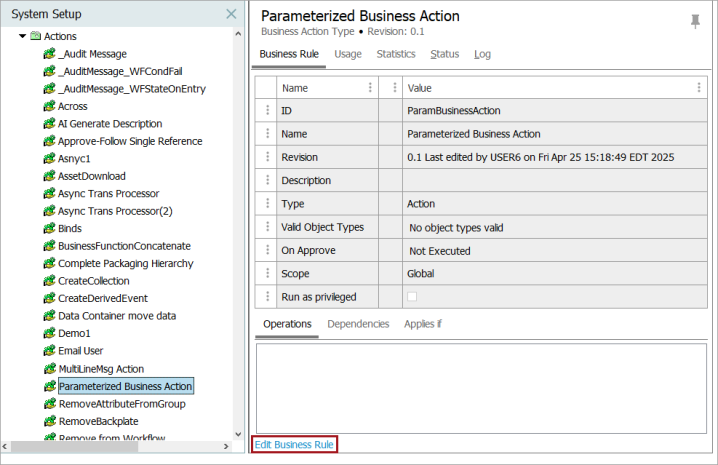
- On the Business Rule Editor dialog:
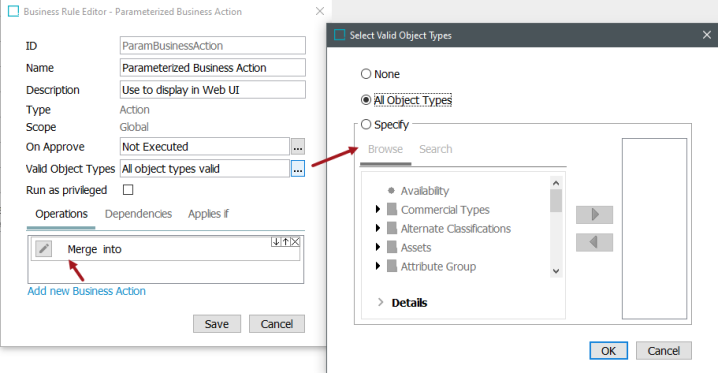
- Click the ellipsis button (
 ) for the Valid Object Types parameter to display the Select Valid Object Types dialog. To activate the business rule, select the All Object Types radio button or the Specify radio button. When specifying object types, select one or more object types using the Browse or Search tab and then click the
  button to move to the included list. Click OK to update the business rule.
 - On the Operations tab, click the Add new Business Action link to add the default operation.
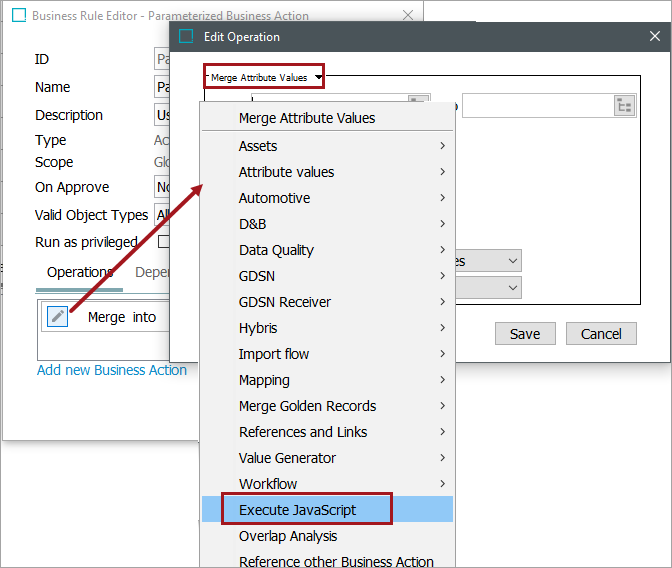
- Click the operation edit button (
 ) to display the Edit Operation dialog, and select 'Execute JavaScript' from the dropdown.
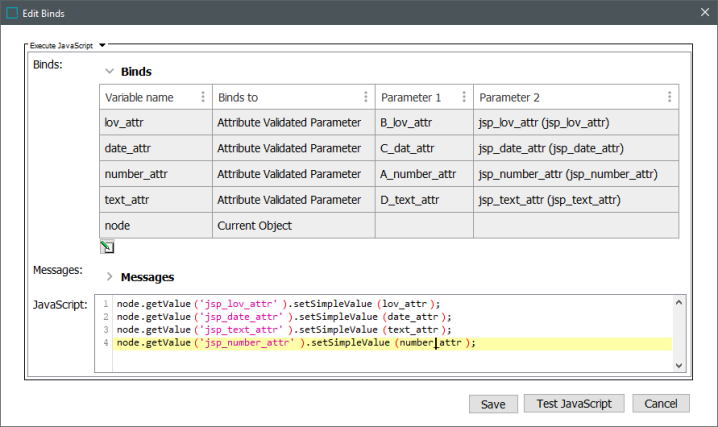
- Click the edit button () below the Binds flipper to display the 'Edit Binds' dialog.
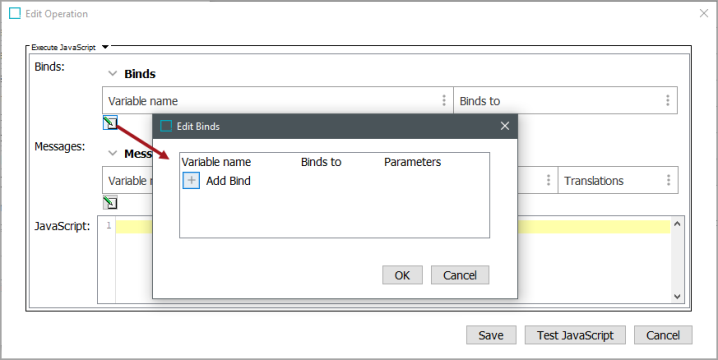
- Click the Add Bind button (
 ) to create a bind for each parameter required, as indicated in the following image:
- Variable name - Required. Add text used for the name of the parameter to be executed.
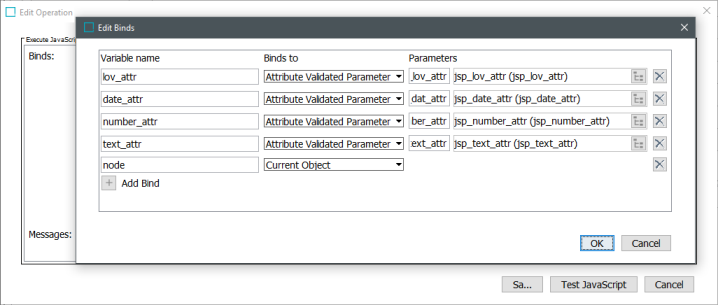
- Binds to - Required. Use the dropdown to select the bind type. In the example shown below, 'Attribute Validated Parameter' and 'Current Object' are selected.
- Parameters - Required for 'Attribute Validated Parameters' binds. In the first text box, enter the external ID of the parameter which will be used when embedding the business action in a bulk update configuration. The value entered in the first 'Parameters' text box determines the ordering of the attribute validated parameters. In the example below, the natural alpha order does not put these parameters into the desired order. So a secondary alpha order has been imposed on these parameters by prepending a capital letter and an underscore to the external ID. This determines the ordering of the parameters as they display when the business rule is accessed. This ordering is also applied when the business rule is run in the Web UI via the Run Business Action.
Click the ellipsis button () in the second field to display the Select Attribute dialog. Select an attribute and click the Select button to determine the validation base type used to validate the parameter value in the Web UI. If this field is left empty, the value will be validated as text. It is possible to select between the validation base types: Text, Number, Date, or List of Values. For example, the parameter of a business rule that is bound to a date validated attribute will display a date picker, while LOV options will display as a dropdown.
- Click OK to display the binds in the Edit Operation dialog.
- In the JavaScript parameter, add the JavaScript code that uses the configured binds.
- Click the Test JavaScript button to verify the JavaScript code. For more information, refer to the Testing a Business Rule topic in the Business Rules documentation.
- Click the Save button to add the configured operation to the business rule.
Creating a Bulk Update Configuration in STEP Workbench
Once configured, the business action must be embedded into a bulk update configuration to work as a parameterized business action in the Web UI. For more details, refer to the Bulk Updates topic.
Prerequisites
- Performing bulk updates requires the user to have privileges to maintain bulk updates, view classifications, view attributes, and create collections.
- For ease of maintenance and troubleshooting, a single business action should be used in each bulk update configuration.
Configuration
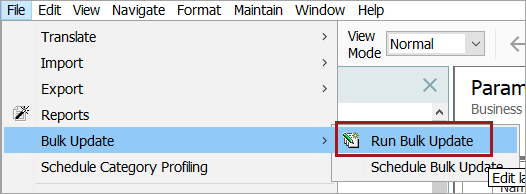
- In the workbench, from the File menu, select Bulk Update > Run Bulk Update.
- On the Configuration step, click the required radio button:
- Select 'Create New Configuration' to create a new bulk update configuration, or select 'Use Existing Configuration' to modify an existing radio button.
- Click the Next button.

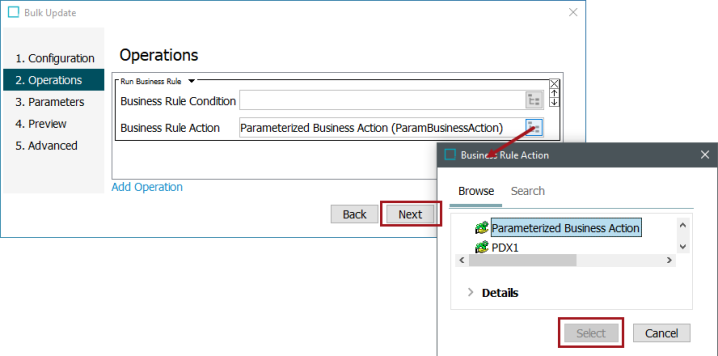
- On the Operations step:
- Select 'Run Business Rule' from the dropdown.
- On the Business Rule Action parameter, click the ellipsis button () to display the Business Rule Action dialog. Select the business rule created above.
- Click the Next button.
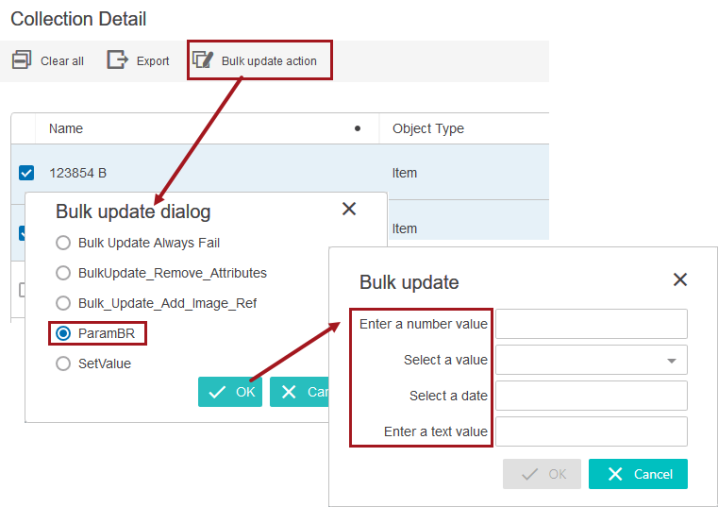
- On the Parameters step, enter a title for each of the configured parameters. The title displays as a label in the Web UI dialog when running the bulk update configuration, as shown in the Make the Bulk Update action available in Web UI section below.
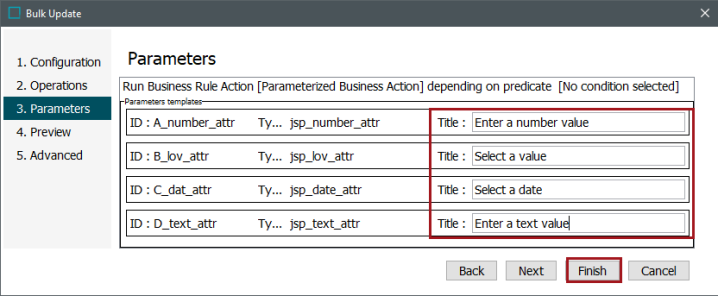
Once configured, the parameters created in the JavaScript business action, and included in a bulk update configuration, are displayed in a bulk update dialog and allow the user to supply the values. This is demonstrated in the Make the Bulk Update action available in Web UI section below.
- Click the Next button two times to display the Advanced step.
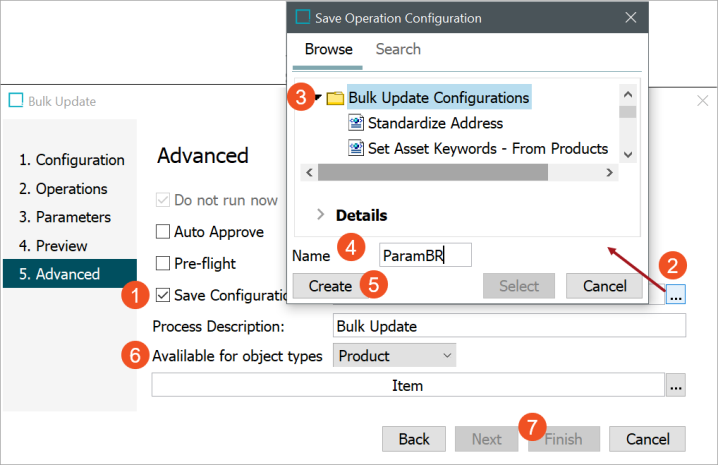
- On the Advanced step:
- Check the Save Configuration parameter checkbox.
- Click the ellipsis button () to display the Save Operation Configuration dialog.
- Select a Tree location to save the configuration.
- Enter a name for the configuration.
- Click the Create button.
- On 'Available for object types,' select the appropriate object type(s) from the dropdown. Click the ellipsis button () to specify individual object types if necessary. For example, in the image below, only products with an object type of 'Item' are available for the bulk update with the parameterized business action.
- Click the Finish button.
Configuring the Bulk Update Action in Web UI
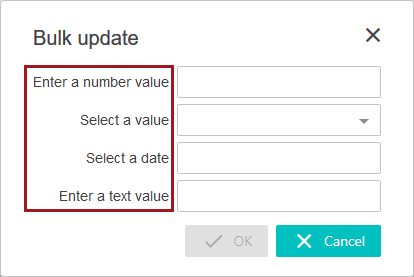
The parameters created in the JavaScript business action, and included in a bulk update configuration, can be displayed in the Web UI on a bulk update dialog.
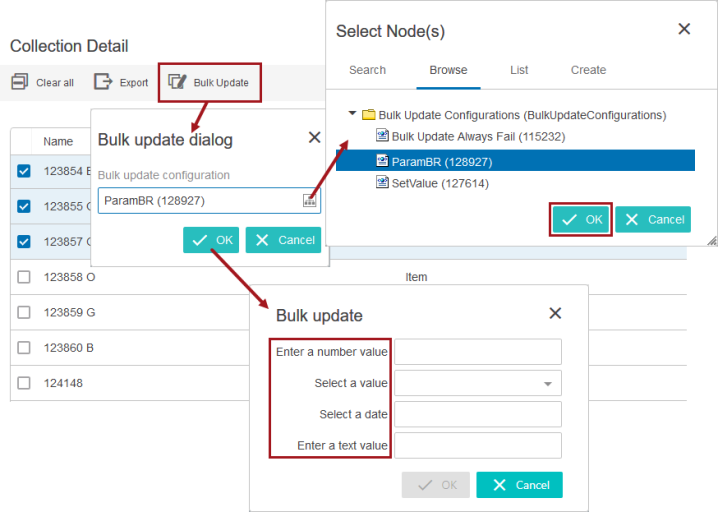
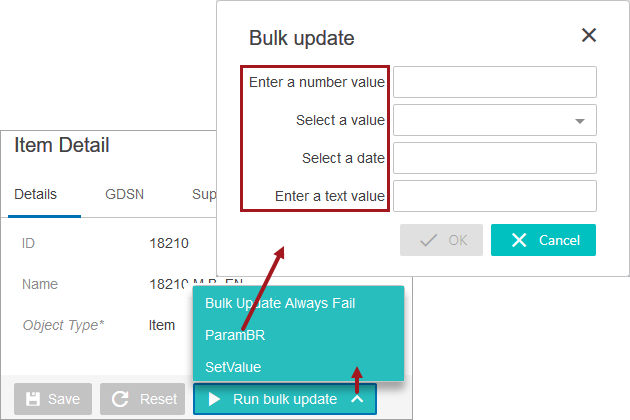
Selecting an object displays the configured bulk update action button. Clicking the action button displays the 'Bulk update' dialog. Only bulk update configurations applicable for the selected object types are included.
The 'Bulk update' dialog allows a user to supply the parameterized values within Web UI.
Note: When entering text where multiple lines are allowed, Ctrl + Enter adds a new line. Pressing Enter alone closes the dialog.
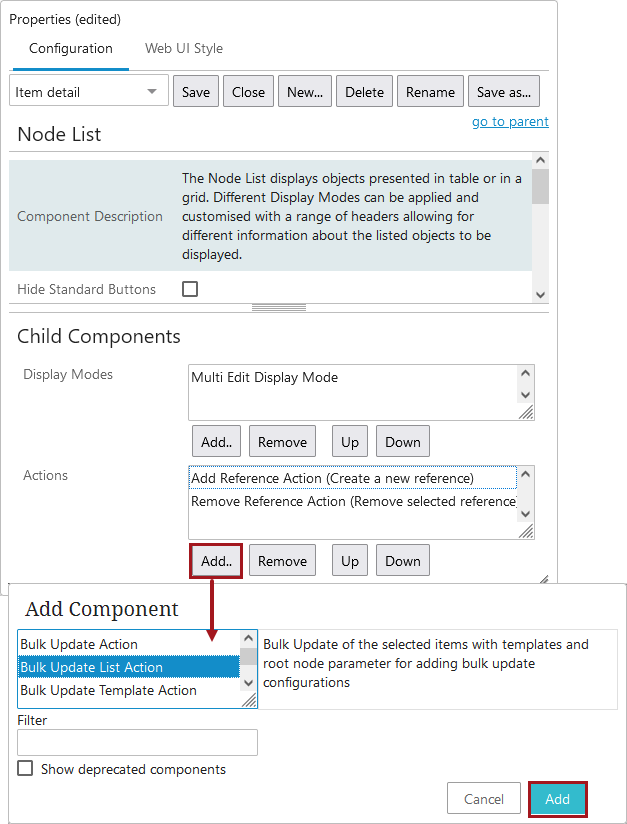
The following components can include an action button to initiate the bulk update and display the bulk update dialog:
- Bulk Update List Action - a toolbar action on a Node List
- Bulk Update Template Action - a toolbar action on a Node List
- Run Bulk Update Template Action Button - a button on a Node Details screen
The setup for each component is defined in the following sections.
Bulk Update List Action
When objects are selected on the Node List, this setup displays a 'Bulk update action' on the toolbar. Clicking the action displays the 'Bulk update dialog' where a valid bulk update configurations is selected. The 'Bulk update' dialog allows the parameterized values to be added prior to running the bulk update in a background process. If any of the attributes used as binds for the bulk update parameters are mandatory, then the OK button will be disabled until all these mandatory values are populated.
Use the following steps to configure the Bulk Update List Action.
-
On a Node List screen, open the designer.
-
In the Child Components section, click Add... and select the Bulk Update List Action.
-
Double click the Bulk Update List Action to display the Bulk Update List Action Properties dialog.
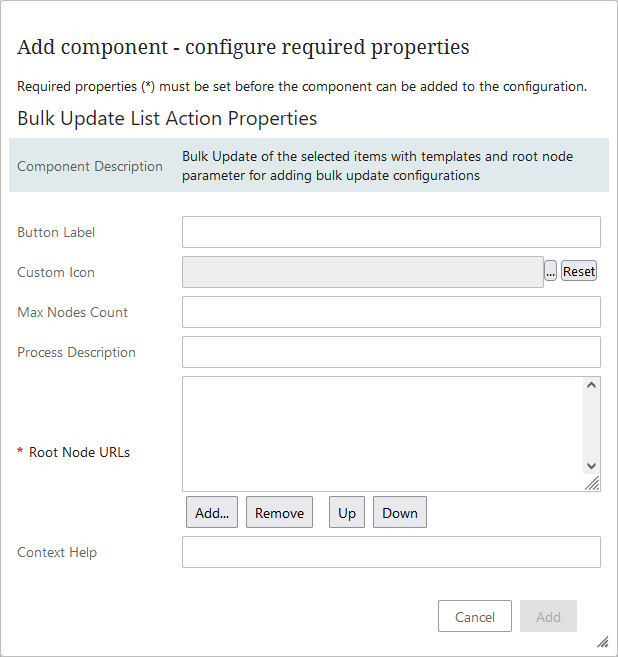
- For the Root Node URLs parameter (required), click Add... and select the location of one or more root nodes that house bulk update configurations. All valid bulk update configurations in the nodes are selectable in the bulk update dialog. When more than ten (10) bulk update configurations are available, the list displays a scroll bar.
- For the Max Nodes Count parameter, define the number of allowed objects. When the user selects a greater number of objects than defined, the warning 'Too many nodes are selected, bulk update cannot be performed.' is displayed.
- Set any other parameters as desired.
- On the Bulk Update List Action Properties dialog click the Add button to display the action on the Node List.
- On the Node List Properties dialog click the Save button and click the Close button to exit the designer with the new settings.
Bulk Update Template Action
When objects are selected on the Node List, this setup displays a 'Bulk Update' action. Clicking the action displays the 'Bulk update dialog' where a valid bulk update configurations is selected via a Node Picker dialog. The 'Bulk update' dialog allows the parameterized values to be added prior to running the bulk update in a background process. If any of the attributes used as binds for the bulk update parameters are mandatory, then the OK button will be disabled until all these mandatory values are populated.
Use the following steps to configure the Bulk Update Template Action.
- On a Node List screen, open the designer.
- In the Child Components section, click Add... and select the Bulk Update Template Action.
- Double click the Bulk Update Template Action to display the Bulk Update Template Action Properties.
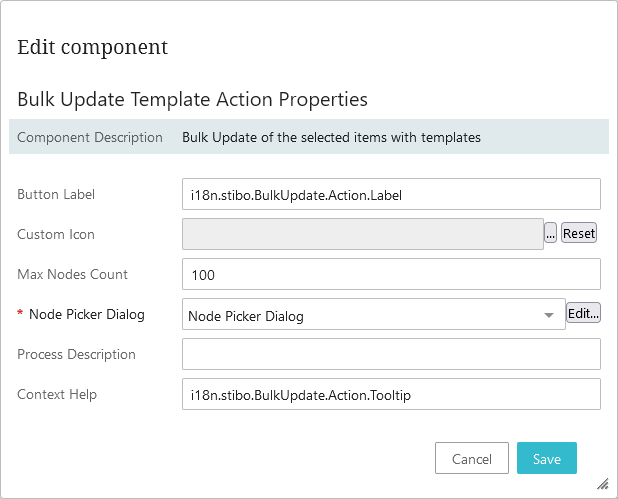
- For the Max Nodes Count parameter, define the number of allowed objects. When the user selects a greater number of objects than defined, the warning 'Too many nodes are selected, bulk update cannot be performed.' is displayed.
- For the Node Picker Dialog parameter (required), click Edit... and set the properties as defined in the Node Picker Dialog topic.
- Set any other parameters as desired.
- On the Bulk Update Template Action Properties dialog click the Save button and click the Close button to exit the designer with the new settings.
Run Bulk Update Template Action Button
When a valid object is displayed on a Node Detail, this setup displays a 'Run bulk update' button. Clicking the button displays a list of the valid bulk update configurations. Once a configuration is selected, the 'Bulk update' dialog allows the parameterized values to be added prior to running the bulk update in real-time, not in a background process. If any of the attributes used as binds for the bulk update parameters are mandatory, then the OK button will be disabled until all these mandatory values are populated.
Use the following steps to configure the Run Bulk Update Template Action button.
- On a Node Detail screen, open the designer.
- In the Child Components section, on the Buttons parameter, select Buttons from the dropdown and click the go to component link display the Buttons Properties.
- In the Child Components section, on the Actions parameter, click the Add.. button and select the Run Bulk Update Template Action from the component list and click the Add button.
- Double click the Run Bulk Update Template Action to display the Run Bulk Update Template Action Properties.
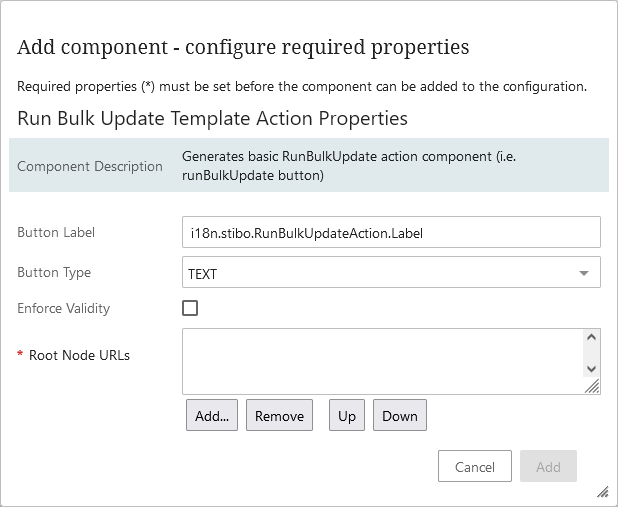
- For the Root Node URLs parameter (required), click Add... and select the location of one or more root nodes that house bulk update configurations. When more than ten (10) bulk update configurations are valid, the list is replaced by a dialog with radio buttons.
- Set any other parameters as desired.
- On the Run Bulk Update Template Action Properties dialog click the Save button and click the Close button to exit the designer with the new settings.