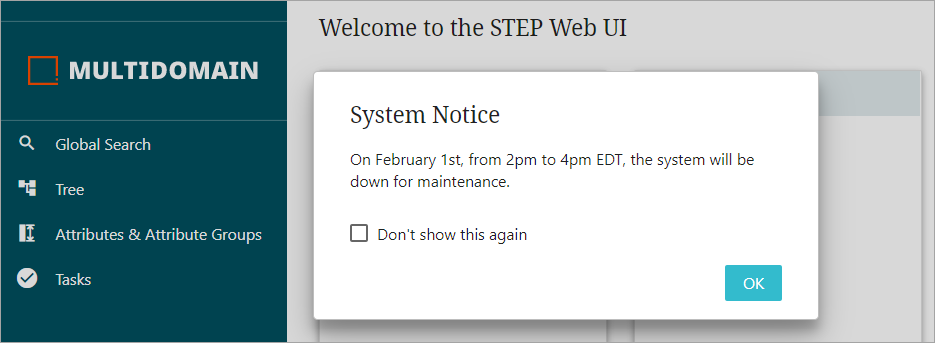
STEP enables users to add announcement messages to the screens after the user successfully logs in to their Web UIs. For instance, if an administrator wants to inform all Web UI users that the system will be down for maintenance, the administrator can create a message, either plain text or HTML, that will appear on that Web UI's screen.
Below is a sample plain text announcement message to demonstrate the look / location of the announcement:
Plain text messages are automatically styled by the announcement feature, but HTML files can be styled based on the preferences of the announcement message's designer, such as font, font size, and color.
If the message is longer than the allowed announcement box, a scroll bar will display beside the announcement message allowing users to scroll through the entirety of the message.
One additional feature of the announcement component is a 'Don't show again' checkbox that appears in the lower left-hand corner of all announcement messages.
Users who have read the announcement message appearing on their Web UI login page can check this box, ensuring the message does not appear on their login screen again, at least in its current form. If the announcement is amended in any way, the announcement message displays again on the Web UI users' screens, and they can again check the 'Don't show again' checkbox.
Announcement messages can be added to as many Web UIs as are configured on a given STEP system. This gives the administrators the ability to be targeted in their messaging to users. For instance, administrators can post one message to a Web UI used by suppliers and a different message to a Web UI used by marketers.
Configure the Announcement Feature
The announcement message file can be added to a Web UI's login page by adding properties to the sharedconfig.properties file located on the application server.
- Create an announcement message file using one of these methods:
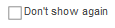
- For TXT files (which cannot be customized), enter a simple plain text message in the file as shown in this example:
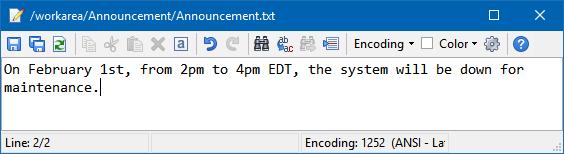
- For HTML files (which allow for a more designed message and can include styling and images), provide valid HTML code as shown in the image below:
Important: To use images in your messaging, contact Stibo Systems to activate the necessary license for each system using an announcement with an image. Customers should use caution and be aware that the option of customizing the layout of Web UI through a custom CSS file, overriding the existing classes, is not supported. Customizations could cause issues for customers with each feature release and/or patch update.
- For HTML files that include an image:
- Save the image to a location on the application server.
- Include the image elements as needed in the HTML.
For example, the asset displayed on the sample announcement above, and the image string text (on line 7 beginning with <img src=) is defined in the following list:
- https://10.323.10.328/webui/UserLWebUI/theme is the IP address of the application server where the announcement is configured.
- Warning2.png (following the IP address) is the name of the asset / image used for the announcement.
- alt= is the asset name value that will show if the physical asset from the IP address is not available.
- width= (and/or height= which is not shown above) determines the overall size of the asset / image displayed in the announcement.
- Add your TXT or HTML announcement file to the application server and note the location. If the file does not transfer over to the application server with the extension of TXT or HTML, add it manually.
Note: When creating multiple announcements for a series of Web UIs, recommended practice is to create a folder structure strictly for announcements.
- On the application server in the sharedconfig.properties file, add the following case-sensitive properties for each Web UI displaying an announcement, regardless of the announcement file type (TXT or HTML):
- WebUI.Announcement.Folder=[path] - replace [path] with the location of the announcement message on the application server.
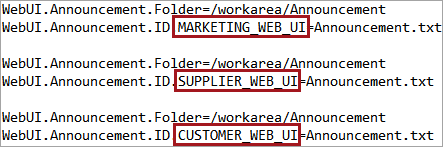
- WebUI.Announcement.ID.[Web UI ID]=[filename] - replace [Web UI ID] with the ID of the Web UI that will display the message, and replace [filename] with the name of the announcement file.
Note: Recommended practice is to locate the relevant Web UI in the System Setup tab, copy the Web UI STEP ID exactly as it appears in STEP, and then paste it into the property.
In the following TXT announcement example, it indicates that the Supplier Web UI will display the Announcement.txt which has been saved to the /workarea/Announcement folder on the application server.

In this HTML announcement example, the Customer Web UI will display the Announcement.html which has been saved to the /workarea/Announcement folder on the application server.

Important: Each Web UI that will display a message must have both properties added to the sharedconfig.properties file, even when the same message is used. In the below screenshot, for example, three Web UIs that display the same announcement, so six entries are required in the sharedconfig.properties file.
- For an HTML announcement file that includes an asset / image, the following additional configuration is required:
- Refer to step 1 for information on licensing / support involved in using images in the announcements.
- On the application server, add the following required case-sensitive property Portal.Theme.Root=[path] - replace [path] with the location of the announcement image on the application server.
In this HTML announcement example, the image to be displayed in the Announcement.html has been saved to the /workarea/Announcement1 folder on the application server.

- Save the modified sharedconfig.properties file and execute a stop / start of the STEP system. Allow a few minutes for the announcement message to appear on the designated Web UI.
Note: Once the announcement message is displaying on the Web UI login page, changes saved to the announcement file itself will display on the Web UI instantaneously.