This topic explains how to add, remove, and override content definitions them within rows, columns, and cells in tables.
Add or Edit Content Definitions for Rows and Columns
- In the Tree, locate the table that you want to edit, then click on the Definition tab.
- Right-click in the content definition cell on the column or row that you would like to edit, then click Edit. In the following screenshot, the content definition cell has a preexisting content definition of
 .
.
Alternatively, you may double-click the content definition cell.
![]()
- In the Row/Column Type & Content Definition dialog that displays, choose the relevant content definition from the dropdown list. For most content definitions, a new dialog will display after you make your selection, requiring you to make additional configurations.

- Refer to the Content Definitions section of this guide here for next steps on how to choose and configure the desired content definition.
Override Content Definitions – Override Cell
In some instances, it may be necessary to overwrite the content definition of a row and/or column at the cell level. One use case is when using the Asset content definition. If applied to an entire column or row, an identical image will appear in every cell across the row or column. For this reason, the Asset content definition is typically applied at the cell level.
- With your table open on the Definition tab, right-click inside the cell(s) that you want to edit, then choose Edit. Cells may be multi-selected by holding Ctrl or Shift while making selections.
- In the Override Cell dialog, you can choose to override the content definition of the row, column, or both.
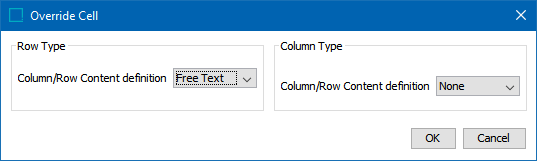
- Select the preferred content definition, then click OK. The dialog changes according to the content definition you have selected.
To Remove Cell Overrides
- Follow step 1 above to access the Override Cell dialog.
- Choose None from the desired Column/Row Content definition dropdown list, then click OK.