Before starting the attribute value migration, review the information and complete the steps included on the Attribute Value Migration topic.
Note: While running the attribute value migration, carefully monitor:
-
System RAM and hugepage usage as out of memory (OOM) issues are common.
-
Your file system size to avoid running out of space, which can cause STEP to crash and/or not function properly.
-
Frequent crashes can generate enough heap dumps to max out STEP Home file system.
-
Heap dumps can generate from different issues but a common one is crashing due to out of memory (OOM).
-
Archive logs can increase significantly.
-
Running the attribute value migration process includes queuing, scheduling, starting, and completing the migration.
Queuing Attributes for Migration
-
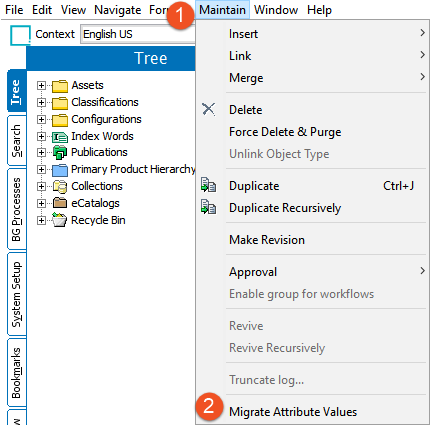
From the Maintain menu, select Migrate Attribute Values.
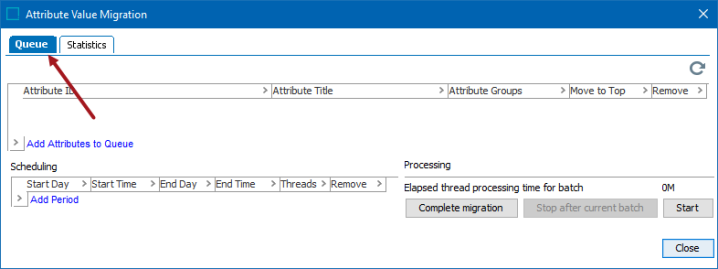
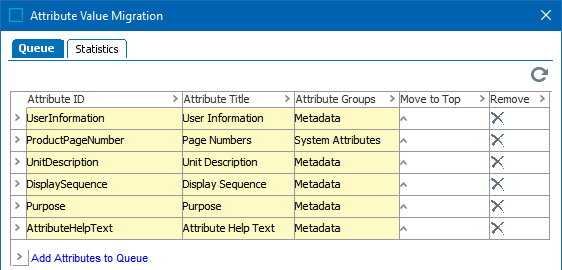
The 'Attribute Value Migration' dialog displays and the Queue tab is selected.
-
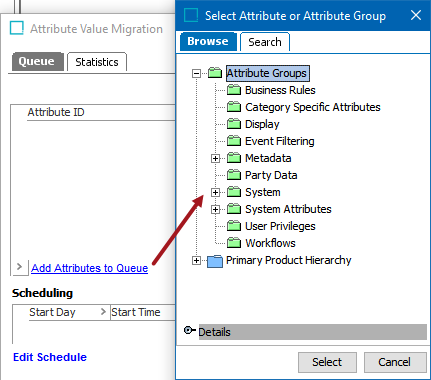
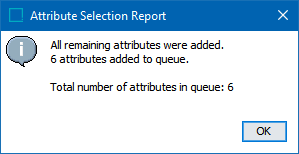
Click the Add Attributes to Queue link. A list of the migratable attributes displays. Choose the desired attributes to add them to the queue and click Select.
Note: If an attribute group is selected, all attributes belonging to that group are added to the queue. In this example, 'Attribute Groups' is selected, therefore, all the groups below it, as well as all the attributes under each attribute group, are included.
A report of the number of added attributes displays. Click OK.
The attributes are added to the queue. Select additional attributes or remove undesired attributes from the queue.
Note: When using the SQL API, for scenarios where the CSV model requires different SQL API views to be used for querying values, the migration of values for certain attributes must be postponed until the SQL has been updated. For details, refer to the SQL API documentation by clicking the Technical Documentation button on the Start Page.
Scheduling the Migration
A schedule is required to run the migration.
Considerations
Review these items before scheduling the attribute value migration:
-
The schedule uses the server time.
-
If the End Day and End Time are identical to the Start Day and Start Time, the period is a full week.
-
If overlapping schedule periods are defined, the period with the fewest restrictions and the highest number of threads is used.
-
A warning displays if periods defined do not allow the process to disable the database mode importer and/or take a SUM lock. Schedule periods are required to complete the migration.

-
The migration process only runs on a single application server in a clustered setup. Consider this when specifying the number of threads for a processing period. The number of threads to use depends on the system hardware and the system utilization. Typically, one or two threads are reasonable for periods where the system is heavily used while 16 threads is reasonable during off-peak hours. It is advised to perform the migration, at least partially, on a test system with the same hardware setup to validate the settings before starting the migration on a production system.
Creating a Schedule
Before scheduling the migration and following the next steps, review the Considerations section above.
Important: Consider the time zone of the application server compared to that of the workbench (the client) where the schedule is created or viewed. When scheduling a job, the local time zone is displayed in the workbench, but the time zone of the server is used to run the background process. Although displayed, the time zone of the client is not included in the instructions to the server to run the job. This can cause confusion about when the job will run since the scheduled time is not automatically converted to accommodate potential differences in time zones.
-
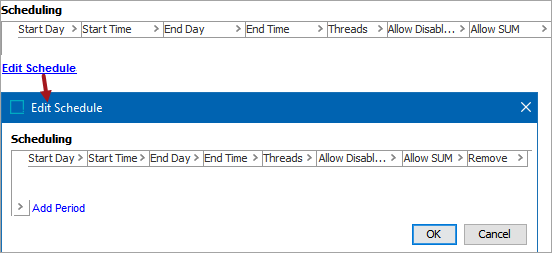
From the scheduling section of the 'Attribute Value Migration' dialog, select Edit Schedule. The 'Edit Schedule' dialog displays.
-
Select Add Period and a default time is added. Configure by clicking on each column and selecting from the dropdown menu.
-
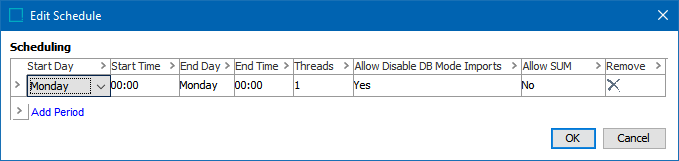
Start Day - The day the scheduling period starts.
-
Start Time - The time on the starting day that the period starts.
-
End Day - The day the scheduling period ends.
-
End Time - The time on the ending day that the period ends.
-
Threads - Indicates how many threads the migration process may use during the period.
-
Allow Disable DB Mode Imports - Indicates if the process is allowed to disable the database mode importer within the period / window. In most cases, it is safe to set this value to 'Yes.' With In-Memory systems, it should always be set to 'Yes' since the database mode importer is disabled.
-
Allow SUM - Indicates if the process is allowed to take a Single-Update Mode lock within the period / window. For more information about Single-Update Mode, refer to the Single-Update Mode topic.
-
Remove - Clicking the X deletes the selected period.
-
Starting the Migration
After configuring your migration schedule, click Start.
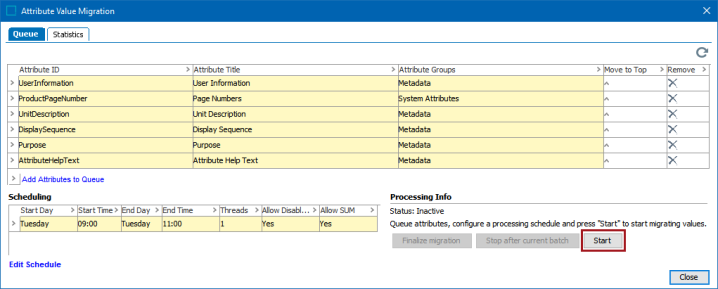
Your migration is now scheduled, and the process begins at the earliest set period.

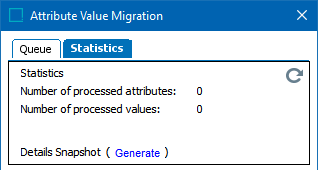
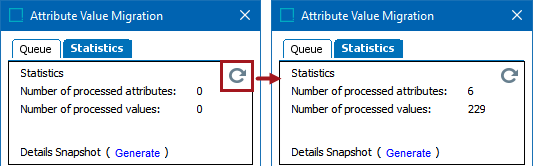
Statistics
The Statistics tab shows details about the migration. The following image shows how the Statistics tab looks before migration has begun.
-
Number of processed attributes - The number of attributes that have been migrated.
-
Number of processed values - The number of values that have been migrated.
-
Refresh icon - Refreshes the GUI, allowing for data updated values to display.
-
Details Snapshot - Selecting the 'Generate' link creates a snapshot report. This report has information about attributes / values that have been processed as well as queued attributes / values to be processed. Finally, it displays the estimates for the remaining processing time.
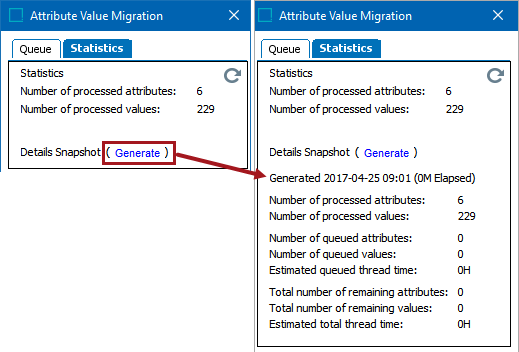
In the generated report, the 'Estimated queued thread time' and 'Estimated total thread time' are the estimated times to process all queued attributes and all migratable attributes, respectively. This does not consider the time spent doing other tasks such as the waiting period for the SUM lock.
Note: The estimates are based on processing using a single thread. Ideally, if the processing is run with two threads, the duration is half of the estimate, and with four threads, it would be a quarter of the processing time, and so forth.
Completing the Migration
After the values for all migratable attributes on the system have been migrated, the final steps for the migration are ready to be initiated. This status can be noted on the 'Processing Info' section of the 'Attribute Value Migration' dialog.
When the button is clicked, a dialog displays and allows you to schedule the 'value7' operations for the next STEP system restart.
If the full text index functionality is enabled on the system on which the migration is being performed, the 'value_ctxix' index is dropped and recreated during the system restart. Once the system is started again, the index is populated asynchronously and until complete, users may get fewer search results for full text index searches.
Important: The final step of the migration requires the STEP system to be restarted.
-
Click Finalize migration to generate a prompt noting that the migration is ready to be completed.

-
Click OK to schedule the final operations of the migration for the next system restart.
Important: The system may be offline for an extended period of time while the processes finish migrating. Plan for a period of downtime before restarting STEP.
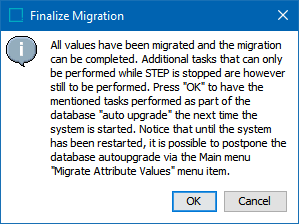
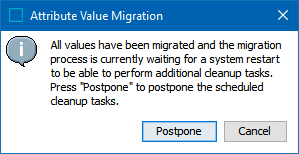
To postpone completing the migration for any reason, in the workbench, on the Maintain menu, navigate to and select the Migrate Attribute Values option. On the dialog box, click the Postpone button to postpone the final steps of this migration. Selecting this option requires that you finalize the migration again from the Attribute Value Migration tool.
-
Restart the STEP system.
-
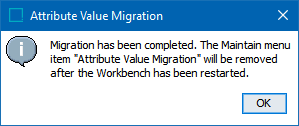
In the workbench, navigate to the Maintain menu and click the Migrate Attribute Values option to display a successful migration dialog. Click OK.
-
Restart the workbench, navigate to the Maintain menu and verify that the Migrate Attribute Values option no longer. All attribute values have been migrated to compact value storage.