Creating an LOV (List of Values) involves:
-
Setting validation rules
-
Selecting valid units
-
Selecting dimension dependencies
-
Adding values
Below are the steps to create an LOV.
-
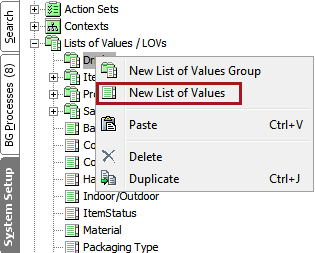
Go to System Setup > Lists of Values / LOVs, right-click the List of Values / LOVs folder (or a desired LOVs group folder where you want to group the new LOV), and click New List of Values.
-
The Create LOV dialog will display. Enter an ID and a Name.
Note: The ID cannot exceed 100 characters. This is the maximum length allowed externally and internally by STEP.

-
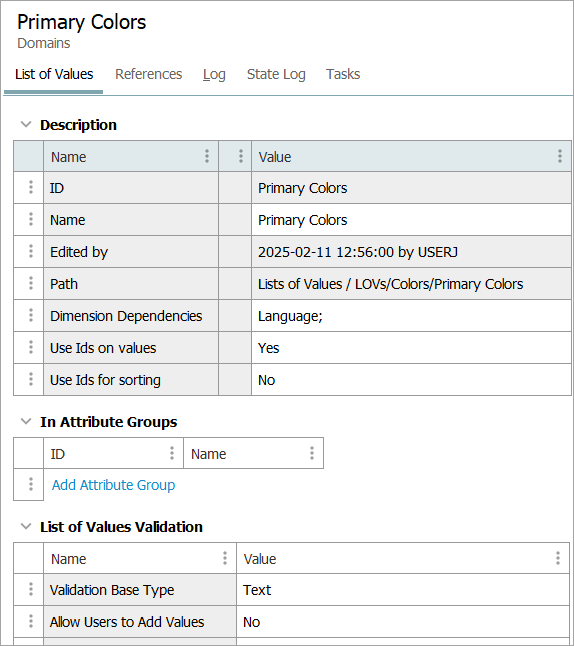
Click the Create button, and the List of Values editor will display (as shown below).
-
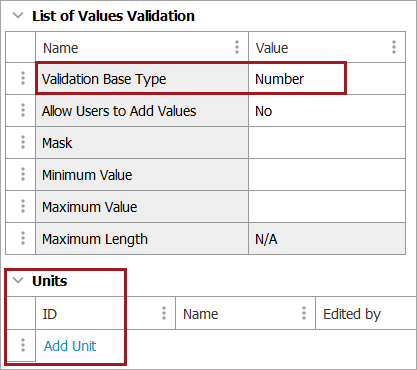
Expand the List of Values Validation section, and click the Validation Base Type parameter field to select the desired validation base type from the dropdown menu.

-
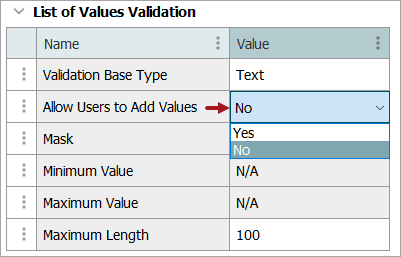
Within the List of Values Validation section, click the Allow Users to Add Values parameter field to select either Yes or No from the dropdown menu (as shown below).
-
Yes: allows the user to add values to the existing list from the object editor.
-
No: does not allow the user to add values, thus requiring them to select a value that already exists in the list. New values can only be added from System Setup.
-
-
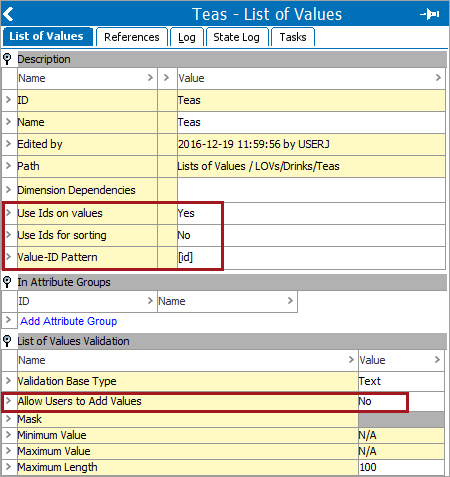
Use Ids on values: Optionally allows the use on an ID for each value within the LOV. Can be useful when importing object data and applying a certain value with a specific ID.
Important: Exports run on the selected context, which means that to output all the values for a dimension dependent LOV, an export needs to be run for each context.
Setting Use Ids on Values to Yes:
-
enables the Value ID Pattern parameter, where a pattern can be keyed to autogenerate IDs. A simple pattern could be [id], which will auto generate a unique ID for each value created in the LOV. The pattern [id] can be combined with a prefix or suffix if needed.
-
enables the Use Ids for Sorting parameter, where Yes means that the values are sorted based on the IDs. No means that the values are sorted based on the Values, not based on the IDs.
Note: The Use IDs on Values, Use Ids for Sorting, and Value-ID Pattern parameters are hidden when the Allow Users to Add Values is set to Yes.
Note: Setting Use Ids on Values to Yes on an LOV that already contains values displays a dialog with options to generate IDs for the existing values. For more information, refer to the Adding IDs to Existing Values in LOV topic.
-
-
Units: Optionally allows for the use of units. The Unit field is only shown in the LOV editor if a numeric validation base type has been selected. For more information, refer to the Units topic.
-
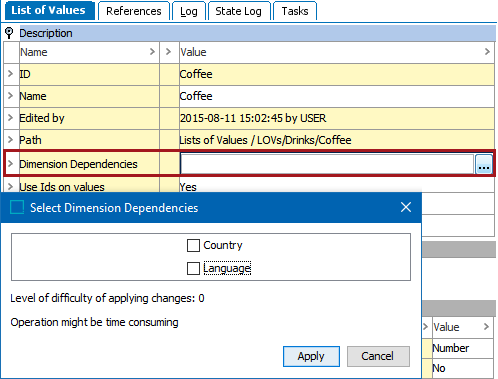
Dimension Dependencies: Optionally allows for the use of more than one dimension. To enable, click the ellipsis button (
 ), and select one or more dimensions.
 -
Setting a dimension dependency of Language allows your LOV values to be translatable and thus appear differently when viewed in different contexts. For more information on making objects and object types dimension dependent, refer to the Maintaining Dimension Dependent Object Types topic. For more information on using attributes with dimension dependent LOVs, refer to the Using Dimension Dependent LOVs With Attributes topic.
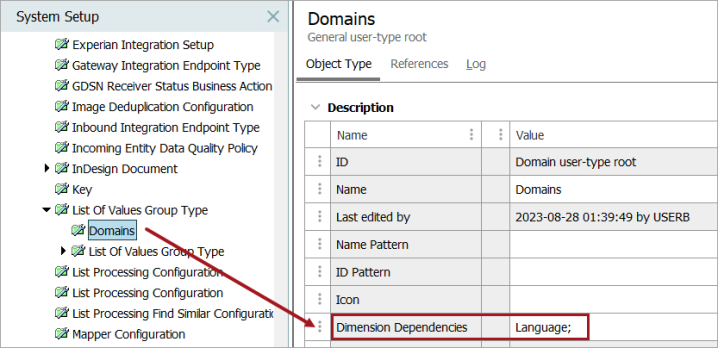
Note: To make the LOV object type itself dimension dependent so the names of your LOVs can be translated, you must set a language dimension dependency on the Domains object type, located at: System Setup > Object Types & Structures > Basic Object Types > List Of Values Group Type > Domains.
-
-
Add all required values to the LOV by following the steps in the Adding Values to an LOV topic.
-
Assign the LOV to the relevant attributes to allow selection of the values.