Whenever the Industry Standard Mapper framework builds a Mapper Configuration setup entity for ECLASS Basic, it will include the ECLASS Classification Mapping plugin and the Attribute Mapping plugin within its Mapper Configuration to achieve its mapping criteria.
The ECLASS Classification Mapping plugin is a Data Onboarding plugin designed to facilitate the mapping of ECLASS classification objects. This plugin handles updates and changes in the ECLASS hierarchy, thereby facilitating the mapping of the classification objects. This topic defines the key features, functionalities, and configuration settings of the ECLASS Classification Mapping plugin.
The fundamental concept revolves around the revision / updation of the referenced target classification object. The plugin enables users to perform actions like Join, Move, or Split based on the information derived from the CUF (Classification Update File).
-
Move: Allows for the relocation of a classification, changing its ID and reference.
-
Join: Merges specialized classifications into a more generalized one.
-
Split: Divides an existing generic classification into more specialized multiple classifications.
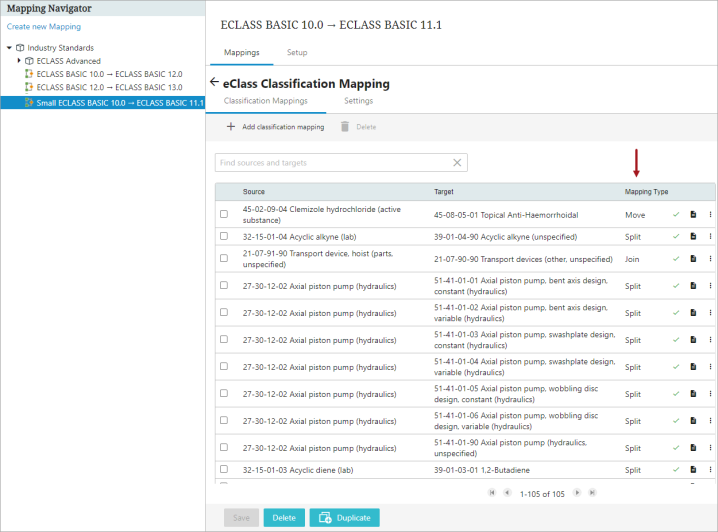
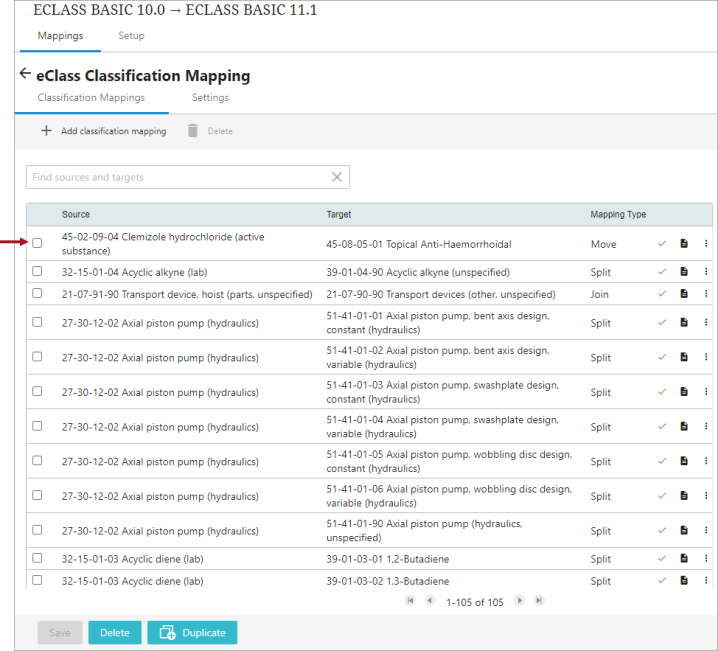
The example below illustrates a Mapper Configuration setup entity that encompasses multiple ECLASS Classification Mapping plugins configured for Move, Split, or Join functions. The Mapping Type column in the screenshot specifies the type of operation performed by each ECLASS Classification Mapping plugin.
Prerequisites
It is assumed that the user creating or configuring the ECLASS Classification Mapping plugin is familiar with the Data Onboarding Automation solution and well-versed in the creation and configuration of the Mapper Configuration setup entity. The basics related to the handling of the Mapper Configuration setup entity are not discussed in this topic. For more information on how to configure and set up the Data Onboarding solution, refer to Data Onboarding section of the Data Onboarding and Standardized Mapping documentation.
Typically, when importing CUFs (Classification Update Files), the Mapper Configuration setup entities are created with the necessary ECLASS Classification Mapping plugin configured to perform join, split, or move operations of / on the classification object files. The ECLASS Classification Mapping plugin is designed to automatically handle Join and Move operations, while for Splits, human intervention is required. The plugin identifies cases where manual intervention is necessary and guides users through defined workflows. The admin should create one workflow to handle all exceptions. Further, that workflow must be configured for each ECLASS Classification Mapping plugin that is instructed to perform a Split function.
This topic only includes information about where to configure workflow within the ECLASS Classification Mapping that handles the split function. How the customer handles such classification objects in a unique workflow is beyond the scope of this topic. It is a customized solution that the Solution Consultant can implement into their system.
A newly created mapping framework is always specific for a fixed source and target object type. They may be the same object type, but it is not a requirement. They may differ, and if they do, a reference must exist between them for the mapping to be applied. In the majority of ECLASS Basic cases, classifications from various versions referenced by products belong to the same object type. Therefore, the recommended approach would be to configure the mapping as 'Self referencing,' where only the source type needs to be defined, as the target object is the same. For more information about creating and configuring a Mapper Configuration setup entity, refer to the Configuring Mapper Configuration Setup Entity topic in the Data Onboarding and Standardized Mapping documentation.
Configuration of ECLASS Classification Mapping Plugin
Note: The Industry Standard Mapper solution is primarily an automated process. Typically, users do not need to create an ECLASS Classification Mapping plugin from scratch. The following procedure is provided for user understanding in the event that manual configuration of a plugin is required.
To configure the ECLASS Classification Mapping plugin, follow these steps.
-
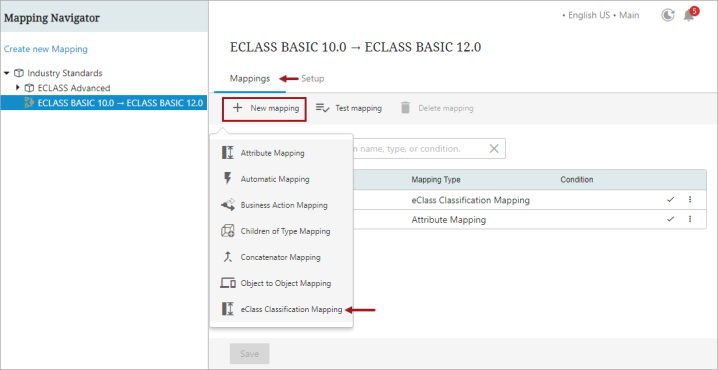
With the required Mapper Configuration selected, click on New mapping available within the Mappings tab of the Onboarding Mappings Details screen.
-
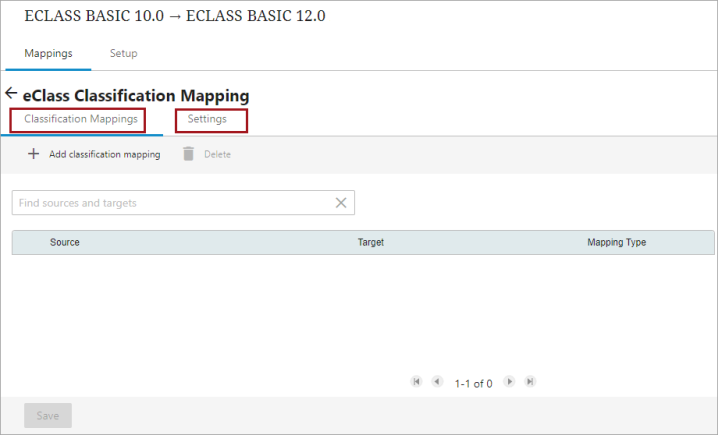
Select 'eClass Classification Mapping' option, and a new screen is displayed with the following two tabs:
-
Classification Mappings: This tab includes options that allow users to establish a mapping relationship. Details pertaining to the parameters available within this tab page is explained in the later section of this topic.
-
Settings: This tab contains multiple parameters that require to be populated before the user tries to build a mapping relationship in the Classification Mappings tab. Details pertaining to the parameters available within this tab page are explained in the later section of this topic.
-
-
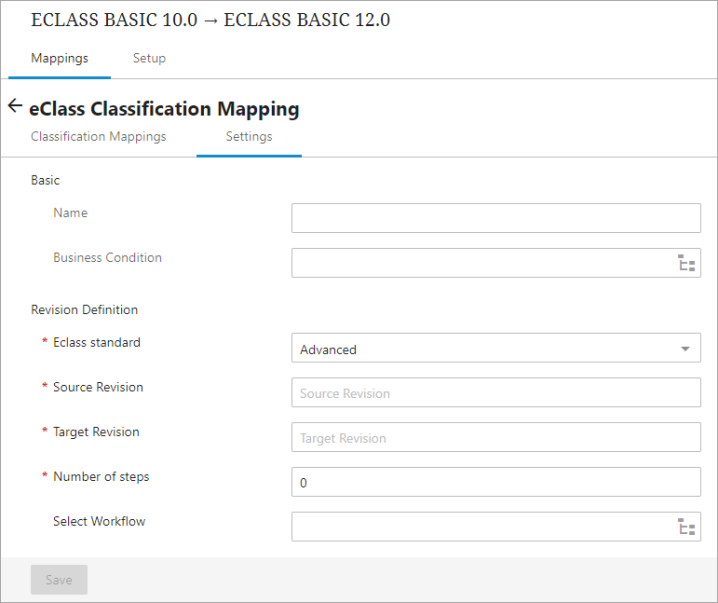
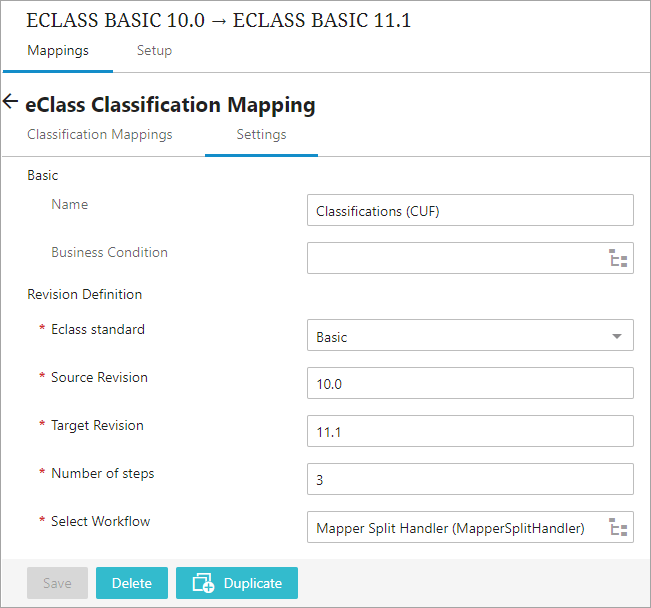
Within the Settings tab, as shown in the screenshot below, populate the following parameters:
-
Name: Type in a suitable name in this field. This could be any name that clearly describes the mapping functionality.
-
Business Condition: The Business Condition parameter allows users to select a business condition. The selected business condition runs the mapper plugin only on the object if the condition is true.
-
Eclass standard: This parameter offers two options: ECLASS Advanced and ECLASS Basic. The selection between these options should be made based on the intended data onboarding versions.
Important: Currently the Industry Standard Mapper solution supports only the ECLASS Basic and does not support the ECLASS Advanced standard. So ensure that the 'ECLASS standard' parameter is always set to Basic.
-
Source Revision: Parameter to type in the version number of the source object.
-
Target Revision: Parameter to type in the version number of the target object.
-
Number of steps: This parameter requires the input of the total number of revisions that have been released between the Source Revision and the Target Revision.
For example, consider a mapping relation established between ECLASS version 10.0 and 11.1. If ECLASS has released the following versions: 10.0 → 10.1, 10.1 → 11.0, and 11.0 → 11.1, then the total number of steps involved is three. Therefore, the numeric value 3 should be populated in the 'Number of steps' parameter.
Note: ECLASS increments the version numbers of all classifications with each release, whether it is a minor or major update. Since the version number is included in the STEP ID, knowing the start and end version numbers, as well as the number of steps between them, is crucial for calculating the correct ID.
-
Select Workflow: This parameter is to be defined with a workflow that has been configured to handle the Split. As mentioned earlier in the topic, the Industry Standard Mapper solution cannot handle a situation where a division of an existing generic classification into more specialized multiple classifications is required. Such classifications are being initiated into the workflow that is being defined within this parameter. The classification objects that are initiated into the workflow will always be written in the execution report of the background processor log.
This means that every time a mapping encounters an issue that cannot be solved programmatically, the object will be entered into the workflow configured in this parameter.
Below is an example of how the Settings tab within the eClass Classification Mapping plugin is configured in the Web UI.
-
-
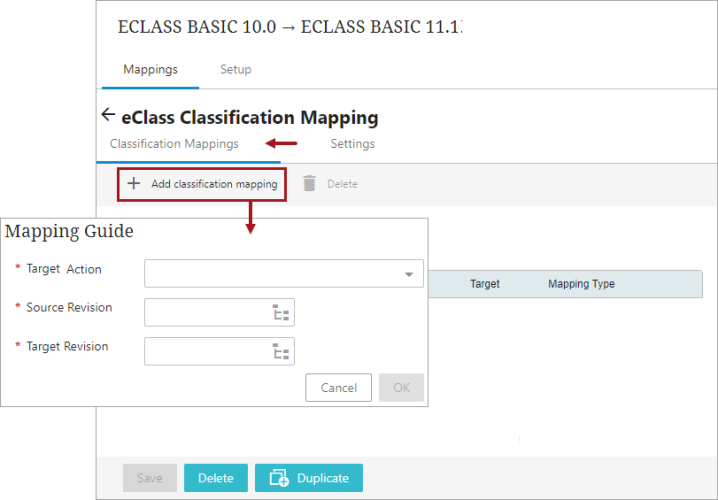
After completing all the required parameters within the Settings tab, navigate to the Classification Mappings tab and click on the Add classification mapping button.
Upon clicking the Add classification mapping button, the Mapping Guide window will display, as shown in the screenshot below. Populate the following parameters:
-
Target Action: This parameter offers three options: Join, Move, and Split. Each option specifies how the classification object from the source should be handled. Refer to the earlier section of this topic for details on the actions performed by each option.
-
Source Revision: Populate this parameter with the classification object from the source version.
-
Target Revision: Populate this parameter with the classification object from the target version.
-
-
Once all the parameters in the Mapping Guide window are populated, click OK to close the window. Then, click Save to save the changes. The newly added mapper row will be listed, as shown below. To edit the eClass Classification Mapping selections, click on the row, and it will open up the Mapping Guide window for you to make edits.
-
Repeat step 4 to add more mapping rows for the same plugin.
Important: Users must save the changes before exiting the Mapper Configuration. If the user fails to click Save, the mapping will be lost once the user leaves the Mapper Configuration.
Users can add any number of mapping rows in the mapping plugin. When there are multiple mapper rows available within the mapping plugin, the order of execution of each mapper row is based on the order in which it is listed within the mapping plugin.
The health of the mapper row is displayed next to each mapper row. Users can also add some additional information describing each of the mapper rows. The user has the flexibility to disable, delete, or rearrange the listing order of the mapper rows. For more information on handling the mapper rows, refer to the Modifying Mapper Rows on the Onboarding Mapping Details Screen topic within the Data Onboarding and Standardized Mapping documentation