The Configuration tool's "Tabs setup" functionality allows admin users to configure preset tabs for the details view. To access the "Tabs setup" page, click on the Configuration tool icon in the upper-right hand corner of the screen. From the configuration tool home page, click on the "Tabs setup" option.

The "Tabs setup" page will display all created tabs. Configured tabs will be listed on the left side of the page. Select a tab to view details.
Adding a Tab
To add a tab:
-
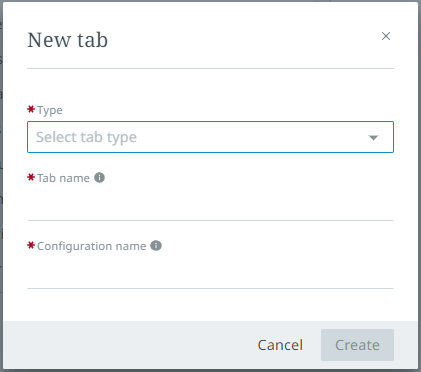
Click the "+" button in the toolbar. The "New tab" dialog will display.
-
Select the type of tab to create: "Attribute tab page," "Asset tab page," "Reference tab page," "Packaging tab page," or "Language tab page."
-
Provide a name for the "Tab name" field. A value will auto-populate for the "Configuration name" field derived from the value provided for the "Tab name" field. Users can revise this value as needed.
Note: The Configuration name is only displayed for admin users and only displays in the Configuration tool. End users cannot view the Configuration name.
-
Click "Create" to create a tab. The new tab will display in the tree on the left side of the screen.
Configuring the Tab
The options available to configure a tab enable the Instrument UI admin to determine:
-
when the tab displays
-
for whom the tab displays
-
the data the tab displays
To configure a tab, use the settings described below.
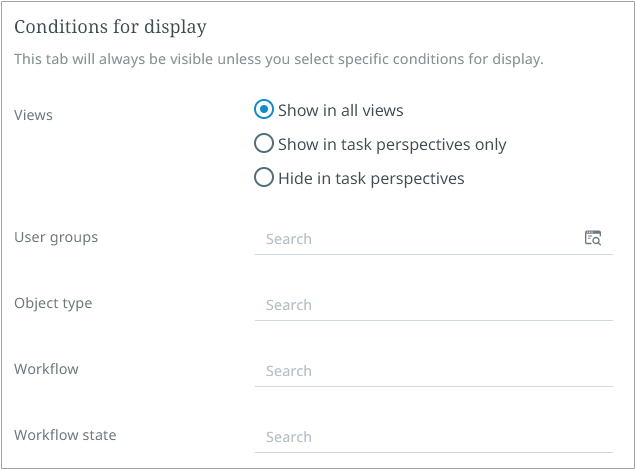
"Conditions for display" Parameters
The admin user can set conditions for tab display using the options found under the "Conditions for display" section. Conditions for display can be combined and include: Views, User groups, Object type, Workflow, and Workflow State. These parameters are listed and described below.
-
Views. The "Views" parameter presents three radio buttons that, when set, determine which perspectives the tab will display in. This setting can help avoid cluttered interfaces by limiting the display of tabs to just those relevant to the user / user group.

-
"Show in all views" -- The tab will display in all perspectives: Browse, Tasks, Collections, as well as in the search screen
-
"Show in task perspectives only" -- The tab will only display in Tasks perspectives
-
"Hide in task perspectives" -- The tab will not display in any Tasks perspectives
-
-
User groups. Allows the admin user to select specific user groups to access the tab. When user groups are selected, the tab is only displayed for the specified groups. If no user groups are selected, all user groups will have access to the tab. Normal privilege rules (maintained in the workbench) are still respected.
-
Object type. Select one or more object types in this parameter to trigger display of the tab when one of the configured object types is being viewed.
-
Workflow. By selecting a workflow, the tab will only display when objects in that workflow are being viewed.
-
Workflow state. By selecting a specific workflow state, the tab will only display when an object in the specific workflow state is being viewed.
Setting Attributes for Display
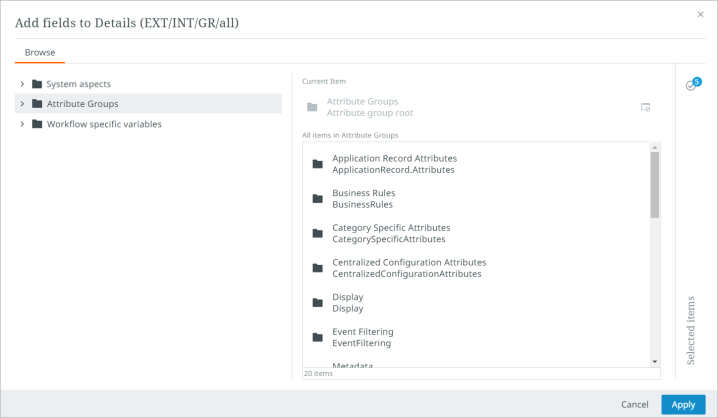
The user can customize the new tab by selecting which attributes, attribute groups, and workflow variables display on the tab. If reference types are included in the selected attribute groups, those reference types can be selected and added for display on the attribute tab.
The "Attribute groups" component allows admin users to select which attribute or reference fields should display in the tab. The search option utilizes a typeahead component with an option to open the Item Picker.
-
To use typeahead, type the attribute name and select it.
-
To use the Item Picker, select the Item Picker icon in the typeahead search bar.

The Item picker allows the administrator to select attributes, system aspects, workflow aspects, workflow variables, and Reference or Link types for a Tasks perspective table. Attributes, Attribute groups, and workflow variables are displayed in a dual list within the attribute tab's edit page.
When the tab is configured as desired, click "Save" to keep all changes made to the tab configuration.
Note: If a work area, perspective, view, or tab is misconfigured, a red-line error indicator will display to the left of the affected configuration element. Hovering the cursor over the red line prompts an informational pop-up to display. The pop-up describes the issue causing the configured element to be misconfigured, (as shown in the screenshot below), giving the user the information needed to make the appropriate change.
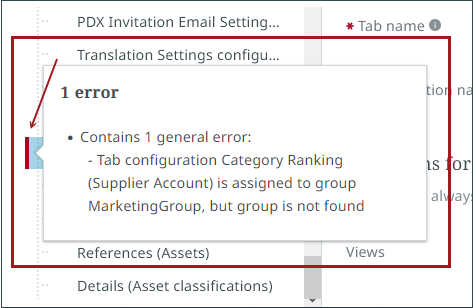
Until the configuration is corrected, the 'Save' and 'Duplicate' buttons will be inoperative.
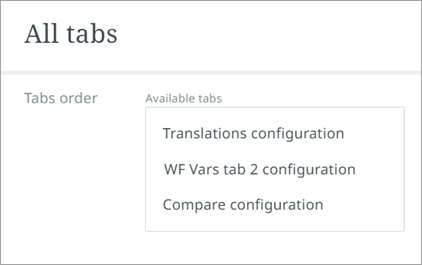
Sequencing Tabs
Click "All tabs" to view all existing tabs. Tabs can be reordered by clicking and dragging the order displayed in the "Available tabs" display.
Duplicating a Tab
Admin users can duplicate a tab. The selected tab page configuration will be duplicated into the new duplicated configuration.
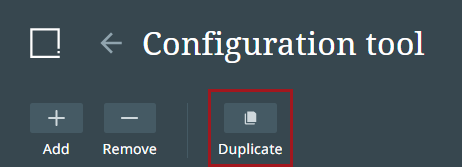
To duplicate a tab:
-
Select a tab page configuration in the tree on the left by clicking it.
-
Click “Duplicate” in the toolbar and the tab will duplicate along with the configuration settings.
-
Click “Save” to save changes.
Tab Type-Specific Configuration Options
-
Attribute tab: The Attribute tab displays attributes and workflow variables. Admin users can specify which attributes, attribute groups, and workflow variables should be used in the tab.
-
Asset tab: The Asset tab displays asset values within the details view of the preset work areas and perspectives.
-
Reference tab: The Reference tab displays a details pane that features a list of valid reference types in a References column and a tabular view of the references for the selected reference type.
-
Language tab: The Language tab allows admin users to configure preset attributes that are language dependent. Admin users can specify which attribute groups should be used in the tab.
-
Packaging tab: The Packaging tab displays any packaging hierarchies the currently selected object resides in.
Removing a Tab
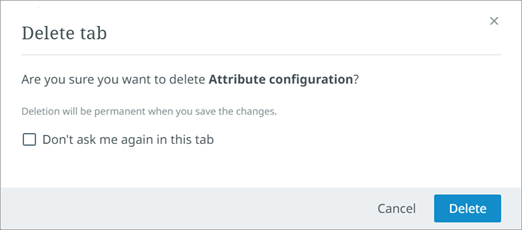
To remove a tab:
-
Click the tab in the tree on the left to select it.
-
Next, click the "-" button in the toolbar. The "Delete Tab" dialog will display. Click delete to close the dialog. The dialog has an optional selection box that states "Don't ask me again in this tab." When this box is checked, the "Delete tab" warning dialog will not display again, and the remove button will immediately delete the selected tab when the "-" button is selected.
-
Click "Save" to save changes made to the tab. Deletion of a tab will be permanent upon saving the changes.
For information on configuring a Compare tab to easily compare golden, external, and internal records for products, review the Configuring the Compare Tab topic in the Central Configuration documentation.