Admin users can configure and manage preset work areas and perspectives in the Configuration tool. The tool can also be used to assign preset work areas and perspectives to user groups specific to tasks and roles.
Preset work area and perspective configurations set by admin users become the default settings for assigned user groups. Preset columns and filters display to users as they have been set up by admins. Admin-defined filters cannot be removed by users once set. If a user attempts to delete a preset work area or perspective, a tooltip message displays stating, "You cannot overwrite admin configurations." However, users can still manipulate and maintain zoom levels, column width, as well as add and maintain new filters in preset perspectives. Upon saving these changes, the 'Reset perspective' feature is enabled which allows users to revert to default perspective settings defined by admins.
Preset work areas can be duplicated and further customized by users in the duplication. Custom work areas, identified by a "Custom" visual marker next to the work area name, are configured by the user and are customized based on user preferences and privileges.
Creating and Maintaining Work Areas
The Configuration tool allows admin users to create and maintain work areas.
-
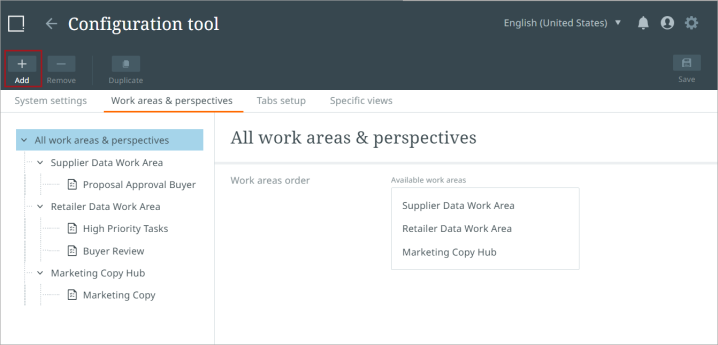
To create a new work area, click the "Work areas & perspectives" tab on the Configuration tool homepage.
-
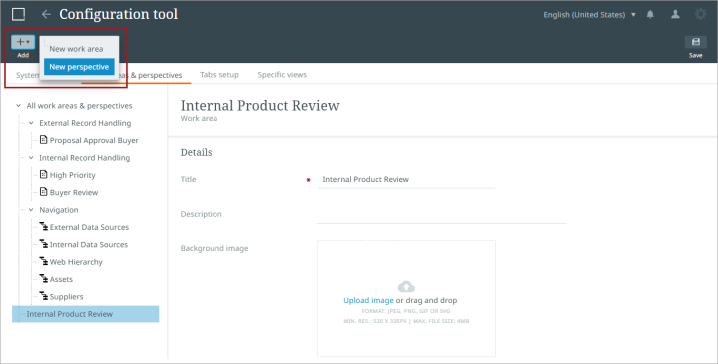
Click the "+" in the top-left corner of the page. A dropdown menu displays.
-
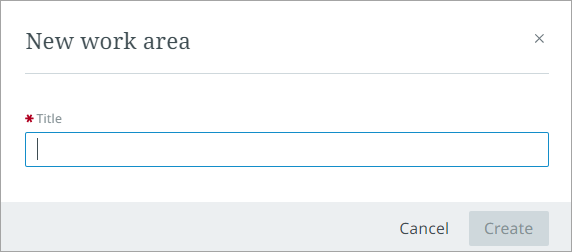
Select "New work area." A "New work area" dialog will display. Mandatory fields will be marked with an asterisk "*". Users cannot create a work area without completing the mandatory fields.
-
Create a title for the work area.
-
Click "Create" to create the new work area. The new work area will display in the navigation menu on the left of the page.
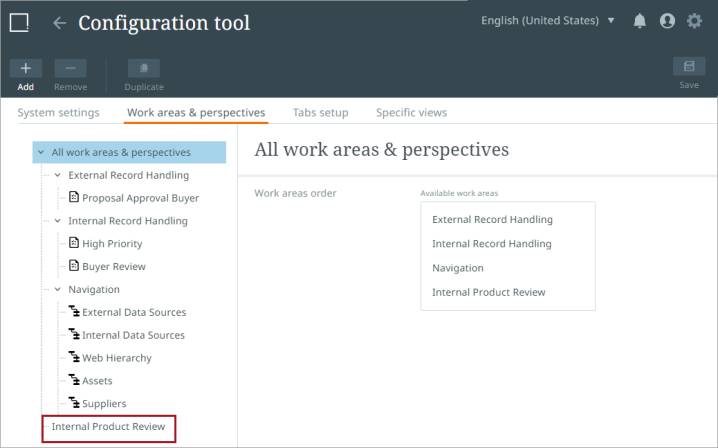
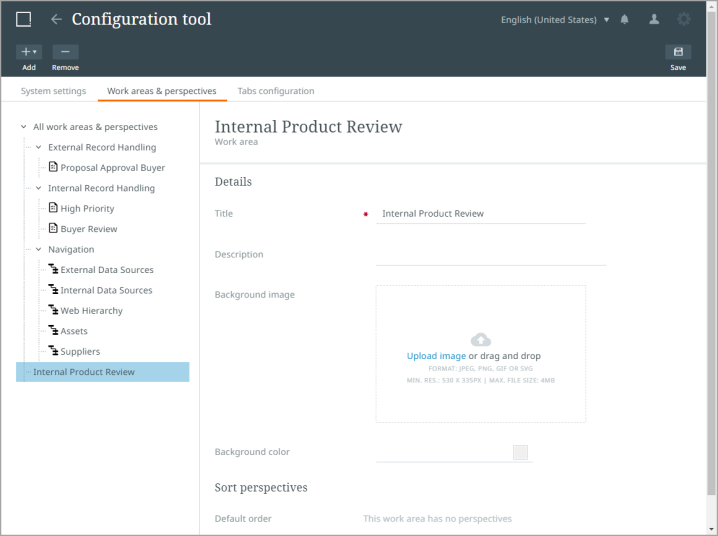
To open the new work area, select it from the left navigation panel. When it is open, the user can further customize the work area by adding a description, background image, and background color.
To save changes, click the "Save" icon in the upper right corner of the page.
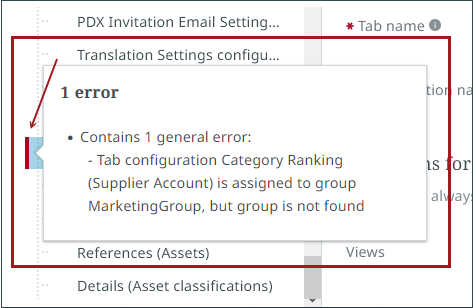
Note: If a work area, perspective, view, or tab is misconfigured, a red-line error indicator will display to the left of the affected configuration element. Hovering the cursor over the red line prompts an informational pop-up to display. The pop-up describes the issue causing the configured element to be misconfigured, (as shown in the screenshot below), giving the user the information needed to make the appropriate change.
Until the configuration is corrected, the 'Save' and 'Duplicate' buttons will be inoperative.
Duplicating a Work Area
To duplicate a work area:
-
Select a work area configuration in the tree on the left by clicking it.
-
Click the "Duplicate" button in the Tool bar.
The new duplicated configuration will be placed at the bottom of the tree. The newly duplicated configuration will have the same title of the original configuration with a “(1)” added at the end of the title of the duplicated configuration.
Removing a Work Area
Users can remove work areas using the Configuration tool.
-
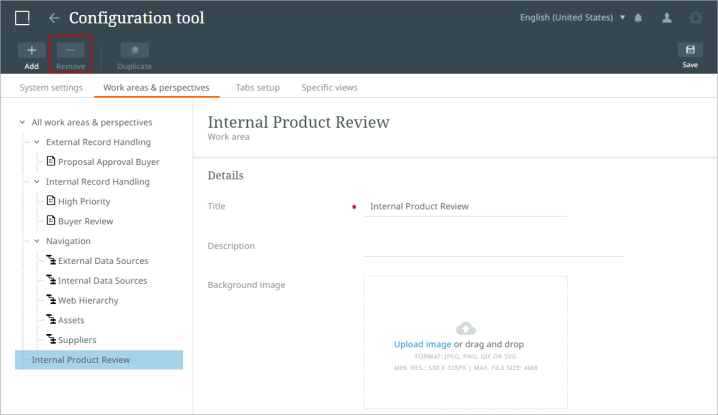
To remove a work area, select the work area in the left navigation panel.
-
Next, click the "Remove" button in the tool bar at the top right of the page.
-
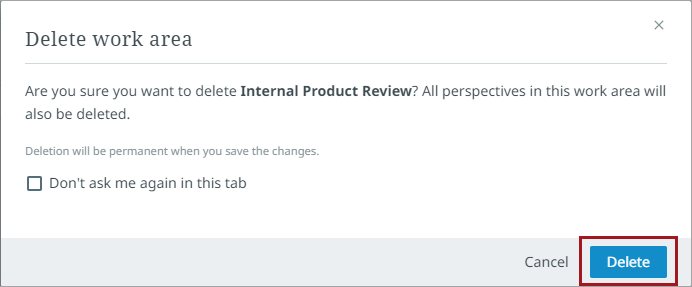
A dialog will display to confirm if the user wants to delete the work area. The dialog has an optional selection box that states "Don't ask me again in this tab." When checked, the "Delete tab" warning dialog will not display again, and the remove button will immediately delete the selected tab when the "-" button is selected.
-
Select "Delete" and then click "Save" to finalize deletion of the work area.
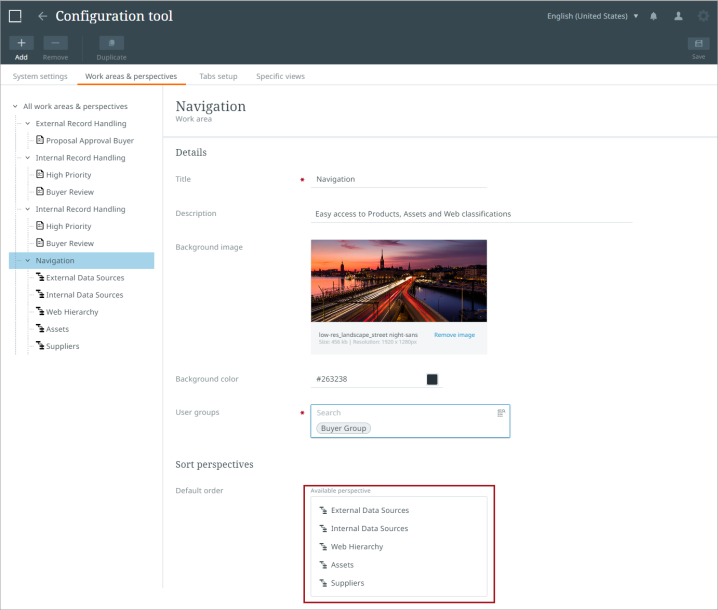
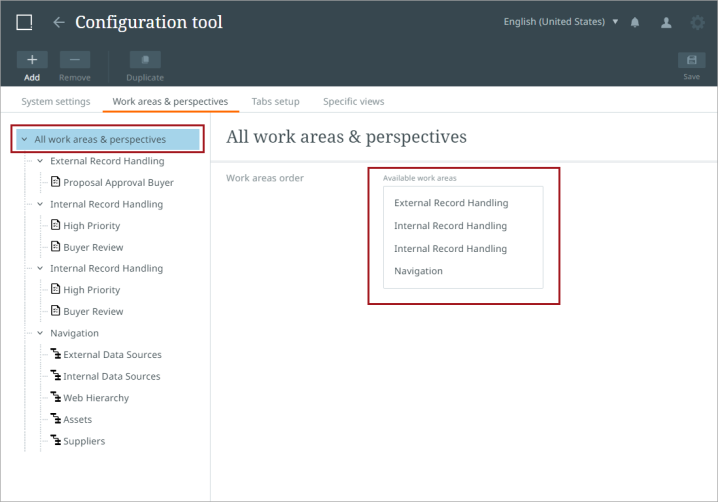
Sequencing Work Areas
Users can sequence or order work areas in the Configuration tool.
-
To sequence a work area, select the "All work areas & perspectives" root node in the Tree to the left.
-
Then inside of the "Available work areas" box, select a work area to move by clicking it, and drag and drop the work areas in the desired order.
Creating and Maintaining Tasks Perspectives
Users can also create and maintain Tasks perspectives in the Configuration tool.
-
To create a new Tasks perspective, click the "+" sign in the upper right corner of the page. A dropdown menu will display. Select "New perspective."
-
A "New Perspective" dialog will display. Mandatory fields in the dialog will be marked with a red asterisk "*". Users cannot create a perspective without completing the mandatory fields.
Name the Tasks perspective and select a workflow. If the Tasks perspective is designed for users who will only need to view a single workflow state, also select a workflow state. If the perspective is designed for a user that needs to view all states in the workflow, leave the "Workflow state" field blank.
When all fields are complete the "Create" button will become active.

-
Click "Create" to create the new perspective. Next, click "Save " to save the new Tasks perspective.
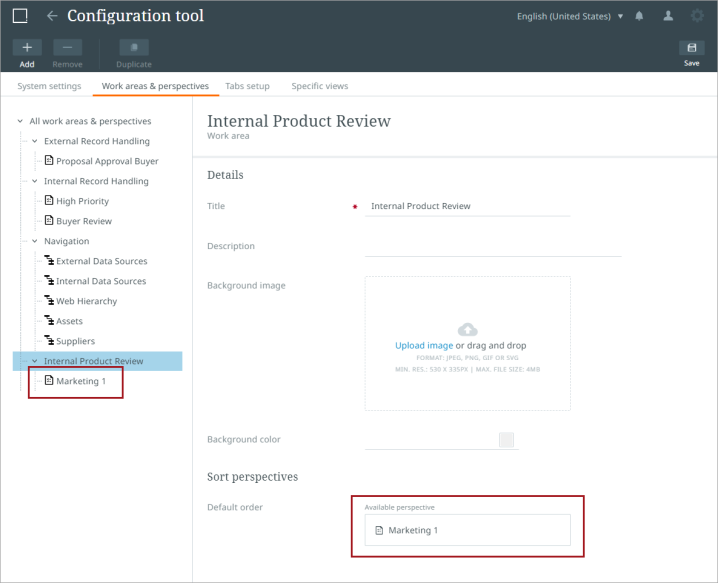
The new perspective will display beneath the work area in the navigation tree menu on the left side of the page as well as under the "Sort Perspectives" option on the work area editor screen.
After the perspective has been created, the user can customize default table columns, change the name of the perspective, and select filters. Users can select one or more user groups to assign to the perspective. Only those users that belong to the selected user group(s) will be able to view the perspectives within the work area. When no user group is selected, the perspective will be available to all user groups. The surrounding work area will be available to the users if they have access to the corresponding perspective.
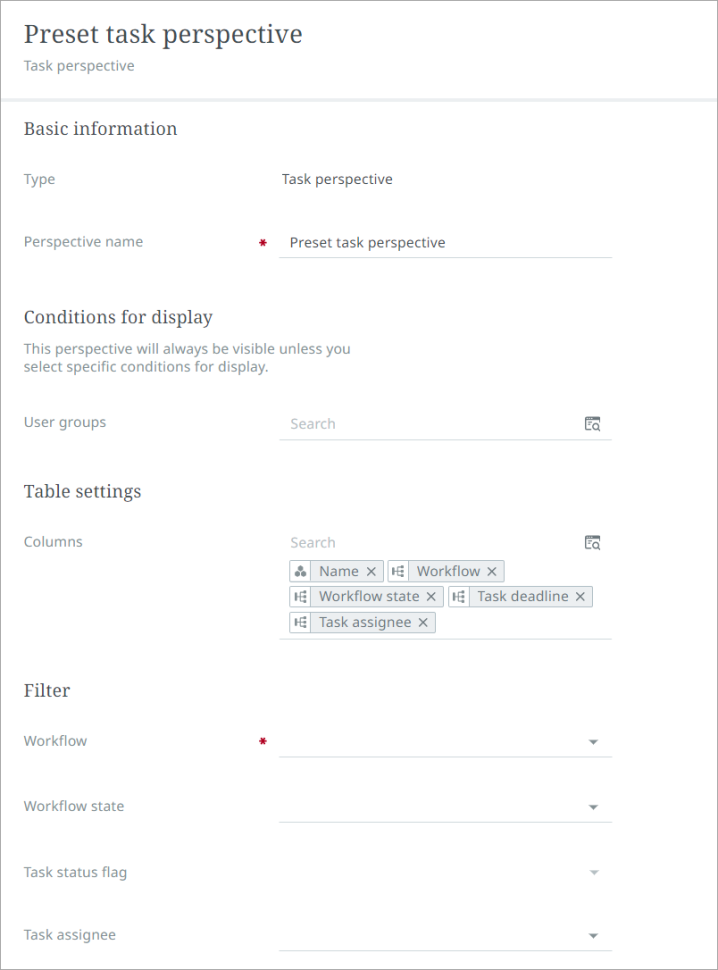
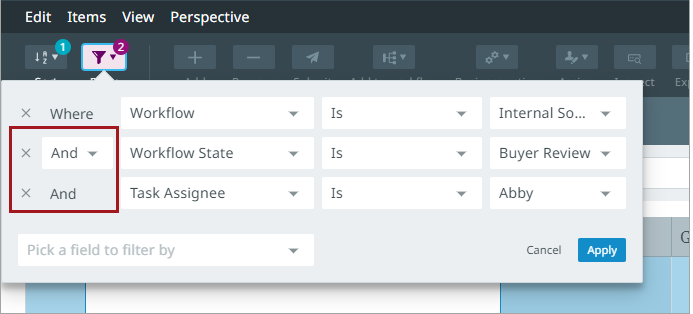
Filter options will filter the data that displays in the table for Tasks perspectives. Available filters include: Workflow, Workflow State, Workflow Status flag, and Workflow assignee. As filters are selected, the Configuration tool includes an implicit "AND" between the filters, resulting in a cumulative filter search.
The image below shows how the filters display in the Work area after they have been saved in the Configuration tool.
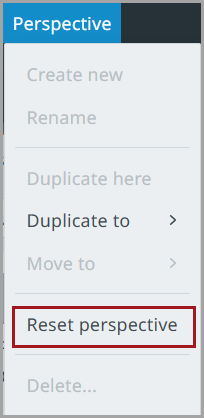
Note: Admin-defined filters cannot be deleted or overwritten by users once set. A tooltip message displays stating, "You cannot overwrite admin configurations." However, other filters can be added to the preset filters by users. Users can reset their preset settings at any time by selecting "Perspective" and then "Reset perspective."
To duplicate a perspective: Select a perspective configuration in the tree on the left by clicking it.
Duplicating a Perspective
-
Click the "Duplicate" button in the Tool bar. A drop-down option will display with two options:
-
Duplicate here: Choose this option to duplicate a perspective to the current work area
-
Duplicate to: Choose this option to select a different work area for the perspective duplicate
-
Removing a Perspective
Users can remove a perspective using the Configuration tool.
-
To remove a perspective, click the perspective in the left navigation panel.
-
Click "Remove" in the toolbar in the upper left corner of the page.
-
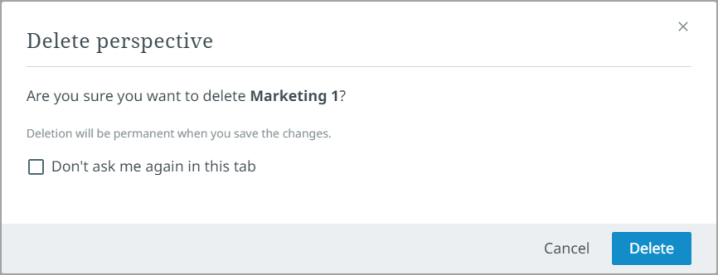
A dialog will display to confirm if the user wants to delete the perspective. The dialog has an optional selection box that states "Don't ask me again in this tab." When checked, the "Delete tab" warning dialog will not display again, and the remove button will immediately delete the selected tab when the "-" button is selected.
-
Click "Delete" and then click "Save" to finalize deletion of the perspective.
Sequencing Tasks Perspectives
Users can sequence or order Tasks perspectives using the Configuration Tool.
-
Select the "owning" work area in the tree on the left side of the page.
-
Perspectives will be listed beneath the "Sort Perspectives" section at the bottom of the page inside the "Available perspective" box. Click a perspective to drag and drop the perspective to the desired order.